- geometries need refinement
- ergo design
- unnecessary plastic
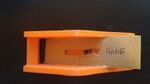
Block Plane
Project developed by Michael Helmke Template:Statusboxtop Template:Status-design Template:Status-prototype You can help Appropedia by contributing to the next step in this OSAT's status. Template:Boxbottom
Abstract
Wood working is a valuable and important skill in the developing world and can make an enormous difference in the development of a community. Planes are tools which are used to shape wood by removing thin uniform strips of wood. There are many types of planes, as a start this is a block plane; the smallest of hand planes designed to be used with one hand. Small and versatile typically block planes are used to facilitate joinery by bringing boards into tolerance with each other, but over all the use of the block plane is only limited by the imagination of the wood worker.

Bill of Materials
- Total four parts made in FreeCAD. Total 135 grams of filament
- Block Plane Base
- Block Plane Top
- Pressure Screw
- Optional Grip (Printed in Semiflex)
- All files posted at : | Youmagine Link
- 5 non-printed parts
- 3 1/2 inch outer diameter nuts
- 1 bolt or screw that fits in the nuts that is at least 2 inches long
- 1 Thumb screw, that fits in the nuts,that is a half an inch long.
Tools needed for fabrication of the OSAT
- MOST Delta RepRap or similar RepRap 3-D printer\
- Epoxy
Skills and Knowledge Necessary to Make the OSAT
- Usefull video on construction, setup, and use of block planes : [1]
Technical Specifications and Assembly Instructions
- Printing Instructions:
- Print Speed : 40 mm/S
- Fill Density : 15%
- Layer Height : .25 mm
- Support Type : Everywhere
- Platform Adhesion Type : None
- Print time : 6 Hours, 50 Minutes
- Assembly Instructions:
- If used, epoxy the printed grip onto the bottom of the top piece of the plane.
- epoxy one of the nuts in the hole in the base of the plane and epoxy another in the hole on the back of the top piece of the plane.
- Press fit the thumb screw into the pressure knob.
- Screw the pressure screw into the underside of the top piece, as far in as it will go.
- Thread a nut all the way up your 2+ inch screw and then thread the screw through the hole that runs clean through the top piece.
- Place the blade on the angled portion of the plane, line up the slot in the blade with the hole in the base of the plane.
- Line up the 2+ inch screw with the nut in the base of the plane and tighten it until you can no longer pull the screw out.
- Tighten the nut on the screw down until it presses on the top
- Loosen the pressure screw until it presses firmly against the blade.
- Assembly time: 15 minutes

- See tutorials posted above in Skills and Knowledge for tutorials on assembly and use.
Common Problems and Solutions
- The large pieces are hard to remove from the bed, go slowly lest you crack the build plate
Cost savings
- Total Material Amount: 135 grams
- Estimated Material Cost: ~ $2.70 depending on filament price
- Hardware Cost: I payed 1.17 for all hardware.
- Commercial Cost: $60 [2]
- Total Savings: ~$56