| (12 intermediate revisions by the same user not shown) | |||
| Line 9: | Line 9: | ||
==Abstract== | ==Abstract== | ||
AutoInjectors are a spring-loaded device that aides in delivering the proper dosages of certain medicines. The have built-in adjusters to ensure the medicine is delivered at the proper depth in the body. They are useful for those that have trouble using a simple needle for injections, possibly children, the elderly, or those with needle-phobias. They are also useful for injecting pets with their medication. The AutoInjector keeps the needle covered until injection time to prevent injury, and some have a built-in safe measure of requiring the injector to be pushed against the skin before the trigger button can be pushed to prevent accidental discharge. | AutoInjectors are a spring-loaded device that aides in delivering the proper dosages of certain medicines. The have built-in adjusters to ensure the medicine is delivered at the proper depth in the body. They are useful for those that have trouble using a simple needle for injections, possibly children, the elderly, or those with needle-phobias. They are also useful for injecting pets with their medication. The AutoInjector keeps the needle covered until injection time to prevent injury, and some have a built-in safe measure of requiring the injector to be pushed against the skin before the trigger button can be pushed to prevent accidental discharge. | ||
<gallery> image:CommercialAutoinjectorAssembled.jpg|Commercial AutoInjector </gallery> | |||
== Bill of Materials== | == Bill of Materials== | ||
#3.5" by .5" Spring | #3.5" by .5" Spring | ||
#3" by .25" Spring | #3" by .25" Spring | ||
#1.5" by .5" Spring | #1.5" by .5" Spring | ||
*Optional Clear Plane to use as Window; leaving open works fine as well | |||
*Glue, like a hot glue gun | |||
*all colors are notional and used to specify which piece is being referred to | *all colors are notional and used to specify which piece is being referred to | ||
Glue Spring holder Top and Bottom pieces together | Glue Spring holder Top and Bottom pieces together | ||
| Line 28: | Line 28: | ||
Place wide end of plunger rod into "yellow" indicator piece. You will have to compress the springs to do this | Place wide end of plunger rod into "yellow" indicator piece. You will have to compress the springs to do this | ||
Insert #2 spring followed by assembled pieces into Injector body. You will have to push down the trigger button in order to slide the pieces into the body | Insert #2 spring followed by assembled pieces into Injector body. You will have to push down the trigger button in order to slide the pieces into the body | ||
<gallery>Image:backendDisassembledAutoInjector.jpg|Disassembled AutoInjector</gallery> | |||
Thread long depth adapter into syringe housing | Thread long depth adapter into syringe housing | ||
Insert primer/depth guide into long depth adapter | Insert primer/depth guide into long depth adapter | ||
| Line 35: | Line 35: | ||
Remove from injector body once springs are set | Remove from injector body once springs are set | ||
Twist syringe housing unit on assemble pieces | Twist syringe housing unit on assemble pieces | ||
== Tools needed for fabrication of the OSAT== | == Tools needed for fabrication of the OSAT== | ||
| Line 42: | Line 41: | ||
== Technical Specifications and Assembly Instructions== | == Technical Specifications and Assembly Instructions== | ||
The Injector Body needs supports generated when printed for the Trigger Button window; these will be snapped off after printing | The Injector Body needs supports generated when printed for the Trigger Button window; these will be snapped off after printing | ||
About 4 hours to print all of the parts | About 4 hours to print all of the parts | ||
5-10 min for final assembly | 5-10 min for final assembly | ||
=== Common Problems and Solutions=== | === Common Problems and Solutions=== | ||
* Make sure the springs are loaded properly. Spring positions are not interchangeable* | * Make sure the springs are loaded properly. Spring positions are not interchangeable* | ||
This project was way beyond my CAD abilities | This project was way beyond my CAD abilities, so not all of the pieces are optimized for printing; Hopefully a someone can improve upon my design | ||
== Cost savings== | == Cost savings== | ||
| Line 60: | Line 55: | ||
== Benefited Internet Communities == | == Benefited Internet Communities == | ||
[http://www.k9diabetes.com/forum/ Owners of Dogs with Diabetes] | |||
[https://stephenking.com/xf/index.php?threads/epipen-experience.2976/ People with Allergies] | |||
[https://community.kidswithfoodallergies.org/forum-directory Parents of Kids with Allergies] | |||
[https://www.diabetes.co.uk/forum/threads/needle-phobia.118065/ People with needle-phobias] | |||
[https://www.emedevents.com/c/medical-conferences-2019/2019-pre-filled-syringes-forum-by-pharmaed-resources-inc Nurses] | |||
==References== | ==References== | ||
| Line 71: | Line 70: | ||
</nowiki> | </nowiki> | ||
<ref> DallasMTBR, director. About the Autoject 2. Youtube - About the Autoject 2, Youtube, 18 June 2017, [[www.youtube.com/watch?v=fndalvwKF4s&t=222s]].</ref> | <ref> DallasMTBR, director. About the Autoject 2. Youtube - About the Autoject 2, Youtube, 18 June 2017, [[www.youtube.com/watch?v=fndalvwKF4s&t=222s]].</ref> | ||
<ref>Owen Mumford. Autoject-Brochure. Autoject-Brochure, www.owenmumford.com/us/wp-content/uploads/sites/3/2014/12/Autoject-brochure.pdf.</ref> | <ref>Owen Mumford. Autoject-Brochure. Autoject-Brochure, [[www.owenmumford.com/us/wp-content/uploads/sites/3/2014/12/Autoject-brochure.pdf]].</ref> | ||
<ref>Rawlings, Kelly. “Injection Helpers.” Main.Diabities.org, 2015, main.diabetes.org/dforg/pdfs/2015/2015-cg-injection-aids.pdf.</ref> | <ref>Rawlings, Kelly. “Injection Helpers.” Main.Diabities.org, 2015, [[main.diabetes.org/dforg/pdfs/2015/2015-cg-injection-aids.pdf]].</ref> | ||
<references/> | <references/> | ||
[[category:OSAT 3D-Printable Designs]] | [[category:OSAT 3D-Printable Designs]] | ||
== External links == | == External links == | ||
[ | [https://www.youmagine.com/designs/autoinjector-prototype All scad files can be found on my YouMagine page.] | ||
Revision as of 02:56, 7 December 2019
AutoInjector for Medicine
Project developed by [Natalie McGrath]
Template:Statusboxtop Template:Status-design You can help Appropedia by contributing to the next step in this OSAT's status. Template:Boxbottom
Abstract
AutoInjectors are a spring-loaded device that aides in delivering the proper dosages of certain medicines. The have built-in adjusters to ensure the medicine is delivered at the proper depth in the body. They are useful for those that have trouble using a simple needle for injections, possibly children, the elderly, or those with needle-phobias. They are also useful for injecting pets with their medication. The AutoInjector keeps the needle covered until injection time to prevent injury, and some have a built-in safe measure of requiring the injector to be pushed against the skin before the trigger button can be pushed to prevent accidental discharge.
-
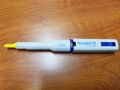
Commercial AutoInjector

Bill of Materials
- 3.5" by .5" Spring
- 3" by .25" Spring
- 1.5" by .5" Spring
- Optional Clear Plane to use as Window; leaving open works fine as well
- Glue, like a hot glue gun
- all colors are notional and used to specify which piece is being referred to
Glue Spring holder Top and Bottom pieces together Use hot glue to create small cushion on end of plunger rod, if desired, for comfort and to aid in stabilizing rod Place the 1st spring onto the plunger rod. Insert the spring holder with the smaller top into the spring with the plunger rod through the middle Place the 3rd spring onto the plunger rod, so that it falls into the spring holder. Place "yellow" indicator piece onto groves inside "blue" plunger and trigger button piece, with indicator marks facing the viewing hole in the "blue" piece Place small end of plunger rod through small hole at the top of the "blue" plunger and trigger button piece Place wide end of plunger rod into "yellow" indicator piece. You will have to compress the springs to do this Insert #2 spring followed by assembled pieces into Injector body. You will have to push down the trigger button in order to slide the pieces into the body
-
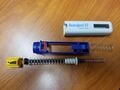
Disassembled AutoInjector

Thread long depth adapter into syringe housing Insert primer/depth guide into long depth adapter
Use syringe housing unit to set springs by inserting it into injector body, as far as it will go Remove from injector body once springs are set Twist syringe housing unit on assemble pieces
Tools needed for fabrication of the OSAT
- MOST Delta RepRap or similar RepRap 3-D printer
Technical Specifications and Assembly Instructions
The Injector Body needs supports generated when printed for the Trigger Button window; these will be snapped off after printing
About 4 hours to print all of the parts 5-10 min for final assembly
Common Problems and Solutions
- Make sure the springs are loaded properly. Spring positions are not interchangeable*
This project was way beyond my CAD abilities, so not all of the pieces are optimized for printing; Hopefully a someone can improve upon my design
Cost savings
- $1 for plastic, $5 for springs, $6 in total
- $27.99 Owen Mumford Autoject EI [1]
- $22 total savings or a 78% price reduction.
Benefited Internet Communities
Parents of Kids with Allergies
References
[[Category:Medicine]] [1] [2] [3]
- ↑ DallasMTBR, director. About the Autoject 2. Youtube - About the Autoject 2, Youtube, 18 June 2017, www.youtube.com/watch?v=fndalvwKF4s&t=222s.
- ↑ Owen Mumford. Autoject-Brochure. Autoject-Brochure, www.owenmumford.com/us/wp-content/uploads/sites/3/2014/12/Autoject-brochure.pdf.
- ↑ Rawlings, Kelly. “Injection Helpers.” Main.Diabities.org, 2015, main.diabetes.org/dforg/pdfs/2015/2015-cg-injection-aids.pdf.