
Zane Middle School triangle of life 2021

| Type | |
|---|---|
| Authors | Julia Iman Vincent Mendez Elizabeth.G Jake |
| Status | |
| Years |
The Triangle of Life project's objective is to create a solution to an area on Zane Middle School's campus (Eureka, Ca) referred to as the Triangle of Death. The Triangle of Death previously was an empty, dirt area in between hallways. Team Triangle of Life installed four concrete circular planters into the area with various plants in order to make the are more aesthetically appealing. The project was implemented and built in Spring of 2021.
Background
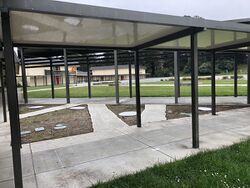
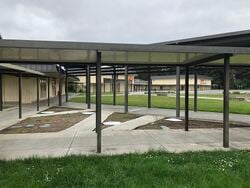
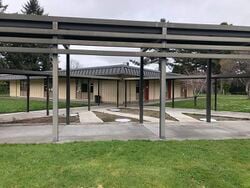
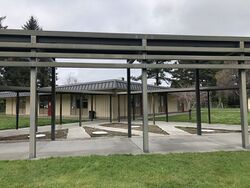
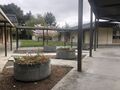
[edit | edit source]Zane Middle School, located in Eureka, California has a diverse student body of approximately 600 students. Their academics focus on Science, Technology, Science, Art, and Math (STEAM). In a centrally located, high traffic area of campus, hallways coming from three different directions diverge, creating a triangle of space. This space is referred to as the "Triangle of Death" due to the unappealing appearance and lack of purpose. A picture of the area before the project is seen below. There have been several attempts to improve the area, none of which have been successful or withstanding due to various factors including safety and incompleteness. A counselor at Zane Middle School, Trevor Hammons, was interested in having the "Triangle of Death" area improved. Team Triangle of Life consists of four Engineering students (Elizabeth Odell, Jake Reeser, Julia Iman, and Vincent Mendez) from Cal Poly Humboldt's ENGR 215 class. The Triangle of Life team worked with Zane Middle School and Trevor Hammons to design and implement a solution to the "Triangle of Death".
Problem statement
[edit | edit source]The objective of this project is to create a solution for the area known as the "Triangle of Death" with something safe, cost effective, more visually appealing, and long lasting. This new area will be more interactive and educational for the students. The design will make sure that students are unable to climb on the roof or disassemble the project.
Criteria was created with the approval of the client. The criteria helps define the problem that needs to be addressed. The constraints add specificity to the criteria and the weight is used to order the importance of the criteria. The criteria and constraints can be seen in the table below.
Criteria:
| Criteria | Description | Weight (1-10) |
|---|---|---|
| Safety | Must meet school safety standards | 10 |
| Durability | Resistant to abuse from middle school students, weather, and should last at least 5-10 years | 9 |
| Maintainability | Necessary maintenance less than once every once a year | 8 |
| Cost | Cost less than $400 | 9 |
| Aesthetic | More visually appealing than the current state | 7 |
| Accessibility | Usable for students | 8 |
Prototyping
[edit | edit source]Prototyping was an integral step in the design process, as it provided key insight into the possible outcomes of our design. The prototypes range from physical representations and research to computer generated drawings.
The below images depict the Cardboard Footprint prototype. This prototype gave us insight into which configuration of planters would be most aesthetically pleasing. We then had the client and other people vote on which configuration they preferred. Ultimately, configuration 4 was chosen.
- Cardboard Footprint of Planters
-
 Configuration 1
 -
 Configuration 2
 -
 Configuration 3
 -
 Configuration 4


The image to the right is a small circular planter prototype. It proved that the circular planters would be aesthetically pleasing in the triangular space.
The Autocad drawing prototype depicted in the image to the right provided a more realistic vision of what the planters would look like configured in the chosen configuration. This prototype was to scale so it also provides important details on the finished product.
The image to the right depicts a prototype of the attachment between a bench and the planters. We found through the prototyping that a planter bench would not be feasible for the allotted timeframe.
-
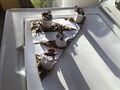 Small Circular Planter Prototype
 -
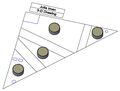 Autocad Prototype
 -
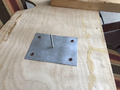 Bench Planter Attachment Prototype


Final product
[edit | edit source]Concrete circular planters were chosen for the final design. Four concrete planters were placed in between the pre existing concrete pathways. These concrete planters were filled with soil and plants were planted in each planter. The plants included two nectarine trees, a white current, a scarlet surprise guomi bush, succulents, and several varieties of bulb flowers.
-
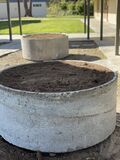
 Triangle of Death as of April 2021
Construction
[edit | edit source]Steps demonstrating how the final design was implemented are shown below.
- Steps of Implementation of Final Design
-
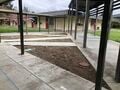 The first step was to remove all the weeds from the area, but leaving the weed barrier fabric. This is a picture of the area after the weeds were removed.
 -
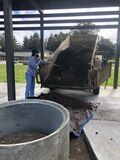
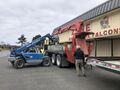 The concrete planters were transported to the Zane Middle School Campus by Hilfiker Retaining Walls Company on a trailer. A forklift was then used to lift the planters from the trailer and carry them to the site of the Triangle of Death.
 -
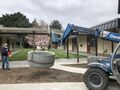 A forklift was used to place the planters in the Triangle of Death. The location was specified by both Trevor Hammons and a custodial staff personnel.
 -
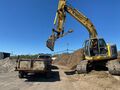 Soil was loaded into the trailer using an excavator at Alves Inc. It was then transported in the trailer to Zane Middle School.
 -
 The soil was removed from the trailer and placed into the planters.
 -
 The planters were completely filled with soil using shovels and wheelbarrows.
 -
 Finally, plants were planted in each planter. There is a larger, main plant in the center with smaller plants and bulbs on the outside. Redwood bark was layered on the soil of the surface and the plants were watered.


Bill of materials
[edit | edit source]The total cost of materials was $ 872.77. Total hours spent on project was 230. All of the cost was donated by the following local businesses: Hilfiker Retaining walls, Redwood Energy, and Alves inc. This is a list of the teams materials and cost of them. The team was able to get all of it donated except for $10.00 for the White Current. All of the materials can be seen in the table below.
| Item | Cost per unit | Amount | Total |
|---|---|---|---|
| Daffodil
Narcissus |
$0.20 | 30 | $6.00 |
| Naked ladies
Belladonna Lily |
$10.00 | 4 | $40.00 |
| Blue Rose
Echeveria imbricata |
$5.00 | 3 | $15.00 |
| Dwarf Red Hot Poker
Kniphofia |
$9.00 | 2 | $18.00 |
| Bearded Iris
Iris germanica |
$0.83 | 6 | $4.98 |
| Calla lily
Zantedeschia aethiopica |
$1.50 | 2 | $3.00 |
| Sweet Scarlet Goumi
Elaeagnus multiflora |
$20.00 | 1 | $20.00 |
| Arctic Jay Nectarine
Prunus persica var nucipersica |
$30.00 | 1 | $30.00 |
| Arctic Glo White Nectarine
Prunus persica var nucipersica |
$30.00 | 1 | $30.00 |
| White Current
Ribes rubrum |
$10.00 | 1 | $10.00 |
| Concrete Planters | $104.00 | 4 | $416.00 |
| Soil | $45.00 | 3.7 | $166.50 |
| Trailer Rental | $78.00 | 1 | $78.00 |
| Subtotal | $837.48 | ||
| Total (with tax) | $901.61 | ||
Operation
[edit | edit source]The project was designed to have as little maintenance as possible, and that was successful. The instructions of what to maintain and how to maintain the area is described in the below sections.
Maintenance
[edit | edit source]The work required to maintain our project can be shown in the schedule below.
Schedule
[edit | edit source]- Monthly
- Water plants in drier months
- Yearly
- Prune bushes that have excessive bush/leaf length
- Pick up/remove fallen leaves, sticks and debris from plants
- Every 5 years
- Replace wood chips
Every 10-25 years
- Plant new plants/trees if needed
Instructions for Maintenance
[edit | edit source]- Watering Plants in Drier Months - The plants that have been planted do not need that much water to sustain themselves, especially with rain. During dry months the temperature is hotter and it does not rain often, so watering the plants every 2 weeks during this time could be beneficial.
- Pruning Bushes Yearly - Obtain clippers of any kind and begin cutting the sticks that have overgrown their area. The amount of cutting is preference of how the client wants the plant/tree to look but a shape of cylindrical sphere would work good for any plant.
- Picking Up and Removing Fallen Debris - To remove fallen leaves and sticks a rake will be needed to rake the debris into one spot. The debris can then be picked up and put into a bag and taken to a green waste facility.
- Replacing Wood Chips From Planters - To replace the wood chips from the planters, wood chips are going to be purchased and brought to Zane. Secondly, the old wood chips need to be raked and picked up from all of the planters. Lastly, the new wood chips will be placed in each planters and spread evenly.
- Planting New Trees/Plants - In order to replace a plant/tree, a previous plant must have died and needs to be replaced. To replace the plant/tree, the dead plant/tree, along with its roots, needs to be removed from the planter. Secondly, the dirt needs to be spread evenly again to prepare for another plant/tree being planted. Lastly the seed or sapling will be placed about 2-3 inches deep into the soil and watered.
Conclusion
[edit | edit source]Testing results
[edit | edit source]Several tests were performed in order to optimize the results of our design. One of the firsts was the small model of circular planters. A smaller version of the Triangle of Death site was created from cardboard and paper and circular planters were made from paper and succulents. This was a test to see if the circular planters would be visually pleasing on the triangular plots of land. The geometry proved to be aesthetically pleasing. Another early test was the cardboard footprints of the planters. Four cardboard cutouts of circles, four feet in diameter, were configured in 4 different ways and photographed so as to be voted on by the client and members of the community. Both the client and the popular vote decided on configuration 4 (pictured in Prototype section). Another important test tested a possible attachment of a bench to the circular concrete planters. This attachment was created using a steel plate, nails, and wood. This test proved that this would be a time consuming process. Also, observations of the students during the school day led to findings that even when students are near a bench or lunch table, they choose to stand and talk with their peers.
Discussion
[edit | edit source]The result of the small circular planter model provided us an idea what the overall visual of circular planters would be, and we all found the circular planters to be aesthetically pleasing when placed on the triangular plots of land. The test involving cardboard footprints of the planters being placed into four different configurations made it obvious which configuration would be the most visually appealing. This prototyping helped secure the exact placement of the planters to avoid moving around extremely heavy planters to test different configurations once they had arrived. The bench planter attachment test proved the process to be tedious and time consuming, causing us to factor in the timeframe of our project. This testing and the results of student observations are what ultimately led to the decision to avoid the installation of benches onto the planters.
Lessons learned
[edit | edit source]One of the main mistakes made during this project is when the planters were being installed, a corner of the pathway was crushed by the forklift. This can be seen in the image below. From this, it was learned that extra caution should be used when using heavy equipment on concrete. It was also noted that unfiltered soil may not be ideal for planting due to debris such as glass, rocks, or metal objects.
Next steps
[edit | edit source]Something that will be added onto our project in the future will be the painting of the sides of the planters by the Middle School students to be the school colors of Zane Middle School. Another possibility of something that will be added in the future is the addition of mosaics on the sides of the planters that match the mosaics of other locations of the school.
Troubleshooting
[edit | edit source]Some possible problems that may arise and the suggested solutions can be seen in the table below.
-
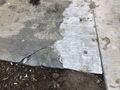 The end of one pathway was slightly crushed by the forklift when installing the planters.

| Problem | Suggestion |
|---|---|
| Plants are dying | Research the plants and change watering schedule |
| Mud/wood chip overflow | Get a large broom and sweep mud/ wood chips back into the triangle area. |
| Plants are destroyed | Go to calscape.org and look for native plants to replace destroyed ones |
References
[edit | edit source]
| Authors | |
|---|---|
| License | CC-BY-SA-3.0 |
| Organizations | Cal Poly Humboldt, Zane Middle School, Engineering 215 |
| Derivative of | Zane Middle School: TOD-19 |
| Cite as | Lonny, Julia21, Elizabeth.G, Jakereeser, Vindez77 (2021–2024). "Zane Middle School triangle of life 2021". Appropedia. Retrieved July 24, 2026. |