Rainwater storage tanks are more important in semi arid areas than any other areas because they are useful in storing limited water supplies for agricultural purposes. In semiarid regions, where precipitation is low or infrequent during the dry season, it is necessary to store the maximum amount of rainwater during the wet season for use at a later time, especially for agricultural supply. One of the methods frequently used is the underground storage tanks. The in situ technology consists of making storage available in areas where the water is going to be utilised. All rainfall-harvesting systems have three components: a collection area, a conveyance system, and a storage area. In this application, collection and storage is provided within the landscape.
Tank design criteria[edit | edit source]
Consider five main factors when designing your underground tank:
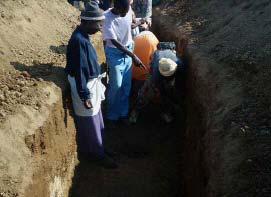
- Seepage: It is very important to store rainwater and not to lose it! The tank should have a durable, watertight, opaque exterior and a clean, smooth interior. A common method used in rural areas is puddling as shown in picture 2. Below ground tanks must also be plastered well and correctly installed, otherwise they can collapse.
- Evaporation: All storage tanks should have a roof made from locally available materials as indicated in the material list. A tight fitting top cover prevents evaporation, mosquito breeding and keeps insects, rodents, birds and children out of the tank. A suitable overflow outlet(s) and access for cleaning are also important.
- Length of the dry spell: This is important in determining the size and number of tanks to be constructed. The longer the dry spells the more water you would need. Sometimes sophisticated calculations are involved, but these tend not to take into account human behaviour and the willingness to use water if it is available and not to conserve it for future use, in the hope that the dry spell will soon be over.
- Daily usage: This is related to the above factor but ensure that the crops are hardened to withstand some stress during the dry spell. Determine how much area you would want to save in case of a very long dry spell lasting more than three weeks.
- Construction costs: To save costs use as many available local materials as possible as shown below. Work in groups to share labour, as this is a labour intensive system. It takes approximately fours for ten people to construct a 10 000 litre tank.
Materials required[edit | edit source]
- 1 rammer locally made from dry wood
- Ant-hill soil (termitaria)
- Water
- 5 x 1,5-2m long dry poles
- Pick, shovel (depending on labour available)
- 10 farm/earth bricks
- Tape measure or ruler
- String 2m
- Knife/hacksaw/small axe
- 50 wooden pegs
- Old Hessian or plastic bags
- 25kg cement
Construction[edit | edit source]

- Along any dug dead level contour (which is your collection area) choose where you can construct your storage tank. All soils that allow rapid percolation the closer should be the storage tanks. This because your soil quickly loses water and that's where your plants are likely to show signs of moisture stress during the dry spell.
- Measure along the channel the length of the tank you want and mark using pegs.
- Dig the marked area up to a further depth of 500cm or more. The deeper
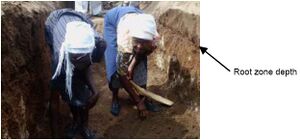
- Mark with a shovel the root zone depth within your tank.
- Place termitaria-cement mixture at the base of the tank and sprinkle water to facilitating easy ramming.
- Using homemade rammer, start ramming up to a maximum depth of 2-5cm. Sprinkle whenever required.
- All the tanks must have a non-permeable layer therefore a thicker layer may be required to avoid seepage and deep percolation. Picture 2 below the process of ramming.
- Mix termitaria with water to make mortar and plaster up to the marked root zone level of your deep-rooted crops as shown in Picture 3.
The table below indicates the recommended options for your tank lining when plastering the walls.
| Material use | Cement–soil ratio | Thickness (mm) |
|---|---|---|
| Cement-anthill/termitaria | 1:8 | 50 |
| Cement-clay soil | 1:8 | 60 |
| Cement-sand soil | 1:3 | 50 |

Covering the top of the underground tank:
- Using earth bricks mark the inlet and outlets of your tank from both ends of your tank.
- Lay your wooden poles across your tank spaced at 2m.Ensure that the poles are not totally fixed for ease removal during maintenance usually during the dry season.
- Decide where you can place two openings at the top for collecting and checking water inside your tank.
- Lay old plastic or hessian bags onto the poles.
- Use same mortar as referred above to plaster the roof of your tank.

Water conveyance devices[edit | edit source]
Fittings are usually built into the tank during construction. These include:
- one or more outlets for water collection;
- a drainage tap (or wash-out) at the bottom of the tank, to be used when cleaning;
- an inlet pipe; and
- an overflow pipe. This must be screened to prevent insect entry.
Advantages[edit | edit source]
- Rainwater is generally much lower in salinity than other water. This is good for plants in the garden and fields.
- Underground tanks reduce the risk of water borne diseases, particularly Legionnaires Disease, as the water remains cooler when stored underground.
- Once the tank is installed, rainwater is cheaper to collect than water conveyed from expensive storage facilities such as dams, which are usually located far away from the fields.
- Using rainwater tanks regularly may reduce storm water run-off from your field. This may reduce flooding, erosion and environmental damage to streams.
- Rainwater tanks provide a secondary backup water supply to your crops should there be a failure or erratic rains or long dry spells.
Some disadvantages of using underground rainwater tanks
- It is difficult to detect the leaks and take corrective measures in case of under ground tanks.
- Water from under ground tanks cannot be drawn by gravity. Some kind of manual or power lifting devices need to be used for drawing the water.
- Further, in coastal areas, under ground tanks are prone to water contamination due to fluctuation in groundwater table and leakage of stored water.
- A rainwater tank may be costly to purchase and install and will require some maintenance. If rainwater from the tank is supplied using a pump then this will need to be maintained and occasionally repaired or replaced.
- If a small tank, less than 10 000 litres is used to store rainwater, it will probably empty frequently, particularly during summer. (However, it is possible to arrange your system so that you have rainwater available for drinking all year round.)
Maintenance[edit | edit source]
Ongoing planned maintenance will maintain your rainwater quality and extend the life of your system. Maintenance should include the following:
- Regularly check the tank to ensure there are no unscreened or damaged openings that allow insects, rodents or animals to get into the tank.
- Check gutters and strainers devices at least twice before and after the rainy season. Keep them clean and free of leaves and debris. Ensure the tank lid is tight.
- Check the tank every two years for sludge and have the tank cleaned if there is a thick layer of sludge on the bottom of the tank.
Contact information[edit | edit source]
Lang, J., Allen, M and van der Wel, B. (2002). Good Alternative Rainwater Tanks: Fact or Fiction? 2002 Water Symposium Proceedings. Office of Sustainability, Department for Environment and Heritage.
http://www.environment.sa.gov.au/sustainability/pdfs/symposium/paper 5.pdf
Nissen-Petersen, E., (1992) How to Build an Underground Tank with Dome, ASAC
Consultants Ltd., Kitui, Kenya, 1992.
Author: Douglas Gumbo
Practical Action Southern Africa
4 Ludlow Raod (off Enterprise Road)
Newlands
Harare
Zimbabwe
T +263 4 776 107 / 776 631
F +263 4 788 157
E practicalaction-zimbabwe@practicalaction.org.zw