Design[edit | edit source]
Locally Delicious School Garden Home Page
Garden Designs[edit | edit source]
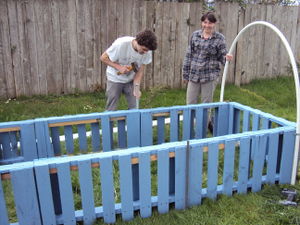
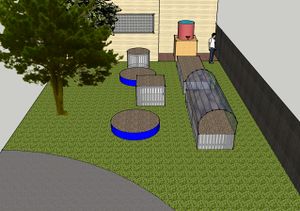
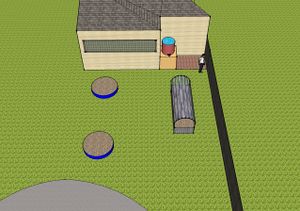
The Sprouting Education school garden is a collection of three different types of garden designs, a raised bed with a greenhouse top, two kiddie pool gardens and a water catchment system. The raised bed is 4’x11’x2’ garden made of wood pallets, and painted to repel water. The original 4’x4’ sized pallets are cut in half to create two 2’x4’ pallets which construct the frame of the raised bed. Inside the bed is lined with a geotextile fabric stapled against the wood pallets to contain the soil in the bed. The entire raised bed frame is stabilized with support brackets at each end of the bed, while rebar stakes are pounded into the ground at the mid-point of the pallets. There are four PVC pipes looped above the bed and attached to the rebar to create a greenhouse frame. An additional PVC pipe is laid across the top of the hoops to secure the pipes in place and hold the plastic sheeting taught to the side panels. The kiddie pool gardens are very simple garden designs. The two plastic Kiddie-Pools are both circular shaped with a diameter of 4’ and 6” deep. The bottom edges of the pools have been drilled for adequate water drainage.
Construction[edit | edit source]
Constructing the Raised Bed with Greenhouse Top[edit | edit source]
To build the Raised Bed With Greenhouse Top, the following materials:
- 4 shipping pallets in uniform shape and design, and around 4’X4’ dimensions (these can be collected for free from dumpsters behind many businesses that ship or receive large inventories)
- 12 pieces of 3’ long rebar
- 7 PVC pipes -12’ long 1/2” diameter
- 12 u-clamps that fit over the PVC pipe
- Geotextile fabric, enough to line the inside of the garden bed, about 104 sq. ft.
- 1 12’ X 12’ sheet of plastic sheeting, the 3 mil. Clear painting tarps will do
- 1 gal. non-toxic weatherproof stain
- As many paintbrushes as painters can be recruit
- sponges
- A nice stash of screws, varying in ¼” to 2” in length
- 12 pieces of salvaged 2’ X 4’ wood at least 18” long
- 1 staple gun with supply of staples
- 1 large sledge hammer or mallet
- 1 power drill
- 1 skill saw
- Sand paper
- Shovels
- Tape measure
- Enough soil to fill the 11’ X 4’ X 2’ garden bed
- 2 pinch clamps that will fit over the PVC Pipe diameter
- 8 bungee chords
Steps
- Check pallets to ensure they are not treated with chemicals. The following website gives a good guide on which pallets contain chemicals: http://web.archive.org/web/20180504134947/http://www.palnetusa.com:80/a/global-domestic-pallet-standards/intl-pallet-standards/what-every-buyer-needs-to-know.tpl
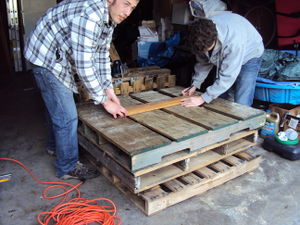
- Measure and cut pallets in half perpendicular to their slats as shown in the picture below. This step should result in 8 similar looking halves. Don’t worry about minor unevenness, which will get sorted out later. Now, sand all large splinters off of the pallets using coarse grade sand paper.
Measuring and Cutting Pallets - Using weather resistant wood stain, paint all the surfaces of the pallets to keep them from rotting. The hard to get spaces between the faces of the slats can easily be painted with sponges. Painting and sanding are great activities for students to help with.
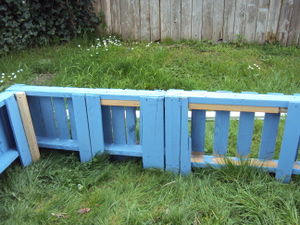
- Take pallets to desired location and arrange them in a 1x3 pallet-halve rectangle. This is the perimeter of the garden. Connect and secure the pallets to each other by screwing salvaged 2x4” pices of wood at the joints. To join side panels and even out the tops of the pallets, place a piece of wood underneath the top trim and secure to both pallets (this should also hide the 2x4 nicely). To join corners, cut 2x4’s to the same height as the pallets. Place the wood vertically on the inside or outside of the corner, and screw it into both corner pallets as shown below.
Joining Pallets - Paint the new wood additions as well as any other touch-ups on the frame. While the paint dries, reinforce the frame with rebar. The rebar will keep the frame from bulging under the pressure of the soil when it is filled. Pound a total of 4 rebar steaks into the ground along the outside of each length of the frame. Rebar should be placed at every corner joint of the two long sides as shown below. Rebar can easily be pounded into the ground using a 2’ capped metal pipe and a large hammer as shown below. Hold the rebar in place and slide the metal pipe over it. Pound the metal pipe until the bottom of it touches the ground (this method insures that all rebar is pounded 1’ into the ground). Remove the metal pipe and repeat for all the rebar.
Pounding in Rebar - Also place 2 rebar steaks into each of the end pallets. To do this, decide on two places in the pallet to set the rebar where it will be hidden from site. Drill holes through the pallet supports, and pound the rebar through the holes until the top of the rebar is flush with the top of the pallet.
- Bend on length of PVC pipe and place over two rebar steaks that are across from each other. PVC pipe is easily bent by having 2 people, one person holding each end of the pipe, walk towards each other until the pipe is bent enough to fit over the rebar. Slide the PVC over the rebar until it touches the ground.Repeat this step until all 4 sets of side rebar are holding a PVC Pipe.
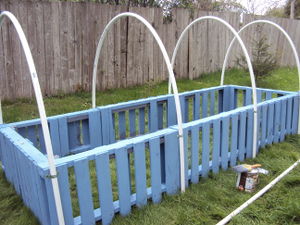
- Now secure each pipe to the pallet frame by placing a u-clamp over the pipe, about 2 inces below the top of the pallet. Screw the clamps down with appropriate screws. Repeat this step until all 8 ends of PVC are secured. The end result of step 6 should look like the picture below.
Hoop Frame - Test the Geotextile or landscaping fabric to see if it is permeable to water in only one direction; if so, place this side of the fabric up. Line the inside of the garden bed with the fabric, again making sure that water will be able to drain out of the garden. Fabric can easily be staple-gunned to the top of the frame. While securing the fabric, remember to leave enough slack in the fabric for it to reach to bottom corners and also to keep a nice flat surface along the edges so that shovels and little hands don’t get caught in the wrinkles as shown in the picture below.
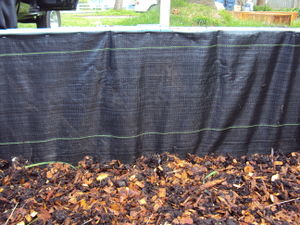
Geotextile Lining - Once the frame is lined with fabric, fill it with soil. A low-quality dirt can be used to fill the bottom, but for the top choose a fertile soil suitable for the plants planned on growing.
- To finish the green house frame, place a piece of PVC pipe underneath the tops of the hoops. This will become the supporting pipe. While two people hold the pipe in place, a third person can screw a u-clamp over each hoop and into the supporting pipe. There should be about 6” of pipe sticking out on both ends of the garden.
- Cut a 12x12 piece of 3 mil. plastic. At two opposing ends, place a the last two PVC pipes flush with the edge of the plastic. Using a staple-gun, staple the plastic to the pipe. Roll the plastic over the pipe once or twice and staple it down again. Staples should be 2-3” apart, so that the plastic is well secured to the pipes.
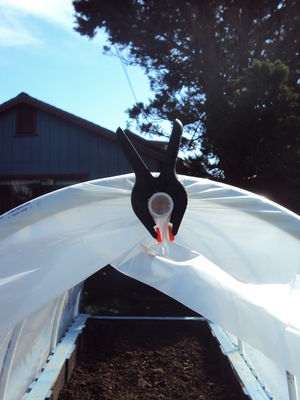
- Now lay the plastic over the hoop frame evenly and secure the plastic to the supporting PVC pipe with a pinch clamp on each end, as shown in the picture below.
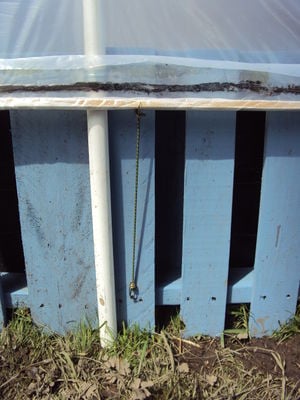
Securing Plastic - To secure the bottom of the plastic, drill 4 evenly spaced holes into each pipe wrapped in plastic (1 at each end of the pipe, and 2 in the middle). Hook 1 end of each bungee cord into each of the holes. Tug on each bungee cord to decide where it should connect to the frame to keep the plastic taught. Screw in screws at the appropriate place, but let the screws stick out about ¼”. Hook the loose end of the bungee cord to the screw as shown in the picture below.
Bungee Cord Hook
Now the garden is ready to plant!
Constructing the Kiddie Pool Garden[edit | edit source]
To build the Kiddie Pool Garden the following materials will be needed:
- Any size rigid plastic pool, as many as you want
- A drill
- Soil
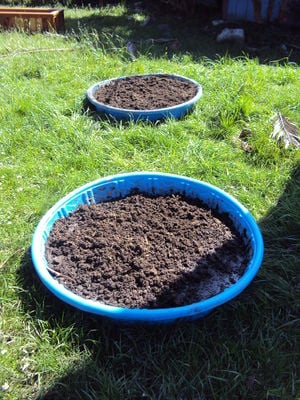
Steps To construct the Kiddie Pool Garden, any size rigid plastic pool can be used. Use a drill with at least a 1/4" diameter drill bit to make about 20 drainage holes on the bottom of the pools. Fill the pools up with soil, and they are ready to plant.
Constructing the Water Catchment System[edit | edit source]
To Build the Water Catchment System, the following materials will be needed:
- a 50 gal. barrel with lid
- a 2 sq. ft. piece of window screen
- a spigot
- a rubber washer that fits the spigot
- a male fitting for the spigot
- 50 ft. hose
- 4 ft. metal strap
- 1 pallet to build a base
- 3 sq. ft. plywood board
- Weatherproof wood stain
- paintbrushes
- Screws
- Drill with bit the diameter of spigot
- Saw
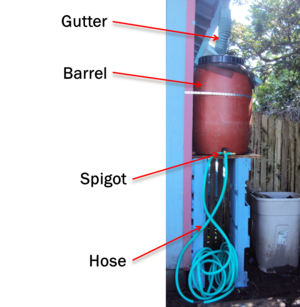
Steps
- To construct the Water Catchment System, find a gutter outlet close to the garden. Dismantle the vertical gutter outlet. Build a base for the barrel by cutting a pallet in half. Paint the pallet halves and plywood with weatherproof stain.
- While the paint dries, drill a hole into the barrel just above the base. Insert the spigot into the hole and attach the washer to the back of the spigot by reaching inside the barrel. When the washer is in place, screw the male fitting into the back of the spigot, compressing the washer. Once the spigot is in place, test for leaks by filling the barrel half way with water. If the spigot leaks, try making the fitting tighter.
- If the lid on the barrel is one piece, cut out the center of the lid so that just the threads remain. If barrel has a two piece lid, simply remove the center section. Place the piece of window screen on top of the barrel, and screw it down with the lid. This creates a filter to keep large debris such as leaves out of the water.
- When the paint has dried, assemble the base. Place pallet halves so that they are taller than wide. Screw the plywood to the tops of the pallets, creating a table-like structure as seen in the photo above. Secure this base to the side of the building, under the gutter, by screwing one of the pallets to the wall.
- Place the barrel on top of the stand and secure it to the wall using the metal strap as shown in the photo above. Attach the hose to the spigot, and wait for rain.
Instructions for Implementation and Use[edit | edit source]
Locally Delicious School Garden
Implementation[edit | edit source]
To implement Trillium’s Children’s Garden, a location must first be selected for each desired component of the garden. For the kiddie pool gardens and raised bed with greenhouse top, an area should be chosen that receives enough sun for the plants planned on being grown. Also an area should be selected that is within 50 ft. of a gutter outlet so that the hose from the water catchment system can reach the garden. The water catchment system should be placed in a shaded area with a gutter outlet. Once a location is chosen, the building instructions can be followed to build the garden.
Use[edit | edit source]
To use the raised bed with greenhouse top, bungee cords are unhooked from screws on the pallet frame. One or both sides of the plastic can subsequently be rolled up and placed in-between the handles of the pinch clamps, allowing access to the sides of the garden. To close the greenhouse top, the plastic is rolled back down and secured to the pallet frame by hooking the bungee cords from the plastic to the screw heads on the frame. The kiddie pools are used as any planter box. If desired, the kiddie pools can be moved short distances by rotating the pool onto a tarp and then pulling on the tarp to move the pool to its new location. To use the water catchment system, wait for the drum to accumulate water. Turn the spigot on and wait for water to come out of the end of the hose. Water the garden, and turn the spigot off when finished. Periodically, clean off the screen on top of the barrel as it will accumulate debris. The pH of the water can be adjusted, and nutrients can be added to the water by removing the lid, placing additives in the water, and closing the lid.
