▼This page is part of the Tolocar project by GIZ.This content is open edit, which means we encourage you to edit and reuse all materials while respecting its license.
Hot Wire Cutter
The Hot Wire Cutter is an open-source, manually operated cutting tool designed for shaping and prototyping with lightweight materials such as expanded polystyrene (EPS) and extruded polystyrene (XPS) foam.
The cutter provides an accessible, low-cost solution for makerspaces, architects, artists, and educational institutions that require precise contour cutting without CNC equipment. The device was created as part of Tolocar’s mission to localize open hardware designs for the Ukrainian materials market, using standard components, locally available electronics, and fabrication methods that can be reproduced in community workshops. It is built around a resistive metal wire heated by an adjustable low-voltage power source. When tensioned across a lightweight wooden frame, the wire melts through foam and similar low-density materials, enabling straight cuts, angled cuts, and free-form shaping. The tool is intended to be simple to construct using basic woodworking techniques, safe and reliable through a low-voltage system (typically 3–12 V), adaptable to multiple cutting lengths and wire types, and affordable for makerspaces and community organisations.
As an open-source tool, its design files, materials list, and build method are publicly available for reuse and modification.
The cutter is designed for: Straight cuts, beveled cuts, curved and freehand shapes and surface shaping and contouring. The operator guides the foam by hand along the heated wire, which melts through the material smoothly and without particulate dust.
Common use cases include: Architectural models, prototyping and mock-ups, stage and exhibition design, craft and sculpture, engineering or design education. The tool is particularly suited for makerspaces and mobile workshop environments, where low cost and portability are essential.
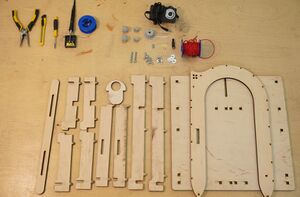
It consists of the following components:
The frame consists of a lightweight plywood structure, typically 8 mm thick, cut into interlocking segments that form a stable U-shaped arm. This geometry maximizes cutting reach while maintaining rigidity.
The cutting element is a resistive NiCr (nichrome) wire (0,3-0,5 mm diameter), chosen for its high melting point and stable resistance.
The hot wire is powered by a regulated DC power supply, usually 3–12 V, 2 A adjustable, standard barrel connector (2.1 × 5.5 mm). The low-voltage system is selected to minimize operational risk while providing adequate heating for foam cutting.
Begin assembling the table from the central walls (with rectangular cutouts), then continue as shown in the photos.
Step 1
Insert screws and nuts into plastic using a soldering iron (or super glue) and pliers. Connect the screw and the plastic slider through the holes in the table and support plate.
Strip about 1 cm of insulation from each end of the wire. Crimp with regular or special crimping pliers.
Step 3
Place the parts according to the images: washers must face each other on the flat (smooth) sides.
Step 4
Measure the wire starting from the 4 holes to the nichrome mounting point:
Bottom: 65 cm
Top: 90 cm
Attach the terminal with wire to the screw, leaving a 5–10 mm reserve before the first hole. Thread the wire evenly through each hole along the arc.
Step 5
Cut the wire at a distance of 10 cm from the 4 holes. Put 10–15 mm heat-shrink tubing on each wire. Also slide on the black part of the barrel connector. Tin the wire ends with solder. Solder each wire to the connector terminals, slide the heat-shrink tubing over and shrink it with a lighter or the side of a soldering iron (NOT the tip). Screw the black part onto the connector.
Thread the nichrome wire through the lower hole as shown. Wind ~1 meter of wire onto the small spool. Attach the spool to the arc and tighten the nut. Thread (without tightening) the wire through the upper two washers, then tighten it using the lower two washers to secure the end of the wire. The wire tension must be sufficient so that it slightly “rings” like a string — adjust several times to avoid breaking. Connect the power connector, turn on the regulator (ONLY WITH ADULT SUPERVISION!!!). Turn the regulator knob to check whether the wire heats up. Turn off the regulator.
Assemble the arc and table together. Secure them with a cotter pin (or locking pin). Plug in the connector, turn on the regulator, and set the knob to half power (6–8 V). Keep fingers away from the heated wire.