
TissueDB/Simulators/Patent Ductus Arteriosus Ligation Simulator

The Patent Ductus Arteriosus Ligation Simulator is a low-cost trainer for closing a patent ductus arteriosus (PDA) by surgical ligation through a left thoracotomy.
| Field | Details |
|---|---|
| Features and Basic Operation | The box gives three levels of sensor-based feedback (Phase 4 of the source module): (1) a clinician-calibrated, colour-coded LED that grades the traction applied to the model and peaks in red when the force is hazardous; (2) a continuous 0–9 digit display, recorded by the phone camera, that gives a running record of the session; and (3) a final 0–9 performance score calculated by the box at the end of the exercise. An augmented-reality phone app (Android and iOS) watches the distance-sensor signal and can flag a potential emergency, such as a PDA rupture from excessive displacement, with on-screen action options. A phone holder on the lid gives an overhead camera view for recording. |
| Current Development Status | Published openly in 2021 (SELF-Training team, Global Surgical Training Challenge); no formal validation study reported in the source. |
| Estimated Build Time and Cost | Not stated as a single total in the source. The SELF-Training team supplies the wooden box, moulds and nozzles free on request; the optional do-it-yourself electronic sensors cost less than US$25 to build. |
| Specialized Tools and Equipment | Custom PDA casting mould supplied in the SELF-Training kit: a two-piece foam outer mould, three connecting green-plastic inserts that form the vessel lumen, and four injection nozzles. |
| Version | Version 1 |
| Development Team Contact Information | SELF-Training team, Global Surgical Training Challenge (2021). Request the in-home kit or ask questions at team.selftraining@gmail.com. |
Tissues
| Tissue | Qty | Material | Cost | Notes |
|---|---|---|---|---|
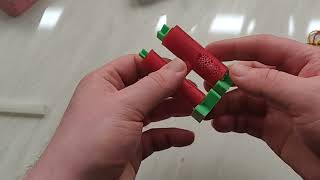
| Blood Vessel (PDA and aorta) | 1 | Gelatin-Glycerol Gel | — | Compliant model of the PDA and aorta; the trainee dissects, clamps and double-ligates the vessel. |
| Pleura (parietal) | 1 | Gelatin-Glycerol Gel | — | Parietal pleura cast as part of the same model; the trainee dissects it off the aorta to expose the PDA. |
Structural Parts
| Part Name | Qty | Material | Cost | Notes |
|---|---|---|---|---|
| Wooden box panels | 8 | Wood (laser-cut) | — | The box chassis — base, three side panels and lid — supplied ready-made in the kit. |
| Internal frame | 1 | Wood (laser-cut) | — | The internal support that holds the model and the sensors. |
| Phone holder | 1 | Wood/plastic (two combs and two arms) | — | Holds the phone over the model for an overhead camera view; width-adjustable. |
| Electronic sensor assembly | 1 set | Proximity/distance sensors, colour-coded LED, 0–9 digit display, reset/initiation and final-score buttons | — | Pre-configured in the kit; a do-it-yourself version is also possible (see the electronics note). |
Consumables
| Consumable | Quantity | Material | Approximate Cost | Notes |
|---|---|---|---|---|
| Glycerol | 40 g per model | Glycerol | — | Base of the gel mixture. |
| Gelatin powder | 15 g per model | Gelatin | — | Sets the gel; mixed with the glycerol and pigment. |
| Red pigment (powdered) | 0.5 g per model | Powdered pigment | — | Colours the model. |
| 9-volt battery | 1 | Alkaline battery | — | Powers the sensor and feedback electronics. |
Build Instructions
Phase 1: Prepare the mould for injection
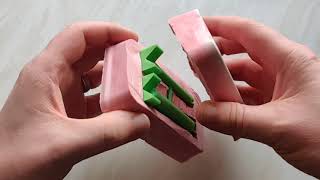
- Connect the three green plastic inserts to one another (as shown in the video) and place them in the fitted space in the bottom half of the mould.
- Push the four nozzles into the top half of the mould, making sure the tips pass all the way through.
- Put the top half of the mould in place and seal the halves firmly with rubber bands. Set aside on paper or cloth towels while making the gel.
Phase 2: Make and inject the gel
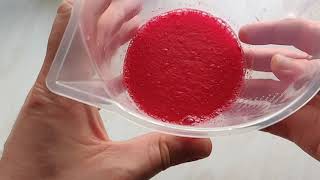
- Place the measuring jug on the scale, zero the scale, and add 40 g of glycerol.
- Zero the scale and add 15 g of gelatin.
- Zero the scale, add 0.5 g of powdered red pigment, and spread the powders across the surface of the glycerol.
- Add cold tap water to the 100 ml line of the jug, stir until fully dissolved, and let it sit for 20 minutes to congeal.
- Transfer the mixture to the cooking pot and stir over low heat (do not boil) for about 10 minutes until it fully liquefies.
- Remove the syringe plunger and check the cap is secure. Fill the syringe with the hot mixture, replace the plunger, turn it upside down, remove the cap, and push gently until no air remains.
- Screw the syringe into each of the four nozzles in turn and push the hot gel through until the mould is completely filled. Some leakage at the seam is normal.
- Refrigerate the filled mould overnight. Excess gel can be ejected into a container and refrigerated for reuse.

Phase 3: Remove the model from the mould
- Remove the rubber bands and nozzles, peel the excess gel from the outside of the mould (save it for reuse), and carefully separate the two halves.
- Use a scalpel or craft knife to clear the gel from the V-shaped ends of the plastic inserts.
- Gently twist and pull out the smaller of the two long inserts, loosening the ends with the knife as needed.
- Use tweezers to free the central connecting pin from the larger long insert, then twist and pull the insert out.
- Push the connecting rod into the larger vessel and remove it with tweezers.
Phase 4: Assemble the training box
- Slot the base into the two side panels with the four holes.
- Slot the side panel with three holes onto the assembly.
- Slot the side panel with many holes onto the assembly (this panel carries the electronics).
- Assemble the internal frame as shown in the diagrams.
- Insert the internal frame into the main box.
- Insert the lid into the two slots at the top of the box.
- Assemble the phone holder by slotting the two combs into the two arms; adjust the width using the different comb slots.
- Slot the phone holder onto the lid in a central position for a tall, centred camera view.


Phase 5: Install the augmented-reality app
- Install the augmented-reality app on a smartphone or tablet:
The box arrives with the electronic sensors pre-configured. Builders making additional boxes can assemble the sensors from scratch following the electrical sensor configuration instructions (schematic diagrams and a video walkthrough).
Electronics and Sensor Setup
The simulator box ships with the electronic sensors pre-configured and ready to use. Builders assembling the sensors from scratch should follow the electrical sensor configuration instructions (schematics and video walkthrough); the cost is given under cost, above.
Software Setup
Augmented-reality app:
- Android: https://play.google.com/store/apps/details?id=com.NMIS.OrganlikeARDR
- Apple iOS: https://testflight.apple.com/join/7CdIIjM4
The app watches the distance-sensor signal in real time and can flag a potential emergency — for example, excessive tissue displacement indicating a risk of PDA rupture — with on-screen action options for the trainee.
References
| Alternative names | Cardiac Surgical Skills Trainer Cardiac Surgical Skills Simulator SELF-Training PDA Simulator PDA Ligation Task Trainer |
|---|
| Authors | Arturopelayo |
|---|---|
| License | CC-BY-SA-4.0 |
| Cite as | Arturopelayo (2026). "TissueDB/Simulators/Patent Ductus Arteriosus Ligation Simulator". Appropedia. Retrieved June 24, 2026. |