
Swetman Makerspace DIY drill presses

| Type | Drill press |
|---|---|
| Authors | Hfoster Sprouts-apollo |
| Location | Swetman Makerspace, Cal Poly Humboldt, Arcata, California, United States |
| Status | Prototyped |
| Years | |
| Made | Yes |
| Replicated | No |
| Uses | Drilling |
| Map | |
|---|---|
| Location | Arcata, United States |
| Coordinates |
For the ENGR 205 class offered at Cal Poly Humboldt as part of the schools engineering program, the team The Presses was tasked with creating six portable drill presses that could turn the Milwaukee hand drills into functioning drill presses. These DIY hand drill presses will be used by the college in their future engineering classes and will be available for open use by students in the Swetman Makerspace.
Background
[edit | edit source]Cal Poly Humboldt is a mid-sized polytechnic University located in the town of Arcata, California. Swetman Makerspace was created for the college as a makerspace for students to use in November 2024. In addition to students being able to use the makerspace to 3D print and use a variety of tools, the makerspace also hosts the ENGR 123 class. ENGR 112 is a class dedicated to teaching students the basics of fabrication. As part of ENGR 123, students create projects that need the use of a drill press to create straight holes. Often these drill presses are in high demand, and as of 2024 were not able to meet the demand of student need. As part of the design project for ENGR 205, the team "The Presses" were tasked with creating 6 drill press guides suitable for use with handdrills for the Cal Poly Humboldt Swetman Makerspace.
Problem statement
[edit | edit source]The objective of this project is to design and make tabletop drill press guides for each of the 6 workstations in the Swetman Makerspace that use the provided Milwaukee hand drills within in each cart.
Criteria
[edit | edit source]The design, production, and implementation of the Drill/Dremel Press is structured by a set of criteria and constraints that outline clear guidelines to the success of the project per the wishes of the client. The table below gives a breakdown of the criteria and constraints for the Drill/ Dremel Press.
| Criteria | Description | Weight (1-10) |
|---|---|---|
| Durability | Must be able to withstand constant use by multiple students over several semesters, using different materials | 10 |
| Safety | Must function safely and not have sharp points or otherwise dangerous pieces. | 10 |
| Reproducibility | The design needs to be moderately easy to reproduce. | 8 |
| Portability | Must be able to be stored and easily moveable. | 7 |
| Aesthetic | The design needs to be visually appealing to the client and users. | 4 |
| Sustainability | Needs to be made from sustainable products. | 8 |
Prototyping
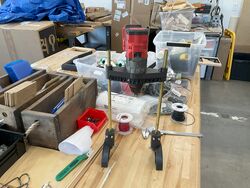
[edit | edit source]The prototyping process was a long process that took many iterations and adjustments to ensure the presses were working properly. We started with cardboard and painter tape, attempting to get the basic shape of the drill guides. The team agreed that the cardboard prototype had appropriate dimensions and seemed to function well. Once the cardboard prototype was complete, we moved on to creating components in Fusion 360, printing these components to test fit and function and acquiring the metal hardware that was to be used in the final press. Our vision was a 15" tall press, a snug holder the drill press sits in (reenforced with a top cap for extra stability), 3/8" rods the holder could vertically slide on, a locking angled mechanism for drilling 30,60,45,90 and 120 degrees, and a 3D printed insert that would drill into a Maplewood base. With these key components in mind, we began the long prototyping process.
Prototype Gallery
[edit | edit source]


3D printed final design of hand drill holder


Construction
[edit | edit source]-
 Semi-final rendition of drill holder
 -
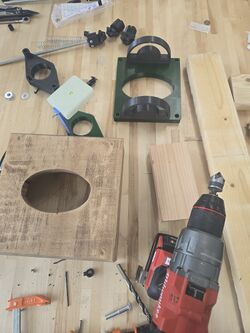 Base, insert, and other components
 -
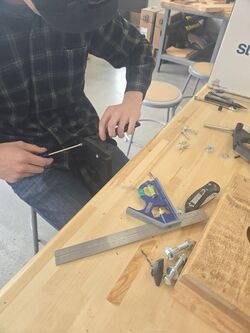 Active measurements and assembly
 -
 Final Angle Mechanism with washer and wingnuts
 -
 3D components in the supports washer
 -
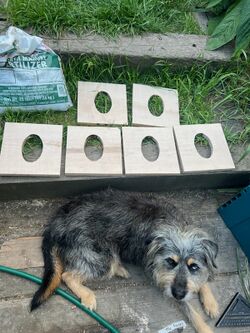 6 completed maple wood bases
 -
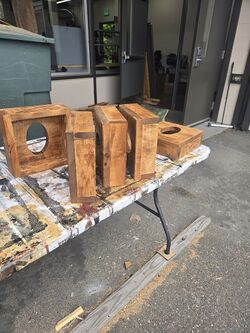 Maple wood bases stained in golden oak


Final product
[edit | edit source]

Our final product is a 15" tall drill press that functions at 45°, 60°, 90°, and 120°. The main contraption sits on top of a maple wood base for stability and clearance. All of the bases of the final drill presses have rubber grips on each corner to help provide extra stability and traction to the surfaces of the Swetman Makerspace. This drill press can be used to drill into thick or thin pieces of material. For the primary uses in the Makerspace, we factored in the general materials used by students and classes so as to make this s practical and useful as possible.
Photo Descriptions
[edit | edit source]The upper photo to the left is the completed drill press that we used during our press conference. It was functional, operational, and overall a success. Many people of differing strengths came to test out the motion of the drill, with the final consensus being that it was a solid drill press design and very easy to use.

The upper right photo is the same final drill press exhibited without a drill to show the components and construction more explicitly. This showcases the 3D printed components, the base, and the sliding mechanism.
Video instruction
[edit | edit source]Cost Analysis
[edit | edit source]Below is a proposed cost of materials for what it took to build each press. The cost is price per unit, in USD. Figure 1.1 does not include the cost of the plastic filament, as it was all provided to us by the Swetman Makerspace. You can find the cost of the filament in Figure 1.2, as part of our proposed maintenance costs. 3D printed components are included here as we expect them to be most likely to need maintenance in the foreseeable future.
| Materials | Price | Item Count | Material Price per unit |
|---|---|---|---|
| Maple Wood | $3.30 | 1X12X12 | $7.25 |
| Screws (6X1) | $5.99 | 4 | $0.48 |
| Bolts (M6X60); Bolts (M6X25) Bulk set 50pc | $9.99 | 8 | $1.60 |
| Wing Nuts (M6) 50 pack | $1.99 | 4 | $0.16 |
| Wing Nuts (M5) 50 pack | $1.99 | 2 | $0.08 |
| Washers 50 pack | $1.99 | 12 | $0.48 |
| Springs 50 pack | $2.50 | 2 | $0.10 |
| Rubber Pads/Levelers | $1.50 | 2 | $0.06 |
| Lock Nuts | $1.99 | 4 | $0.16 |
| 3/8 in. x 6 ft. Plain Steel Solid Round Rod | $6.99 | 4 | $4.66 |
| Bullseye Spirit Levels | $7.51 | 6 | $1.25 |
| Total | $16.27 | ||
| Tax | $1.18 | ||
| Grand Total | $17.45 |
Figure 1.1 Cost of materials table at price per unit.
Proposed Maintenance Costs
| Component | Quantities | Manufacturing Costs | Total |
|---|---|---|---|
| The Holder | 1 | $0.77 | $0.77 |
| The Depth Stop | 1 | $0.06 | $0.06 |
| Angle Gear | 2 | $0.61 | $1.22 |
| Cap 1 | 1 | $1.74 | $1.74 |
| Cap 2 | 2 | $0.06 | $0.12 |
| Bearing Lock system | 2 | $0.59 | $1.18 |
| Bar attachment | 1 | $0.43 | $0.43 |
| Total | $5.52 |
Figure 1.2 Proposed maintenance cost detailing the 3D printed components.
Operation
[edit | edit source]The Drill Presses were designed to be simple to operate and understand. Always wear safety glasses and ensure the base is properly secured while using the drill press.


Loosen the wingnuts around the bar and cap screws to insert the drill into the holder. Then tighten the wingnuts to ensure security and stability while using the press.
The bearing system at the base of the press can be locked into place to ensure stability while drilling at an angle. Loosen the wingnut on the inside of the bearing system, adjust the gear to the desired angle, and lock into place by tightening the wingnut.
Maintenance
[edit | edit source]Maintenance for the 3D printed DIY drill presses created for the Swetman makerspace has been designed to be minimal. The Presses chose a mix of durable long-lasting materials (Maplewood and metal hardware) and open-source Fusion 360 designs that can be easily modified and reprinted with plastic filaments.
General maintenance
- Properly store the drill presses after each use in the designated area in the Swetman makerspace
- Dust off the drill press after each use
In the case of a 3D component breaking:
- The Swetman makerspace has the open-source Fusion 360 files and will be able to easily print new components.
Maintenance schedule
[edit | edit source]This depends solely on the frequency of usage and type of usage.
Maintenance Schedule for Drill Presses Guides
[edit | edit source]| Frequency | Component/Area | Task | Responsible Party |
|---|---|---|---|
| After each use | Entire drill press unit | Wipe off sawdust/debris and check for any loose parts | User |
| Weekly | Moving parts (rods, gears, bearings) | Lubricate lightly with silicone spray or machine oil | Makerspace staff |
| Monthly | Wingnuts, bolts, and hardware | Check for tightness and wear; replace worn hardware | Makerspace staff |
| Monthly | 3D-printed components | Inspect for cracks, stress wear, or deformation | Makerspace staff |
| End of each semester | Drill holder and gear system | Perform detailed inspection and test all angle lock settings | Makerspace staff |
| As needed | 3D-printed parts | Reprint and replace using open-source Fusion 360 files | Makerspace staff |
Conclusion
[edit | edit source]Testing results
[edit | edit source]Initial testing of the completed drill presses demonstrated that they functioned effectively for their intended purpose. While there is a slight amount of play in the vertical guide system, this does not significantly impact performance. With proper clamping or the use of a vise, the press remains stable and accurate during drilling operations.
The drill press was able to successfully drill through the primary materials tested- wood and plastic, which are common in projects completed in the Swetman Makerspace and ENGR 123 coursework. Drill paths were consistently straight when the angle locking system was properly secured. The gear-based angle system performed well, and all designated angles (45°, 60°, 90°, 120°) were tested with no mechanical failure.
These results confirm that the design meets the basic functional requirements for student use, with some room for improvement in securing the drill for high-precision applications.
Discussion
[edit | edit source]The testing process revealed that the drill press guide design is effective for the intended Makerspace environment. While the drill press is not as rigid or precise as a commercial unit, it performed well under typical student use cases, especially when drilling through wood and plastic. These are the most common materials used in ENGR 123 and other introductory engineering courses at Cal Poly Humboldt.
One key observation was the slight play in the vertical movement of the drill holder along the rods. This play did not significantly affect functionality but may reduce accuracy if the user does not properly secure their workpiece. To address this, the team recommends that users employ clamps or a vise to stabilize the material during drilling. In future iterations, tighter tolerances or upgraded bearing systems could help minimize this movement.
The angle-locking mechanism worked consistently and maintained its position under drilling pressure. This feature adds valuable functionality for students who need to drill at fixed angles, especially in prototyping tasks. The rubber feet on the maple base also provided good surface grip, which contributed to stability.
Overall, the press is functional, safe, and appropriate for student use.
Lessons learned
[edit | edit source]Throughout the development of this project, the team gained valuable experience in iterative design, prototyping, and collaborative problem-solving. One of the most important lessons learned was the significance of precise fit testing, especially when working with 3D-printed parts. Early versions of the components did not align properly, requiring multiple rounds of reprinting and adjustments in Fusion 360. Additionally, it would have been more efficient and effective to create both a printing time analysis and a filament quantity analysis early in the project. These tools would have significantly improved workflow efficiency and ensured that sufficient filament was available to complete all six drill press guides.
Another key takeaway was the benefit of physical prototyping early in the design process. Starting with cardboard models allowed the team to visualize scale and function quickly and cheaply, helping to inform design decisions before committing time and resources to printing or cutting materials. Project management was also a learning curve. Balancing fabrication, design revisions, and documentation required consistent communication and time management. In future projects, setting clearer milestones and allowing more buffer time for testing and adjustments would streamline the workflow.
Troubleshooting
[edit | edit source]| Problem | Suggestion |
|---|---|
| Any | Contact Coordinator |
Team
[edit | edit source]- Laura Deliso
- Haley Foster
- Lea Gregordi
- Willy Patton
References
[edit | edit source]
| Authors | |
|---|---|
| License | CC-BY-SA-4.0 |
| Organizations | Cal Poly Humboldt |
| Cite as | Lonny, Leanarda24, Sprouts-apollo, Hfoster (2025–2026). "Swetman Makerspace DIY drill presses". Appropedia. Retrieved July 10, 2026. |