
StartUp Humboldt stage focal point

| Type | Art |
|---|---|
| Authors | R123 Alexander Gaines Lizard |
| Location | Arcata, California |
| Status | Deployed |
| Years | |
| Made | Yes |
| Replicated | No |
| Uses | education, science |
| Map | |
|---|---|
| Location | Arcata, United States |
| Coordinates |
ENGR 205 Stage Focus for StartUp Humboldt. This project is for the Cal poly Humboldt class Engineering 205. The stage focus was created by the team Adrenaline Junkies in fall of 2025. This wiki article is to explain how it was designed and assembled.
Background
[edit | edit source]StartUp Humboldt is a business that provides support to startups, entrepreneurs and businesses local to the Humboldt area. They have a physical space which is both a co-working and presentation space. Due to their connection with the Humboldt area they decided to work with Cal poly Humboldt and the Engineering 205 class on this project in Fall of 2025.
Problem statement
[edit | edit source]The objective of this project is to design and implement a stage focus for StartUp Humboldt. To be used for presentations given within the StartUp Humboldt space.
Criteria
[edit | edit source]Displayed below is a table of our criteria and constraints as set by the client weighted (1-10) lowest to highest.
| Criteria | Description | Weight (1-10) |
|---|---|---|
| Client Preference | Must meet the clients preferred version of our project. | 10 |
| Compatibility with Space | Must look like it belongs in the Startup Humboldt Space and compliment existing furniture and art. More cohesive is better. | 8 |
| Aesthetics | Must be visually pleasing and draw attention to it. More visually pleasing is better. | 8 |
| Cost | It must cost less than $200, the less the better. | 5 |
Prototyping
[edit | edit source]Our prototyping phase included 3D printing our designs to prove that they would work. We initally had hoped to use PLA 3D printer scraps that had been shredded, heated in an oven on a baking sheet, then pressed flat. Unfortunately, we found it difficult to get the material thin enough for the look we wanted. However, we were able to still use this reclaimed PLA for our bearing and hub drive system. We had a design for the tensioner that included a second gear for finer adjustment, but found it too cumbersome to incorporate into the final design, as it was ultimately unnecessary. A popsicle stick showed us what our dimensions would look like in 3D, allowing us to receive client feedback before we invested in making larger cuts on our final material. A 3D animation and small-scale physical model using 3D prints and toothpicks allowed us to demonstrate the proof of concept to our client.
- Prototype gallery
-
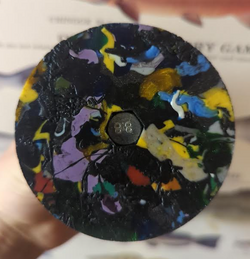 Image of reclaimed shredded PLA disk
 -
 An image of our prototype for a 3d printed tensioner
 -
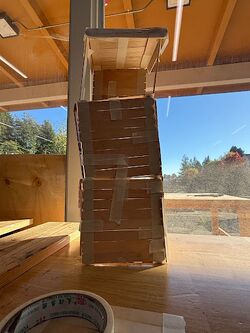 An image of a scale model popsicle stick prototype for the stage focus wooden box
 -
 The original sketch of the parallax idea
 -
 An animated gif demonstrating how the concept works
 -
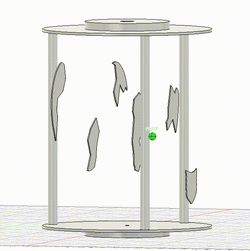
 A proof-of-concept small-scale model demonstrating that the parallax effect works for our application


Final product
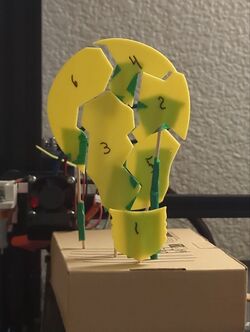
[edit | edit source]The final design is a 16 inch rotating carriage with 6 image fragments suspended by guitar strings, sitting atop a 4ft birch box. When viewed from the correct angle, the image fragments form a lightbulb. The effect of using objects of different sizes at different distances to form an illusion is called a parallax. The carriage is rotated by a 12v DC gearmotor, ensuring that every person in the audience will have a moment to view the image during one of the rotations. The rotating portion of the focus stands above 4 feet tall and the total size of the focus is 6 feet tall, placing the rotating image within sight of most people around average height.

- Final product gallery
-
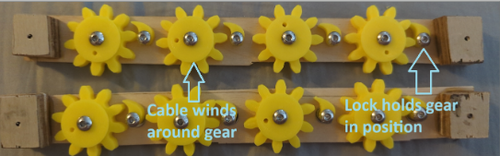 Image of cable retention system
 -
 Image of underside of lightbulb carousel
 -


Construction
[edit | edit source]
We used a PWM controller to adjust the speed at which the lightbulb will rotate.

We made a wooden box that is 4’ x 2’ x 1.5’. The box is made from birch plywood and has hardwood trimmings on the edges. In addition we made a roof to put on top of the lightbulb carriage. A hole is drilled into the center of both. Stain is also applied.

They are 3D printed from PLA and are used to tension the lightbulb pieces

The top and bottom are ¼’’ plywood cut with a laser cutter attached together with 4 wooden dowels and 3d printed flanged sockets.

The light bulb is put on top of the box where the rotation is driven by a belt and motor from below. Recycled PLA disks are used to reduce friction and act as washers.
Then the roof is connected to the box by 4 wooden dowels.
Video instructions
[edit | edit source]A good way to display a process is by making a video explaining your process. See Template:Video for information on how to add and annotate videos.
Bill of materials
[edit | edit source]| Item | Amount | Cost per unit | Total |
|---|---|---|---|
| 3/4” birch plywood 4’x8’ | 2 | USD 60.00 | USD 120.00 |
| 5/16 wood dowels 48” | 2 | USD 3.00 | USD 6.00 |
| PLA Filament 1kg spool | 1 | USD 0.00 | USD 0.00 |
| Pack of 19 Guitar strings .010 | 1 | USD 9.00 | USD 9.00 |
| 12v gearmotor | 1 | USD 0.00 | USD 0.00 |
| PWM Control board | 1 | USD 8.00 | USD 8.00 |
| 5/16 wood dowels 48” | 2 | USD 3.00 | USD 6.00 |
| M4 bolt kit | 1 | USD 7.00 | USD 7.00 |
| 5/16 nuts | 4 | USD 1.00 | USD 4.00 |
| Wood art canvas 14”x14” | 2 | USD 0.00 | USD 0.00 |
| 5/16” ID fender washers 20pk | 4 | USD 1.75 | USD 7.00 |
| 500 grams of PLA chips | 1 | USD 0.00 | USD 0.00 |
| Skate bearings 20pk | 1 | USD 0.00 | USD 0.00 |
| 5/16 Threaded Rod 2pack 10” long | 1 | USD 5.00 | USD 5.00 |
| GT2 pulley belt | 1 | USD 9.00 | USD 9.00 |
| 18awg wire 25ft | 1 | USD 0.00 | USD 0.00 |
| Fuse block 2pcs w/ 2A fuse | 1 | USD 0.00 | USD 0.00 |
| On/off switch | 1 | USD 1.00 | USD 1.00 |
| 12v 2A lamp power supply | 1 | USD 0.00 | USD 0.00 |
| Grand total | USD 182EUR 156.52 <br />GBP 132.86 <br />CAD 225.68 <br />MXN 3,794.70 <br />INR 13,622.70 <br /> | ||
Operation
[edit | edit source]
Plug the stage focus into a wall socket.

Adjust the knob to change the rotation of the light bulb to your desired speed. Turn to the left to make the rotation slower and to the right to speed up the rotation.
Maintenance
[edit | edit source]There are no actions need for maintenance given the simplicity of the design and robustness of the components. All 3D printable files are available here should something cause them to break.
- File:GT2 Pulley Parametric motor.stl Pulley that attaches to the motor
- File:Big dowel holder.stl Dowel attachment for the 7/8" dowel
- File:Motor bracket.stl Motor bracket to mount the 12v gearmotor to the inside of the box
- File:Electronics Housing Parametric.stl Housing for the electronics
- File:Bulb pieces w holes.stl The bulb pieces themselves with holes for mounting. If the holes are filled in too much from your printer, use a sewing needle and lighter to heat the holes larger.
- File:GT2 Pulley threadedrod.stl Pulley that attaches to the threaded rod on the carousel
- File:Dowel mount v1.stl Dowel attachment for the small dowels on the carousel
- File:Tensioner.stl Tensioner system with optional small gear (unused in final design)
Conclusion
[edit | edit source]Testing results
[edit | edit source]The parallax test showed that the optical illusion would work at the correct distance.
The test for the motor ensured our wiring was sound and would work well with our project.
Discussion
[edit | edit source]We made a scale model of the light bulb with the pieces held up by tooth picks stuck into a box. We calculated that the sticks should be placed 10cm apart for this test. We found that this was effective in showing the optical illusion we were going for.
We purchased and wired our electronics needed to make the rotation work first to ensure we had no further issues later on. Upon testing it we found there were no issues and that the PWM was effective at increasing and decreasing the RPM of the motor.
Lessons learned
[edit | edit source]From this project we have learned a great deal about design and execution of a proposed solution. In addition to learning about how to effectively reach the correct solution. Next time however there are some things we would do differently. To start we would like to construct the box entirely from hardwood. While not cost effective, unless the wood is donated, it would greatly add to the aesthetic of the design.
Next steps
[edit | edit source]There is no next step for the project; there is no further design or assembly required.
Troubleshooting
[edit | edit source]| Problem | Suggestion |
|---|---|
| Slow or fast rotation | Check the knob on the PWM controller and ensure it is set to your desired rotation speed |
| The pieces of the light bulb appear out of place | Adjust the tensioners to ensure the pieces are in the right place. Make sure the strings are taught when finished. |
Team
[edit | edit source]- Atom Bell
- Landon Brocato
- Alex Gaines
- Riley Mullen
References
[edit | edit source]
| Authors | |
|---|---|
| License | CC-BY-SA-4.0 |
| Organizations | Cal Poly Humboldt |
| Cite as | Lonny, R123, Lizard (2025). "StartUp Humboldt stage focal point". Appropedia. Retrieved July 11, 2026. |