
Schatzari Cookstove

| Type | Cookstove |
|---|---|
| Authors | Greg Chapman Tirian Mink Ruben Garcia Omar Masera Victor Berrueta Ilse Ruiz Mercado |
| Location | Arcata, California |
| Status | Deployed |
| Years | 2010 |
A Patsari cookstove, nicknamed the Schatzari was built at the Schatz Energy Research Center (SERC) laboratory on May 27, 2010.
The purpose of this Appropredia page is to describe the construction process of the Patsari, with a particular focus on the modifications and deviations that were made from the document, "Estufa Patsari; Manual de Construccion (EPMC)." This page is intended to serve as an amendment to the construction manual that was published by the Grupo Interdisciplinario de Tecnologîa Rural Apropiada (GIRA), and should not be considered a stand-alone document. The construction process marks the beginning of a collaboration between GIRA and SERC. The goal is to use the stove as a tool to develop research projects aimed at investigating the relationship between stove combustion design parameters and emissions of black carbon (BC). BC is a major contributor to global warming and accelerated glacial melt. Furthermore, emission of BC inside the home is a public health concern because of its role in causing chronic and acute respiratory diseases in groups that experience significant exposure, particularly in the Global South. This will add to the scientific knowledge base of biomass cookstoves, as they relate to local and global scale emissions inventories of BC and co-pollutants. Past studies have shown that the Patsari's combustion chamber design increases combustion efficiency, reduces emissions of BC and other particulate matter, and decreases consumption of fuel wood.
Summary
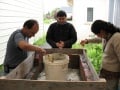
[edit | edit source]GIRA members leading the construction process were Omar Masera, Victor Berrueta, and Ilse Ruiz Mercado. SERC members assisting in the construction process were Greg Chapman, Tirian Mink, and Ruben Garcia. The stove was completed and briefly tested on May 28, 2010.
The latest version (as of 5/27/10) of the EPMC was followed closely. Any deviations from the manual were made to accommodate the difference between materials procured in Arcata versus Mexico, as well as to accommodate future stove testing. The primary modifications were the addition of air supply lines into the combustion chamber, as well as ducts for the insertion of thermocouples into various locations inside the stove.
Pre-construction Preparation Work
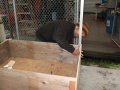
[edit | edit source]As specified in the EPMC, a heavy-duty metal table (130cm x 99cm x 78.5cm) capable of supporting several hundreds pounds was procured to serve as a stove base. The table was sanded and cleaned to eliminate rust.
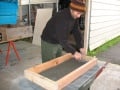
A mold was built from plywood to ensure proper exterior stove dimensions. The mold dimensions (107cm x 70cm x 29cm) were slightly larger than specified in the EPMC, as advised by the GIRA team.
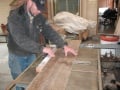
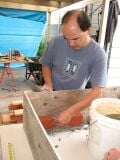
Since local bricks were slightly smaller than that normally used, a brick configuration was designed to fit the mold with the smaller bricks. This required cutting bricks and dry fitting them in the mold through a trial and error process until proper stove dimension were achieved. Since local sand was courser than that normally used, a sieve was built to filter out small rocks (approximately > 1/8" wide).
Bricks were arranged inside the mold and photographed to preserve the exact brick configuration during the brick laying process. It should be noted that the exterior dimensions of the stove are not important so long as the stove can accommodate the combustion chamber interior dimensions of 36cm x 22cm x 12cm, and the cooking surfaces.
- Pre-construction preparation work
-
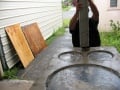
 Cutting the plywood
 -
 Sieving the sand
 -
 Building the mold


Materials
[edit | edit source]

| Description | Dimensions | Quantity |
|---|---|---|
| standard red bricks | 20.5cm x 9.5cm x 6.2cm | 55-60 |
| yellow fire bricks | 23.4cm x 11.9cm x 3.2cm | 8-10 |
| Sakrete Types S Masonry Mortar | 60-pound bag | 2 |
| gravel | 25-gallon bucket | 4 |
| fine sand | 5-gallon bucket | 2 |
| H.C. Mortar Clay (A Superior Clay Product) | 50-pound bag | 1 |
| ½" Hardibacker fireboard | 3'x 5' sheet | 1 |
| metal chimney tubes | 4" diam x 90 cm | 3 |
Accessories
[edit | edit source]
The following tools and materials were manufactured in Mexico and brought by the GIRA team:
| Description | Dimensions | Quantity |
|---|---|---|
| Metal chimney base (with two rectangular inlets for secondary burners and one circular outlet for chimney) | 9 cm diam., 5cm x 8cm | 1 |
| Metal secondary burner mold | See picture | 1 |
| Novaceramic Vintex brick/ with interior holes | 105cm x 70cm x 27cm / 8cm x 8cm x 6cm | 1 |
| Primary burner, 14 gauge steel | 54 cm diam | 1 |
| Secondary burners, 14 gauge steel | 28 cm diam | 2 |
Overview of construction process
[edit | edit source]Day 1: On Wednesday May 26, 2010, members of GIRA arrived at SERC to take part in a planning session for the following day's stove construction process. GIRA members observed that due to regional differences in clay, sand, and mortar, sample clay mixtures should be made to determine the optimal mixture. To determine this, different ratios of clay, sand, and mortar were made. The following day, the samples were observed and it was determined the most suitable ratio was 1 part clay, 2 parts sand, and 2 parts mortar (1:2:2).
Day 2: On Thursday May 27, 2010, members of GIRA and SERC built the Patsari cook stove.
Day 3: On Friday May 28, 2010, the chimney was installed and the stove was demonstrated by preparing a batch of quesadillas.
Step-by-step construction process
[edit | edit source]- Laying the bricks
-
 To minimize conductive heat loss to the metal table, and to assure good adhesion of bricks, a sheet of ½" Hardibacker was laid on the table as a base for the stove to be built. The sheet was scored, cut and centered on the tabletop. The wood mold was centered on the fireboard, prior to beginning stove construction. Bricklaying was started inside the front left-corner of the wood mold.
 -
 A half-bucket of mortar was mixed with enough tap water to make a thick, workable, non-runny mixture for brick laying. Subsequent batches of mortar were made in a similar fashion as needed. Mortar was placed on the bottom of each brick making up the bottom-most layer, to bind the stove bottom to the fireboard. Mortar was placed on every side of each brick that butts up to another brick


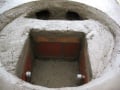
Bricks were laid in the following sequence with careful attention focused on maintaining combustion chamber dimensions of 36cm x 22cm x 12cm,
- Outer-bottom course, including bottom course of combustion chamber (Note: three fire bricks were used as the bottom layer of the combustion chamber and the first course of combustion chamber bricks started from the Hardibacker (not on the fire brick))
- Outer-middle course, including middle course of combustion chamber (Note: a non-mortared brick should be placed under the combustion chamber opening, to serve as a support for the middle course, until dry.)
- Outer-top course, not including top course of combustion chamber bricks; the third course of combustion chamber bricks were added after the addition of gravel below.
- Air flow control in the combustion chamber
-
 Bricks were soaked in a bucket of tap water for at least 30-60 seconds prior to being laid. This was done in batches of 6-8 bricks.
 -
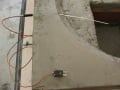
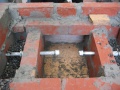 To control air flow into the combustion chamber for testing purposes, holes were drilled through both the outer stove walls and inner combustion chamber walls to allow for the installation of 1/2" (inside diameter) galvanized pipe
 -
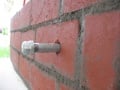 These pipes were aligned approximately 8" from the combustion chamber aperture and 6" from the surface of the fire brick base of the combustion chamber


- Construction continued...
-
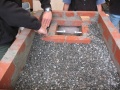 After all three courses of brick were securely in place, the mold was filled with gravel up to the top of the second course. This should approximately coincide with the top of the second course of combustion chamber
 -
 Three fire bricks were then used to form the third and final layer of the combustion chamber
 -
 The metal chimney base was positioned on top of a firebrick, at the back end of the stove, with the two tunnel inlets facing forwards (see EPMC for details)
 -
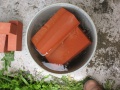
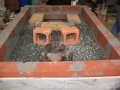 The Novaceramic Vintex brick was cut in equal halves and positioned in the gravel to serve as support structures for the channels that connect the primary combustion chamber to the secondary burners. For accurate positioning, the primary (larger) burner was momentarily placed on top of the combustion chamber and the secondary burner mold placed close to the chimney inlets (see EPMC for details)
 -
 The brick halves were then positioned between the back of the primary burner and the small burner mold, as indicated in the image. Once proper positioning was attained the primary burner and secondary burner mold were removed
 -
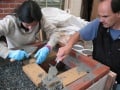
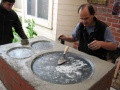
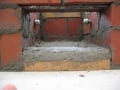
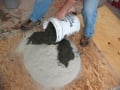 To create the stove's top clay layer, one bucket of filtered sand, one bucket of mortar, and a half-bucket of mortar clay (2:2:1 ratio) were thoroughly dry-mixed with a shovel on a large sheet of plywood. Tap water was slowly added and mixed in until a sticky and non-runny clay like consistency was reached. The GIRA team indicated that the ideal consistency for the mixture can be described as "chewing gum."
 -
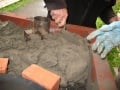 The clay mixture was carefully added to the back half of the stove only, until the top of the third brick course was reached (After construction was completed, GIRA members observed that the mixture was crumbling and it was speculated that this was due to too much sand and too little clay. This should be accounted for in future construction of Patsaris in the US)
 -
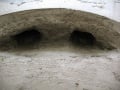
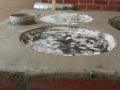
 The secondary burner mold was then re-positioned near the chimney inlets (as in step 10) and pressed into the clay to create a seat in the clay for the secondary burner to sit. This process was repeated on the adjacent side
 -
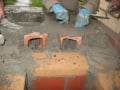 Channels were carved out to connect the secondary burner chambers with the chimney inlets and the hollow bricks
 -
Clay was then added to the front half of the stove with the primary burner in place acting as a mold. The burner circumference was traced out in the clay to delineate the location of the primary burner
-
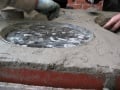 Outside of the burner boundary, clay was added to the top of the final brick course. Inside the burner boundary, a 2 to 3 cm layer of clay was added from the top of combustion chamber brick course. The objective in building up the clay above the combustion chamber was to create a 2 cm vertical gap below the bottom of the burner
 -
 A small semi-circle was carved out toward the back end of the front burner and tunnels dug out through the hollow half bricks
 -
 This connects the air flow from the primary burner to the secondary burners
 -
 The top clay layer was then measured for evenness and adjusted and smoothed
 -
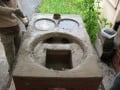
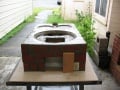
 The burners were put into their respective spaces and their edges sealed by working the clay into the gaps around the burners
 -
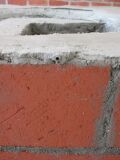
 The plywood mold was removed and a 2 cm layer of clay was laid on the bottom of the combustion chamber. The intention was to achieve a combustion chamber aperture height of 12 cm, while the actual height is 11.7 cm
 -
 1/8" (inside diameter) stainless steel ducts were added in three locations to accommodate insertion of thermocouples into the combustion chamber, and both of the secondary burner channels.
 -
 more ducts
 -
 and still more ducts
 -
 Mortar mixture was used to touch-up and fill-in remaining gaps between bricks.
 -
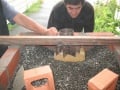
 A portable fan was positioned to face the combustion chamber entrance and turned on. The stove was allowed to dry overnight
 -
 The next morning the chimney was added and attached to the laboratory roof
 -
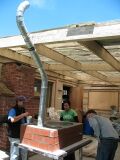 The chimney
 -
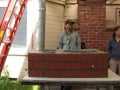
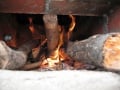 The stove was started


| Authors | |
|---|---|
| License | CC-BY-SA-3.0 |
| Organizations | Schatz Energy Research Center (SERC), Grupo Interdisciplinario de Tecnologa Rural Apropiada (GIRA) |
| Cite as | Tirian (2010–2024). "Schatzari Cookstove". Appropedia. Retrieved July 9, 2026. |