3D printed Parts[edit | edit source]
Before building your Prusa i3 MK3S, make sure that all 3D printed parts are included in your kit. If you are missing any parts, print them using these settings:
- PETG black filament (You will need black plastic for the filament sensor to work properly)
- 0.2 mm layer height
- 20% grid infill
| File Name | Count | File Location |
|---|---|---|
| Y-Axis Assembly | ||
| y-rod-holder.stl | 4 | Original Prusa i3 MK3 Models |
| y-belt-idler.stl | 1 | Original Prusa i3 MK3 Models |
| y-motor-holder.stl | 1 | Original Prusa i3 MK3 Models |
| y-belt-tensioner.stl | 1 | Original Prusa i3 MK3 Models |
| y-belt-holder.stl | 1 | Original Prusa i3 MK3 Models |
| X-Axis Assembly | ||
| x-end-motor.stl | 1 | Original Prusa i3 MK3 Models |
| x-end-idler.stl | 1 | Original Prusa i3 MK3 Models |
| Z-Axis Assembly | ||
| z-axis-bottom.stl | 1 | Original Prusa i3 MK3 Models |
| z-axis-top.stl | 1 | Original Prusa i3 MK3 Models |
| z-screw-cover.stl | 2 | Original Prusa i3 MK3 Models |
| E-Axis Assembly | ||
| extruder-body.stl | 1 | Original Prusa i3 MK3 Models |
| adapter-printer.stl | 1 | Original Prusa i3 MK3 Models |
| fs-cover.stl | 1 | Original Prusa i3 MK3 Models |
| fs-lever.stl | 1 | Original Prusa i3 MK3 Models |
| extruder-cover.stl | 1 | Original Prusa i3 MK3 Models |
| extruder-idler.stl | 1 | Original Prusa i3 MK3 Models |
| extruder-motor-plate.stl | 1 | Original Prusa i3 MK3 Models |
| x-carriage.stl | 1 | Original Prusa i3 MK3 Models |
| x-carriage-back.stl | 1 | Original Prusa i3 MK3 Models |
| print-fan-support.stl | 1 | Original Prusa i3 MK3 Models |
| fan-shroud.stl | 1 | Original Prusa i3 MK3 Models |
| cable-holder.stl | 1 | Original Prusa i3 MK3 Models |
| LCD Assembly | ||
| LCD-cover-ORIGINAL-MK3.stl | 1 | Original Prusa i3 MK3 Models |
| LCD-knob.stl | 1 | Original Prusa i3 MK3 Modelss |
| lcd-supports.stl | 1 | Original Prusa i3 MK3 Models |
| Heated Bed Assembly | ||
| heatbed-cable-cover.stl | 1 | Original Prusa i3 MK3 Models |
| heatbed-cable-cover-clip.stl | 1 | Original Prusa i3 MK3 Models |
| Electronics Assembly | ||
| Einsy-base.stl | 1 | Original Prusa i3 MK3 Models |
| Einsy-doors.stl | 1 | Original Prusa i3 MK3 Models |
| Einsy-hinges.stl | 1 | Original Prusa i3 MK3 Models |
| Extruder-cable-clip.stl | 1 | Original Prusa i3 MK3 Models |
| Heatbed-cable-clip.stl | 1 | Original Prusa i3 MK3 Models |
| PSU-cover-NODRILL.stl | 1 | Original Prusa i3 MK2S Models |
| Other | ||
| SpoolHolder_B4.stl | 1 | Prusa Printable Parts and Upgrades |
Motors[edit | edit source]
in some kits the motors are unmarked (there is no label telling you where to place them). If this is then you will need to label them yourself. The motors are labels based on the relative length of the wires attached to them.
- Longest Wires: E-Motor
- Z-Motor Right
- Y-Motor
- X-Motor
- Shortest Wires: Z-Motor Left
If two or more motors have the same wire length, then just try to match the above guide as close as possible.
Part Sub-Assemblies[edit | edit source]
Depending on your kit, some components may not come pre-asembled. If this is the case, then follow the appropriate set of directions below.
Hot End Assembly[edit | edit source]

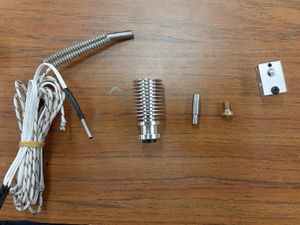
Hot end parts. From left to right: Heater/Thermistor, Heatsink, Heat Break, Nozzle, Heater Block - Heater
- Thermistor
- Heatsink
- Thermal Break
- Nozzle
- Heater Block

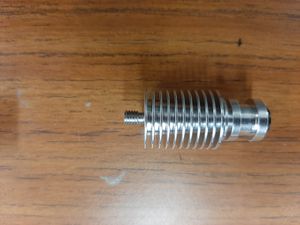
Heatsink with thermal break attached 
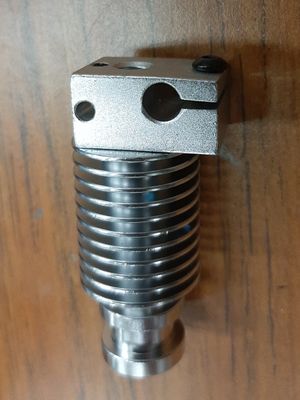
Heatsink, thermal break, and heater block assembled 
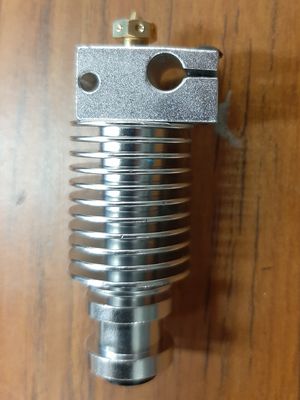
Heatsink, thermal break, heater block, and nozzle assembled