
Occidental greywater

| Type | Greywater system |
|---|---|
| Authors | Gabriel Krause |
| Location | California, USA |
| Status | |
| Years | 2006 |
Greywater treatment system made from 55 gallon drums. This is, essentially, a five stage, activated sludge greywater system. The greywater is biologically processed to be recycled for decorative landscaping.
Rather than writing a general "how-to" for this type of greywater system, I'll start with a "this is what I did" type of article.
Assess the clients needs
[edit | edit source]This client lives in a high drought area of Northern California whose well runs dry during the summer months of the year. Large storage tanks buffer the year round water requirement of the property. However, water still has to be trucked in several times during the dry season. The purpose of this greywater system is to minimize the impact of irrigating a half acre of decorative landscaping surrounding the house by recycling the used water. Depending on the weather, an estimated 100-200 gallons per week is needed for landscaping. The system needs to be low maintenance, easy to use and have enough storage for regular waterings. And supply 100% of the landscaping hydration needs during the drought season.
Topographical Study
[edit | edit source]The house is two stories. Greywater produced on the second floor has enough head to gravity feed the complete treatment process of the planed system. The first floor drains are too low for a gravity feed greywater system and will not be part of the this treatment plan. The second floor has a large kitchen with a dishwasher, a clothes washer, and two bathrooms. The first floor has a small kitchen and one bathroom. Most of the greywater potential is produced on the second floor.
Diverting the Greywater
[edit | edit source]All the second story greywater drains were replumbed into a common pipe. A wye valve was installed to direct the greywater to either the greywater treatment system or the septic system. In the picture below, the two valves determine where the water flows. The left valve (at the center of the picture) drops down into the septic. The right valve directs to the greywater treatment system. Any greywater retrofit should maintain the option to revert to the original system.
If the residents have a need to use chemical cleaners that will go down the drain, having the option to switch to septic will save the health of a biological greywater treatment system. Also, if the greywater system requires maintenance, it's really nice to not have second hand water flowing at you. This greywater system is turned off during the rainy months. When installing any plumbing, follow the local codes. Most of them are there for really good reasons. This retrofit maintains all the required pipe ventilation and meets or exceeds the minimum pipe slope requirements. Somewhere online I researched the California Residential and Commercial Standards. These standards require that any pipe diameter less than or equal to 2" have a slope of 1/4" fall/foot. And any pipe diameter greater than or equal to 3" have a slope of 1/8" fall/foot.

From the wye valve the greywater travels down a 4" pipe to the processing chambers (45-gallon drums) in a retired chicken coop.


To allow for the cap of the first drum to open, the downspout rotates upward and out of the way via a set of mated male and female threaded pipe adapters incline on the 4" pipe. They're threaded loose enough to rotate easily and tight enough so that its friction keeps the downspout in the desired position.

The downspout is designed to create a fairly tight seal with the drum's lid. I wanted to minimize the potential for unforeseen outside influences that could foul the system.
Greywater Treatement
[edit | edit source]
This is the heart of the greywater treatment system. Greywater enters from the downspout on the left and gets progressively cleaner as it's pushed through each drum from left to right.
For the most part, a healthy flora of aerobic bacteria is what does the cleaning. After an initial seeding of beneficial bacteria, heavy aeration is required to keep the system functioning well. The first drum, containing the dirtiest water gets the heaviest aeration. My target rate for the first two drums is 300 Liters per hour (Lph). That is about 7.5-Lph per gallon of water, which is close to the target aeration rate for municipal activated sludge sewage treatment systems. The next two drums are receiving about 240-Lph, or 6-Lph/gal.
One way that this system differs from a typical activated sludge system is that there is no separate settling period. Debris from the house drains and large flocs settle to the bottom of each drum. Part of the regular maintenance is to drain the sludge that collects at the bottom of each drum two or three times a summer. In the picture below, the 2" plumbing and valves make this maintenance easy. One at a time, open each valve for about 10-15 seconds. At the bottom of each drum, an industrial sized floor drain has been installed. A few feet of water pressure, large drains and drain pipes creates decent suction and the sediment gets sucked away. The drains lead to an old oak tree nearby.

Side Note
In writing this, I have thought of an improvement to this combined aeration/settling system. As it is, water on the out of this system is fairly clear. But to improve it further, when I get a chance, I'm going to lift the air stone from the bottom, progressively higher in each drum. The aeration from the air stones create considerable turbulence (check picture below) at their flow rates so only the largest flocs and debris settle to the bottom. A non turbulent region below the air stones would allow for more settling and cleaner water on the out. In the first drum, I'll lift the stone only a few inches. The deeper the aeration, the greater dissolved oxygen concentration because of increased water pressure and the contact time the bubbles have with the water before reaching the surface. I'll raise the air stone about 6-inches in the second drum and about 12-inches in the last two drums. I haven't calculated it, but I'm guessing that the high O2 flow rate in these drums will make the difference in height fairly negligible. The upward motion of the air bubbles will maintain a water flow cycle through the drum that will continuously carry oxygenated water from the top down below the aerator. So below the aerators water will continuously flow but the turbulence above wont keep the larger flocs from settling. ADDENDUM: Raising the air stones as described improved the clarity of the water output, and doesn't seem to have any drawbacks.

Continued...
Water transfer from drum to drum through 1-inch irrigation pipe pushed through a 15/16-inch hole and an 90-degree elbow (see the elbow between the two drums below). It takes some force to get the irrigation pipe through but the seal is water tight and it saves the cost of expensive bulkhead fittings, which are typically used to tap a hole in a tank. Additionally, these holes are drilled on the curve where the drum starts tapering to the lid. Being on the curve forces the irrigation pipe to slant downward into the water, minimizing the chance for oils and surface scum to transfer from drum to drum. And since flocs tend to sink rather than float, there's less chance that they will flow up the irrigation pipe into the next drum.

In the last drum, the water exits into another irrigation pipe, this one slanting upward (see in picture below at right). It leads to the 500-gallon storage tank. The opening at this pipe is set higher than all the other drum-to-drum pipes and sets the water level in all the drums. As greywater flows into the system from the house, water is pushed progressively through the system and exits at the surface of the final drum. Currently this pipe is skimming the surface of the last drum, which is fairly processed and clean, but I think I'll put an elbow on this pipe to pull water from an inch or two below the surface instead.
The water flows out of the chicken coop to the 500-gallon storage tank about 30-feet down the hill. Here you can see the drum to storage tank pipe, the maintenance drain, the return pipe for pressurized, treated greywater leading back to the house and the aeration hose coming to the drums.


Greywater Storage
[edit | edit source]Here's where the water from the drums enter the storage tank. The other pipe is the overflow drain, currently leading to the old oak tree as well. But, since the overflow is treated, I'm thinking about plans to direct it to a series of currently unused garden ponds nearby. The first small pond will serve as an ornamental wetland treatment for the water before flowing into a larger pond nearby.


Hardware
[edit | edit source]The Storage tank is also oxygenated to maintain aerobic conditions, keeping the water 'healthy' until used for landscape irrigation. The storage tank is being aerated at a rate somewhere around 2300 Lph. About 4.5-Lph/gal. It has been over a year since the current system has been built and I'm very happy with the performance of the air pump. It's an Airtech 40 Pond Aeration pump. They claim that they make the most efficient air pumps on the market and it's the only company I could find that openly publishes their performance curves. You can see it mounted to the top of the flotec well pressure tank. Coincidentally they match. The Airtec isn't UL approved for outdoor use so you see it with my makeshift pump housing which protects it from any water that might leak from the roof of the aviary and doubles as a baffle to keep dust from entering the pump's air filter. Hopefully the air filter will last longer because of it. The housing is a cut down 5-gallon bucket mounted on lamp hardware which keeps it from touching the vibrating pump. The pump is fairly quiet unless there is something to vibrate against.

The system shown here at the storage tank out flow is a Flotec ¾-hp jet pump, a Flotec 40-gal pressure tank providing continuous 30-50 psi water pressure to a couple greywater designated spigots back up at the house for irrigation.

I have recently added a float switch and a separate cut-off switch to the jet pump. The float switch is shown in only about 10-inches of water. It's tethered to open the circuit when the water level goes down to about 4-inches. It doesn't close the circuit until the water level fills back up to about 10-inches.


Repairs
[edit | edit source]Recently, the greywater flow got switched to the septic system for some maintenance, but wasn't switched back after the maintenance finished. Irrigation continued as normal, draining the storage tank and the jet pump ran for two days without water. It got hot and melted the PVC adapters going in and out of the pump. Fortunately, the pump didn't need to be replaced because it has a built-in temperature switch that shuts off before it's own components melt or burn out. Only the plumbing surrounding the pump had to be replaced. The float switch simply cuts the power to the pump if the tank gets too low, preventing this type of problem in the future. I installed the manual cut-off switch to the jet pump as well after realizing that any maintenance required for the jet pump meant turning off the power to the air pump as well. Now aeration of all the drums and storage tank doesn't have to be interrupted if any work is required on the jet pump. The picture (above right) shows the master switch and outlet powering the air pump above and jet pump switch box below. The float switch is wired in line at this lower switch box. The manuals for all the equipment are zip lock bagged and stapled to the wall in for convenience in case anyone less familiar with the system needs to work on it in the future.
Replacing the plumbing for this problem was a fairly simple task, thanks to some preplanning when the system was built. Looking back at the jet pump detail picture, the red valve at the tank out-flow allowed me to work on the plumbing without losing any more water from the tank. And, the quick connect adapters (grey, larger diameter) before and after the pump allowed for replacement of only the sections damaged by overheating. Also, the coupled male-female threaded pipe adapters before the pressure gauge kept me from having to replace the whole gauge assembly. Coming back to the air pump, when designing the pneumatic plumbing to the air stones, using irrigation pipe seemed to be the most cost effective way to cover the, close to 50-foot, distance. In the picture below the irrigation tubing (in need of a pipe clamp) is pushed onto the air pump nozzle.

Air Distribution
[edit | edit source]From the irrigation tubing, I used a barb hole punch and standard 1/8" drip irrigation barbs to tap into the tubing. From there I used the more expensive vinyl tubing typically used for airstones. Most of the airstones have 1/4" nipples. I saved on adapters by just pushing the 1/8" vinyl tubing into 1/4" vinyl tubes as you can see in the picture below. The first airstone is larger with a 3/8" nipple.

It is certainly not the most elligant and likely has some minor leaks but it works.
Maintenance Schedule
[edit | edit source]Monthly
[edit | edit source]Once a month open the first two drums and scoop out any oils that have collected with a pool skimmer. Most of it is in the first drum and the second drum usually just has a couple traces.
Every other month
[edit | edit source]As mentioned prior, suck out the sediment at the bottom of the drums. Open each valve, one at a time, for 5-10 seconds. Clean the airstones. Turn off the air pump. Pull the airstones up and out of the drums and tanks. Soak each airstone for a minute or two in muriatic acid (pool filter cleaner) using a plastic container (it etches glass). Eye and skin protection required. Read the label.
Beginning of season
[edit | edit source]Visually inspect all plumbing, electrical wires and the jet pump. Clean or replace the air filter on the air pump. Switch drain valves from the septic to the greywater system.
Turn the power on to the system.
Seed the system with beneficial aerobic bacteria. One bottle of K-87 is enough (see below). When the first drum is at least half full, pour a few tablespoons in. Seed the system again when water reaches the storage tank by pouring the bottle evenly between the four drums. I have been using Roebic Laboratories K-87 soap digester. The local hardware store stocks several Roebic products. When I first started building this system, I called the company up and asked which of their products contain the most aerobic digestive bacteria. K-87 was their answer. Looking at their website now, it looks like they may have added the perfect product to their line, Air-O-Pak.
At the end of the season
[edit | edit source]Switch drain valves to the septic system.
Clean the airstones.
Scrub down the walls of each drum and storage tank with a long-handled brush. Drain drums and storage tank completely. Leave them open until completely dry, then close it all up until next drought season. Shut the power to the system.
Potential Improvements
[edit | edit source]I'm considering adding some bacterial media to the last two drums, creating significantly more surface area for the bacteria to adhere to. Low operation cost and easy maintenance are the requirements for this system. One idea I heard about, that I like and am considering, is to reuse old plastic drink bottles. The bottoms need to be cut off so that the flow of aerated water can pass through. Smaller bottles have more surface are to volume than larger bottles. Throwing the bottles directly in the tanks would make cleaning and maintenance a hassle. I'm wondering if large (around 10-gallon) plastic mesh bags are available, like a larger version of what onions are often sold in at the supermarket. Filling one of those with bottomless plastic bottles and hanging them in the drum from a hook fastened to the lid might work well. It would be easy to remove and easy to replace. And the empty bottles cost nothing.
Water Quality Test
[edit | edit source]I finally got around to having the greywater effluent laboratory tested. I sampled the greywater from the hose that is used to water the landscaping after letting it run for about 5 minutes. I let the water run in order to clear out any stagnant water that may have been sitting in the hose and plumbing.
I chose three tests that would give a pretty good idea of the overall water quality, Biological Oxygen Demand (BOD), Chemical Oxygen Demand (COD), and a Fecal Coliform count. I would like to have had a Total Coliform count, as well as conducting all four tests on the greywater before it went through the system for comparison. But the three tests alone cost $150US, so I compromised. The tests were taken on September 5th, 2007; The end of summer. The well at this property had been dry for a couple of months and potable water was being purchased. So the household was being very conservative with their water use. Generally, being conservative means less dilution of the dirts and soaps going down the drain into the greywater system. So we can assume the water being treated was dirty. I don't know how dirty because I have never tested it; It was probably worse than normal and much worse than what the result show here for the treated water.
Laboratory Results
[edit | edit source]| Analysis | Results |
|---|---|
| BOD5 @ 20 degrees C mg/L (Std. Mthds. 20th ed. 5210) | < 5.0 |
| COD mg/L (HACH 8000) | 32 |
| Fecal Colifom MPN/100ml | 23 |
I apologize for not having done the research to tell you what these numbers mean. If any of you reading this are familiar with water quality testing and could offer your expertise, it would be appreciated.
-
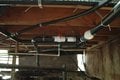 Fig 1: Greywater and sewer valves underneath the house.
 -
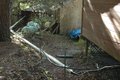 Fig 2: Piping coming from to the greywater system.
 -
 Fig 3:Greywater piping running along fence. (slope is downward, but looks different because fence is steeper than piping)
 -
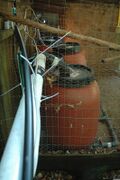 Fig 4:Greywater into first tank.
 -
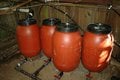 Fig 5:All four, 55 gallon, greywater treatment tanks.
 -
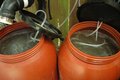 Fig 6:Aeration in first two, 55 gallon, greywater treatment tanks. (Notice most bubbles in the first tank.)
 -
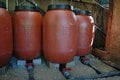 Fig 7:Settling takeoffs for all four, 55 gallon drum, greywater treatment tanks.
 -
 Fig 8:Processed greywater leaving the treatment system and heading towards the 500 gallon, aerated, holding tank.


| Authors | |
|---|---|
| License | CC-BY-SA-3.0 |
| Cite as | GoodSignal, Lonny (2006–2026). "Occidental greywater". Appropedia. Retrieved July 18, 2026. |