
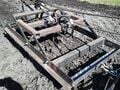
Donkey Drag Cultimulcher

A simple homebuilt drag harrow using modern S-tines and a cage roller. This unit was sized for use by a team of small donkeys. The goal was to efficiently utilize the limited draft power in a unit that was easy to build and maneuverable in small spaces.
My initial impetus was to make a drag that was light enough for my miniature donkeys to handle. The team had experience with ordinary 3' drag harrows, the kind with 8 teeth arranged in 3 rows, with a rotating mechanism that controls the depth. However, the team was unable to penetrate soil very deeply and definitely could not pull up sod or serious weeds. I realized that S-tines properly mounted at the correct angle move the most soil for a given draft, so I built the drag around standard agricultural S-tines (Danish tines). The biggest challenge was to fabricate a horizontal raise/lower mechanism. I think I came up with a fairly robust system that is not too difficult to build. I have tested it in my garden and I am very happy with how well it works. The unit is super-maneuverable and the cage roller really does a job on the clods.

Project Background
[edit | edit source]Drag harrows using a rotating raise lower mechanism do not keep the teeth at an optimum angle for easiest penetration into the ground. Basic cultimulchers using S-tines start at around $4,000 and go up from there. The Donkey Drag can be built for less than $500 and can be sized for your exact situation. Once you have a unit with S-tines, there are many different teeth available and the tines are always held at the correct angle for working the soil.
- easier pull and superior ground penetration over c-tine drags
- inexpensive to build using mild steel and stick welding
- can be sized for available draft power
- maximum depth 5" as built
Project goals
[edit | edit source]A design that is easily built by amateurs, rugged in the field, and effective in weed control, bare fallow cultivating, and seed bed preparation.
Design
[edit | edit source]The prototype unit was built with primarily 1/8" (.120) metal stock with the flat stock and roller ends being 1/4" stock. The s-tine rails are 2" x 3/16" square tubing, which was definitely heavier than required (should have used 2 x 2 .120 stock). Use .120 for all main members. The main frame is 2 x 3 angle iron with 2 x 3 square tubing cross members. The main frame could be built using 2 x 3 angle all around. There are 2 front cross members on the prototype, but only 1 is needed. The prototype is 32" wide and 48" long (overall dimensions).
The unit has 2 28" wide tool bars which are mounted 9" apart on center. The cage roller should be pushed back as clods can get stuck between the roller and rear cross member as built. The prototype has two front cross members but only needs one that is capable of mounting the front casters. A front mounted crumbler gang was considered but discarded once I realized this would make turning very difficult. The rear cage roller was built on a 1" shaft but a 3/4" shaft should be strong enough at this size. Use turned and polished round stock and ordinary agricultural pillow block bearings to fabricate.
Be diligent welding the two frames. If they are warped in any way the raise and lower will be very stiff due to the geometry shifting. The lift arms are 1 1/2" x 1/4" stock drilled 11" on center. All the lift arm pins are 3/8" bolts. I used grade 8 bolts which are nice in that the threads are very robust when forced through misaligned holes in mild steel. The rear lift arms have a 1 1/2" square tubing cross member, which mounts the raise/lower piston and is necessary to keep everything aligned at different heights.
Cage roller
[edit | edit source]The cage roller is fabricated with 8" discs with 8 pieces of 1/2" rebar welded in place. This creates a roller which is not round but octagonal. The effect is that the unit is constantly being raised and lowered by 1/2" or so as it moves forward, shaking the teeth and loosening the soil. This effect would be less pronounced with a larger roller size or more rebars being fitted. The cage roller, being not round, also presents some forward resistance on flat ground and makes it less likely the unit will coast into the draft animals' heels. Nevertheless, care should be taken on sloped or hard-packed surfaces. Also, the octagonal rolling on hard ground shakes the drag and makes a unique and disquieting noise that may spook unseasoned animals. Be prepared to hold back and help your team when hitching for the first time. If possible, work in an enclosed environment or do the first hitch on sand or soft ground.
-
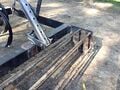 Cage roller is built on a 1" polished round stock mounted on ordinary pillow block bearings. The end pieces are 1/4" stock plasma cut to an 8" round. The rails are 1/2" rebar. Be diligent welding the rebar as the contact area is small and it can be difficult to get good penetration on short welds.
 -
 Depth control piston is 1 1/4" x .120 square stock inside of 1 1/2" x .120 square stock. This is a very tight fit and may suffer in the field from dirt or corrosion. It's necessary to remove the weld bead inside of the 1 1/2" stock to make it fit at all. Experiment with other combinations if you like.
 -
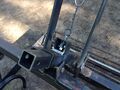 3/8" locking pin with ordinary compression spring. This part of the project required some fine welding, I used both tig and bronze brazing at times. For most builders bronze brazing is the easiest and most reliable.
 -
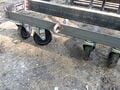 These are ordinary 5" plastic casters that normally are used in an office or warehouse. I wanted a front end that would steer very easily and these seem to fit the bill. Usage in the field will determine how well they work out. But they are inexpensive and readily available.


-
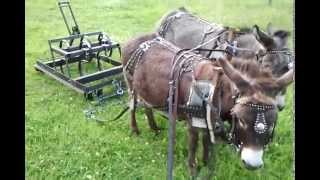
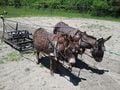 The drag tested well with this team of miniature donkeys. Total team weight is around 5-600 lbs. This size team worked well at a depth of 3" and could pull up moderate size clumps of crab grass and assorted weeds. Note this is a fairly well conditioned and trained team. For working all day in a larger field a bigger team is recommended. The author's plot is around 1/2 acre in size.
 -
 Rear view of early testing with a team of miniature donkeys

Video walk around
[edit | edit source]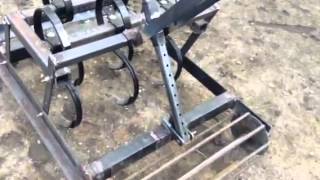
Field Demonstrations
[edit | edit source]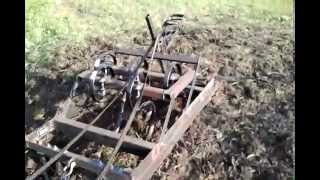
Different Configurations
[edit | edit source]-
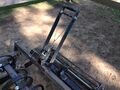
 Here the drag is setup with just 3 tines set close together, in order to maximize tillage depth with limited draft power. In this "ripper mode", our team of miniature donkeys can rip up sod and penetrate 4-5" into tough soil. The drag tracks well enough that it is easy to make repeated passes without the teeth wandering into the previously worked soil.

Costs
[edit | edit source]I spent around $350 on this project using mostly new steel and all new s-tines, bolts, casters, etc. I could have saved a little on shipping with more foresight. I also ordered an extra assortment of teeth for the tines which I may or may not use. So far I am only using the 1" reversible spike teeth.
| item | source | cost |
|---|---|---|
| 5 s-tines with brackets and assorted points | http://www.agrisupply.com/danish-s-tine-shank-standard-duty/p/27804/&sid=&eid=/ | $129.00 |
| 4 swivel casters | http://www.harborfreight.com/4-inch-x-7-8-eighth-inch-rubber-swivel-caster-66361.html | $25.00 |
| assorted .120 steel | http://www.pottingersteel.com/ | $150.00 |
| 1/4" steel discs for cage roller | local shop with plasma cutter | $32.00 |
| 2 1" pillow block bearings | http://www.agrisupply.com/ | $33.00 |
| 1" x 32" polished round stock | local steel supplier | $30.00 |
| TOTAL | $366.00 |
Design improvement
[edit | edit source]My ideas for the next version:
- Move cage roller back at least 2" to prevent clods from getting stuck between the roller and rear cross member.
- Shorten front by 4" or so and remove one of the front cross members.
- Lighten and improve the tool carrier:
- Replace square tubing side rails with 2" x 1/4" bar stock. This will lighten the carrier and give the unit 4 more inches of usable tool space.
- Replace 2" x 3/16" square tubing cross members with 2" x .120" cross members. It really feels like .120 stock will be more than strong enough at this scale. A 4' wide tool carrier might require the 3/16" stock, though.
- The tool carrier could be further widened 1/2" by mounting the lift struts on the outside of the base rails, rather than on the inside.
- Use a 3/4" shaft to build the cage roller rather than 1". Slightly lighter and less expensive, and should be plenty strong at this scale.
- The doubletree can get caught up in the casters during a sharp turn in place. Moving the front casters closer to the middle might alleviate this infrequent problem.
- We have added a travel stop (a piece of 3/4" pipe around the locking pin compression spring) to prevent the locking pin from being pulled out so far that it mis-aligns and will not re-engage when released.
Next Steps
[edit | edit source]More testing and use in the field are required to determine the durability of the design. Try duck feet sweeps, 4" sweeps, etc. If you have your own designs to share, please link them here.
Conclusions
[edit | edit source]A good reference point for building your own custom drag at a fraction of the cost of new, and superior to old c-tine style drags.
Contact details
[edit | edit source]Charlie Tennessen https://www.facebook.com/charlie.tennessen
| Authors | |
|---|---|
| License | CC-BY-SA-3.0 |
| Cite as | AnrchyAcres (2014–2026). "Donkey Drag Cultimulcher". Appropedia. Retrieved July 26, 2026. |