
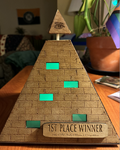
CSU Research Competition 2025 Business, Economics, and Hospitality Management trophy

| Type | |
|---|---|
| Authors | Teophil Labus Vincent Pugliesi Nickolas Roberts |
| Location | Arcata, California, United States |
| Environment | Temprate |
| Status | Deployed |
| Years | |
| Made | Yes |
| Replicated | No |
| Uses | Award |
| Map | |
|---|---|
| Location | Arcata, United States |
| Coordinates |
The "Pyramid of Business & Economics" is a unique trophy designed to celebrate the first-place winner of the 39th annual CSU Student Research Competition. Created in Fall 2024, the trophy aims to offer an engaging alternative to traditional awards like placards or certificates, featuring a visually striking design that people will be excited to display. The pyramid, with an integrated light feature and floating, spinning top, combines innovation and artistry to create a memorable symbol of achievement. This trophy is intended for students and award recipient, highlighting their excellence in a way that stands out.
Background
[edit | edit source]Team Trifecta, consisting of Teophil Labus, Vincent Pugliesi, Nikolaus Roberds, partnered with Cal Poly Humboldt's Office of Research and Sponsored Programs (ORSP) to design a unique trophy for the 39th Annual CSU Student Research Competition. This competition brings together top research projects from across all CSU campuses, where students present their work in various fields each split into undergraduate and graduate competitions. The trophy created by Team Trifecta will be awarded to the first-place winner in the field of Business, Economics, and Hospitality, offering a visually striking alternative to the traditional award. This year marks Cal Poly Humboldt's first time hosting the competition and the Office of Research and Sponsored Programs wanted to make a memorable impact by providing an award that not only symbolizes academic achievement but also captures attention with it innovative design creating a lasting impression on the recipient.
Problem statement
[edit | edit source]The objective of the project is to build a unique and memorable trophy for the 1st-place winners of the 39th annual CSU Student Research competition in the category of Business, Economics, and Hospitality.
Criteria
[edit | edit source]After meeting with the client and having a conversation about the goals of the project team Trifecta came up with a few restrictions for the design. The table bellow will out line the key details of the conversation. The client wanted us to create a trophy that was safe for recipients to receive, not allowing any accessible harm the recipient. There was a need to make the trophy easily portable, as recipient's could come from anywhere across the state of California. There was also a need to keep it within the client and team Trifectas budget of $425.
| Criteria | Description | Weight (1-10) |
|---|---|---|
| Cost | Product must not exceed the budget of $425. | 10 |
| Safety | Product must not actively present any hazards to a persons safety. | 10 |
| Aesthetic | Product must be pleasing to look at and make a person want to display. | 10 |
| Portability | The product is easily carry able and can be transported by plane or car. | 9 |
Prototyping
[edit | edit source]Trifecta's testing process utilized two prototypes to perfect the final design of the Pyramid of Business and Economics. The prototype in the first picture is made of cardboard, paper, and glue. The top is held up by a plastic wire, and the drawings are all hand-drawn. The title card was written and glued using a piece of yellow construction paper. The size of this prototype was 1-foot by 1-foot by 1-foot which made Trifecta realize that the size would be too big for implementation. Due to the wobbly nature of the tip of the pyramid with the plastic wire, the final design was made to have a much more sturdy spindle.
The second prototype made by trifecta, as shown in the second picture, is made using a 3D printer with PLA filament. The dimensions for this prototype were created to be 9-inch by 9-inch in correlation with the final design The prototype was created to test the functionality of our magnetically floating top concept. This provided extremely valuable feedback as to how the floating top was going to have to be oriented and held up and what restraints were needed to keep it stable.
-
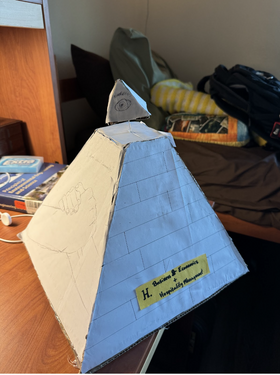 1x1x1 foot Cardboard Trophy Prototype. "Community Side" and title card shown.
 -
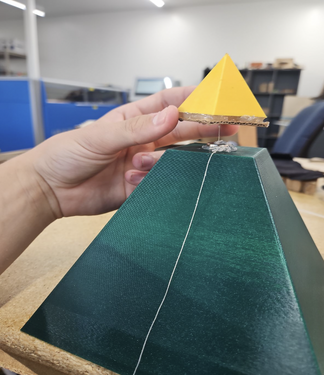 7x7x7 inches PLA Magnetic String Trophy Prototype


Final product
[edit | edit source]-
 "Brick" side with title card and green light shining through
 -
 "Brick" side with lights off
 -
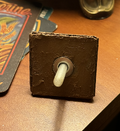 Bottom of the "Eye of Providence" with spindle and Magnet attached
 -
 Business and Economics trophy built with lights on. White light shining through "brick" side and "Sustainability" side.
 -
 Tittle card for Business and Economics trophy


Our final product features a 9in x 9in x 9in pyramid with a magnetically suspended 1.5in x 1.5in x 1.5in separated top. The bottom part has two elliptical holes cut on the side of the base plate for handles and one circular hole in the center for the insertion of the light. The pyramid features brick patterns on two sides with random bricks cut out, a pattern of two hands holding the recycle symbol cut out on one side, and a pattern of a handshake cut out on one side. There is a light inserted into the bottom of the pyramid to illuminate the cutouts through frosted polycarbonate to disperse the light.
The top piece consists of four plywood triangles shaped together in a pyramid with the eye providence laser etched into all four sides. the top pyramid is suspended using magnets and is constrained by a spindle which allows it to depress against the magnets and spin freely. The spindle and top can be detached for more easy transport of the trophy.
The Pyramid of Business and Economics symbolizes the core values of business and economics, focusing on community and sustainability. The design features two prominent sides: one representing community with a handshake surrounded by sun-rays, and the other representing sustainability with hands and a recycling symbol. The eye at the top of the pyramid represents the eye of providence which ties back into economics. The use of a light in the base highlights the trophy’s importance, emphasizing its role as a symbol of achievement and recognition for the recipient.
Construction
[edit | edit source]Materials List
[edit | edit source]- 3D printer PLA
- 3/8 in Plywood
- Tan Silicone Caulk
- Enamel Based Frosting Spray
- Krazy Super Glue
- Golden Oak Wood Stain
- Polycarbonate (plexiglass)
- Neodymium Magnets
- Amazon Basic Lights
- Protective Clear Stain
Tools List
[edit | edit source]- Laser Printer
- Belt Sander
- Routing Table
- Dremel
- 3D Printer
- Inkscape
- Fusion 360
- Tap and Die set for threads
Construction Process
[edit | edit source]
Using a software called Inkscape images and designs can be modified, to better suited for the laser cutter. Depending on what laser cuter is being used it might want the images to be in a particular format. In Trifectas case the printer could only vector cut images with red lines. Trifecta had the laser cuter etch images with black lines.
Instructional Video Here
[edit | edit source]
Once the laser cutter cut out the needed designs on to 3/4 inch plywood, Trifecta routed the edges of the bottom parts of the trophy to be at a 45 degree angle. For smaller cuts such as the top of the trophy, a round sanding machine was used to shave the edges at a 45 degree angle.

Taking the bottom sides of the trophy with cut out images. Trifecta added gorrilla to the wood and then placed plexiglass atop the plywood. This plexiglass was sprayed with a frosted spray. When spray the plexiglass individuals wore proper protection and sprayed form 10 inches away from the applied surface.

The sides of the trophy were painted with golden oak stain because the stain was light enough for the laser etched design to still show through. The stain was applied in one coat and wiped with a towel right after application.

The base of the trophy was created using Fusion. The edges of the base were made at a 15 degree angle. The base was printed in two separate halves, one half having pegs and the other having holes for the pegs to fit into. The base was printed with room for the Amazon Basics light to fit into the center and hole for grip
The spindle was created through Fusion. It was created in two separate pieces a top base and a pin to fit into the bottom. The top part of the spindle acted as the base for the top part of the "Eye of Providence" so its edges were created with a 15 degree angle. The top had room for a magnet to be placed inside. The pin was created in the shape of a nail and would run through the top base. After being printed the pin was threaded with a dice threader.

The 45 degree edges were place together and then taped. After all four coroners were tapped individual coroners were untapped and then supper-glued. After being supper glued the edge was tightly tapped back together. Once all the sides were glued and tapped, it was left to dry for around one hour. After drying the tape was removed. Tan Silicone Caulking was applied on the inside edges of the trophy to ensure there were no gaps.
Two 45 degree edges were super glued together and held tightly for 5 minutes. The two that were glue were then super glued to another set of two to create all four sides and let to dry for 1 hour. After drying tan silicone caulking was applied to the inside edges of the tip to seal any gaps or blemishes.

When connecting the two halves of the base the conjoining edges and Amazon Basics Light were sanded. Super glue was then added to the sanded areas and the light and two halves were pushed together. The base was left to dry for 1 hour. After drying the top edges of the base were sanded. Superglue was applied and the base was added to the bottom of the trophy. Laser cut circles about 3 centimeters wide are then superglued to the bottom of the base to lift the trophy.

For the top of the bottom of the trophy the a hole was drilled and then threaded using a dice threader. Inside the bottom of the trophy three neodymium magnets were placed to the top over where the whole was thread. For the tip of the trophy, the spindle was added in with superglue and caulking to hide any holes. The spindle and tip of the trophy were then screwed into the hole of the bottom part of the trophy.

The same steps were employed to create the title card as in step one of the process. After being printed the title card was placed using super glue on the "Brick" side of the trophy.
When all the components of the trophy are done being place together. A protective clear stain is applied to the outs side of the trophy to make sure the wood last.
Video instructions
[edit | edit source]Bill of materials
[edit | edit source]| Item | Amount | Cost per unit | Total |
|---|---|---|---|
| 3D printer PLA filament — 2.2lb spool, silver | .75 | USD 25.00 | USD 18.75 |
| 3/8 in plywood — 2' x 4' sheet | 1 | USD 40.00 | USD 40.00 |
| silicone caulking — standard size tube | .5 | USD 6.00 | USD 3.00 |
| enamel based frosting spray — small spray can | 1 | USD 10.00 | USD 10.00 |
| super glue — small bottle with brush | 2 | USD 5.00 | USD 10.00 |
| wood stain — small tin | 1 | USD 15.00 | USD 15.00 |
| polycarbonate — 2' x 4' sheet | .5 | USD 54.00 | USD 27.00 |
| neodymium magnets — 15mm diameter 10 pack | 1 | USD 4.00 | USD 4.00 |
| light — small LED with remote | 2 | USD 5.00 | USD 10.00 |
| Grand total | USD 137.75EUR 118.47 <br />GBP 100.56 <br />CAD 170.81 <br />MXN 2,872.09 <br />INR 10,310.59 <br /> | ||
Operation
[edit | edit source]To change the Business and Economic trophies batteries you must access the bottom base of the trophy. You may chose to do this by laying the trophy on its side. Once accessed you can unscrew the bottom of the light fixture. When the light fixture is opened the old AAA batteries can be pulled out and replaced with new ones. Ensure the correct polarity. When finished reapply the screw on bottom for the light, and text batteries with remote.
When dusting use a soft rag or feather duster. You can dust from top to the bottom of the Business and Economics trophy making sure to only add a light amount of pressure.

With the remote that comes with the Business and Economics trophy. You can press the on button to turn on the light. Make sure that you are at least 5 feet away when turning it on. Once the light is on, you have the option to change the color using the red (r), blue (b) and green (g) buttons. There is also a fade button to alternate colors and you can save a color by pressing the save button. If you want to return to the white light you can press the white button. To set a timer for the light you can either press the 10 minute, 30 minute, 60 minute, and 120 minute button for a desired time.
Maintenance
[edit | edit source]The maintenance cost will be very low and will only include two things. The first piece of maintenance will be replacing the batteries in the light when they go out, with an estimated cost of $3-6/year. The second piece of maintenance is dusting the trophy twice per year, which would take 5 minutes per dusting.
Conclusion
[edit | edit source]Testing results
[edit | edit source]For Durability, the trophy remained intact with no significant damage after handling and movement. The 3⁄8 inch plywood and plexiglass proved resilient under pressure. For portability, the trophy met the transportability requirement, fitting comfortably within the one-foot by one-foot size constraint. It was successfully and comfortably transported by both car and person without damage. For Aesthetics, the design was visually appealing. The laser cut detailing and stained finish gives the trophy a professional, polished look. The symbols of community and sustainability were well represented. For the Light Functionality, the remote controlled light worked as expected, with all color and brightness settings functioning smoothly.
Discussion
[edit | edit source]The tests showed that the Pyramid of Business and Economics met most of the criteria effectively.
Lessons learned
[edit | edit source]If Trifecta was given the opportunity to make the trophy for Business and Economics again, there would be some structural aspects that would be improved, such as adding braces and supports that didn't block the lights from the light dispersion plate. There would need to be more research done in creating better structural support as well as something to conjoin the sides more tightly. It might also be nice to look into less delicate magnets, some of the magnets cracked in the building process. We would also change the angles to be more easy to cut for the trophy and join together, backing a 15 degree angel to conjoin with a 45 degree angle was challenging.
Troubleshooting
[edit | edit source]| Problem | Suggestion |
|---|---|
| Does not turn on | Make sure the remote and light have batteries |
| Piece falls off or breaks | Super glue can be used to reattach any components |
| Top component does not depress or spin freely | make sure magnets are still present and there is no dust or blockages disrupting the movement of the spindle |
| Traveling with trophy | the top pyramid may be removed by unscrewing the spindle from the base to mitigate the risk of it breaking off during travel |
Team
[edit | edit source]Introduce team and semester in the following format:
- Teophil Labus
- Nikolaus Roberds
- Vincent Pugliesi
References
[edit | edit source]
| Authors | Teophil Labus, Nikolaus Roberds, Vincent Pugliesi |
|---|---|
| License | CC-BY-SA-4.0 |
| Organizations | Cal Poly Humboldt |
| Cite as | Teophil Labus, Nikolaus Roberds, Vincent Pugliesi (2024). "CSU Research Competition 2025 Business, Economics, and Hospitality Management trophy". Appropedia. Retrieved July 13, 2026. |