
Appendix I: Important Recipes
Lime is caustic and will burn, vinegar is recommended to be kept on hand as a chemical counter-agent for first-aid.[1] Be sure to wear appropriate protective gear such as chemical-resistant cover-alls, gloves, and goggles as well.
Lime Putty
Following package directions, it is necessary to slake the lime in a large, clean, heat and chemical resistant container. I used a new 35 gallon metal trash bin. Unless using high-magnesium quicklime, it is important to add water first then slowly add the lime powder.[2] You will notice chemical boiling and a rise in temperature as the ingredients begin to interact, potentially explosively, which is why you add the water slowly to draw out the reaction. I wore my chem-resistant coveralls, gloves, a respirator and goggles during this process. Be sure to stir well so no clumps of lime powder remain untouched and so chemically un-reacted to the water. Eventually (follow directions according to lime-type) the mixture attains a putty-like consistency similar to thin oatmeal. When well mixed make sure to leave a few inches of water on top to keep it from dehydrating,[3] then leave to slake for as long as you can.
Wheat-Paste
Boil three quarts of water in a six-quart pot. Meanwhile, in another container, mix about 3 cups high gluten organic flour with cold water. Stir until the lumps are gone and the consistency of pancake batter is reached. Slowly add this to the boiling water, stirring carefully and maintaining a boil (if you lose the boil, just cook longer). The mix is done when it becomes translucent, though not completely see-through;[4] from my experience, if you can maintain the boil you are likely to use just a little more than two cups of the batter. Wheat-paste keeps is the fridge overnight.[5]
Clay Slip
Mix tested and screened clay with water until the thickness of heavy-cream is achieved while also mixxing in 1/2 cup wheat-paste for every five gallons of slip,[6]
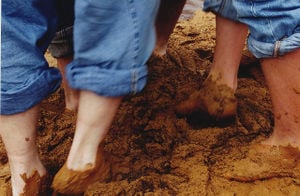
(I erred a tablespoon or so heavy on the wheat-paste).
Cob
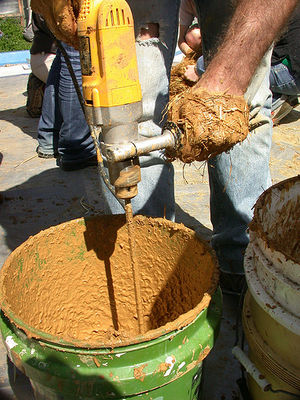
Make Clay Slip heavier than usual, like a thick mud. Now smother over straw until you have muddy handfuls of straw.[7] Voila- cob.
Lime-Wash
This is made by mixing 2 parts lime putty to 1 1/2 parts water. Mix this well, it should be about as thick as whole milk. Pigments must be first added to water, then mixed into the lime-wash. Be sure to mix the desired pigment fully into the water to avoid clumping of pigment in the wash,.[8] After all are mixed, I found it wise to run all through a strainer like available through a paint store in order to get out any undissolved clumps of putty or pigment, though the paint stainer was a little too thin, cheesecloth worked well.
Conversion of Final Decision Plaster Recipes to 1 gallon ratios
[see Appendix II: Experiments, for more on Final Decision Plaster Recipes]
Recipe for plaster # 2, the Lime Plaster finalist@ 1 gal ratio
| 3/4 cup lime putty x 16 cups (1 gal) = 48/4 = | 12 cups lime putty |
| 2 1/4 cups sand = 9/4 cups x 16 = 144/4 = | 36 cups sand |
| 1/2 volume straw | |
| H2O to hydrate to plaster consistency |
36 cups sand+12 cups lime putty=48 cups plaster / 16 cups= 3gal plaster before straw.
So this is mixable in a give 5gal bucket. Add lime-putty and sand slowly in order to mix thoroughly, then add straw to half volume and mix again. Finally, add the H20 to hydrate to workable consistency, possibly no water at all.
Recipe for plaster # 4.3, the Manure Plaster finalist@ 1 gal ratio
| 3/8 cup clay x 16 = 48/8 = | 6 cups clay |
| 3/8 cup manure x 16 = 48/8= | 6 cups manure |
| 3/8 cup lime putty x 16 = 48/8= | 6 cups lime-putty |
| 3/8 cups straw x 16 = 48/8= | 6 cups straw |
| 3/4 cup sand x 16 = 48/4 = | 12 cups sand |
| 1/8 cup wheat-paste x 16 = 16/8 = | 2 cups wheat paste |
| H2O to hydrate to plaster consistency |
6 cups clay + 6 cups manure + 6 cups lime-putty + 6 cups straw + 12 cups sand + 2 cups wheat-paste = 38 cups plaster / 16 cups = 2.11gal plaster total.
So this is also mixable in a 5gal bucket. Add clay, manure, lime-putty and wheat-paste to mix wet ingredients. Next mix in sand and then the straw. Finally, add the H20 to hydrate to workable consistency, possibly no water at all.
Recipe for plaster 5.7, the plaster I did not use but tested well, the Earth-Lime finalist@ 1 gal ratio
| 3/4 cup clay x 16 = 48/4 = | 12 cups clay |
| 3/4 cup lime putty x 16 = 48/4 = | 12 cups lime-putty |
| 1 1/4 cups sand = 5/4 cups x 16 = 80/4 = | 20 cups sand |
| 3/4 cup straw x 16 = 48/4 = | 12 cups straw |
| 1/8 cup wheat-paste x 16 = 16/8 = | 2 cups wheat paste |
| H2O to hydrate to plaster consistency |
12 cups clay + 12 cups lime-putty + 20 cups sand + 12 cups straw + 2 cups wheat-paste = 48 cups plaster / 16 = 3gal plaster total.
This mix is also doable in a 5gal. Add the clay, lime-putty, and wheat-paste first to mix the wet ingredients, then mix in the sand. Finally add the straw, and add the H20 to hydrate to workable consistency, possibly no water at all.
Recipe for School Stucco Pink Lime-Wash@ 1 gal
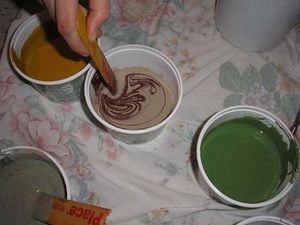
First follow directions to make Lime Putty, then Lime Wash [above], being extra careful the mineral pigment is completely mixed with the water you use before it combines with the Putty to make the Wash.
| 2 cups lime-wash x 8= | 1 gallon lime-wash |
| 1/8 cup yellow ochre x 8= | 1 cup yellow ochre |
| 1 tablespoon red iron oxide x 8= | 1/2 cup red iron oxide |
So actually this makes 1 gallon and 1 1/2 half cups School Stucco Pink Lime Wash, to be precise.
Appendix II: Experiments[edit | edit source]
[see part 1: Finding Plaster and Paint Recipes, for experimental methodology]
Discovery Test: Recipes, Hypothesis, Results, Analysis & Revised Hypothesis[edit | edit source]
Discovery Recipes
[When I use a Pinch as a measurement, I mean a two-finger and thumb dollop, probably about a heaping tablespoon. I describe straw amounts roughly because straw doesn't fill out a volume measurement like my other ingredients. Straw can be packed into a volume tightly or loosely; unscientific as it is, I opted for a loose pack somewhere between the two extremes. Measuring by weight would have been more precise but I didn't think a job site was a good place for a precision scale.]
[Lime is caustic and will burn, vinegar is recommended to be kept on hand as a chemical counter-agent for first-aid.[9] Be sure to wear appropriate protective gear such as chemical-resistant cover-alls, gloves, and goggles as well.]
Recipe 1. Light Lime Plaster: 1 cup lime putty, 2 cups sand, 1 pinch wheat paste, 1 pinch clay, add 1/2 volume of mix of straw, add water as needed after straw to regain wet plaster consistency
Recipe 2. Lime Plaster: Recipe 1 minus wheat paste and clay, add water as needed.
Recipe 3. Manure Plaster: 1 cup clay, 1 cup sand, 1 cup manure, 1 pinch wheat paste, add water as needed.
Recipe 4. Light Manure Plaster: 1 cup clay, 1 cup sand, 1/2 cup manure, roughly 1/2 cup straw, 1 pinch wheat-paste, add water as needed.
Recipe 5. Earth-Lime Plaster: 1 cup clay, 1 cup sand, 1 cup lime putty, roughly 1 cup straw, add water as needed.
Hypothesis
Hypothesis 1: Recipe 2 (Lime Plaster) will perform best.
Hypothesis 2: Recipe 5 (Earth-Lime) will perform worst.
Discovery Test Results
Brush Test Results
Least damage to most: Recipe 2 (Lime)*, Recipe 1 (Light Lime), Recipe 4 (Light Manure), Recipe 5 (Earth-Lime), Recipe 3 (Manure).
Analysis:
- Recipe 1 (Light Lime) held up better than all but Recipe 2 (Lime), leading one to think more lime is better.
- Recipe 3 (Manure) held up terribly and was cut through like butter, not worth bothering with.
- Recipe 5 (Earth-Lime) almost tied for third place with Recipe 4 (Light Manure), defying Hypothesis 2.
- Recipe 2 (Lime) was barely damaged at all, inspiring a retest. *Still undamaged after retest. Confirms Hypothesis 1.
First Water Test (undamaged area) Results
Least damage to most: Recipe 2 (Lime), Recipe 1 (Light Lime), Recipe 4 (Light Manure) & Recipe 5 (Earth-Lime) tied, Recipe 3 (Manure).
Analysis:
- Recipe 2 (Lime) was clearly undamaged after both tests.
- Recipe 1 (Light Lime) had moderate damage, mostly by brush not water, taken with the point above again we see that more lime is better at these levels.
- The outer rim of Recipe 4 (Light Manure) held up to brush & spray, but the impact area of center point of spray suffered 100% damage clear through the plaster.
- The outer rim of Recipe 5 (Earth-Lime) was damaged clear through by brush; center held up well to both water and brush. The edge prove particularly susceptible to friction ripping the straw up, but internally we can see the soundness of this plaster for more normal wear.
- Recipe 4 (Light Manure) vs Recipe 5 (Earth-Lime): Recipe 4 held up good to friction but horribly to water pressure; Recipe 5 was prone to friction damage on edges but good otherwise.
- Recipe 3 (Manure) was heavily damaged by brush, but held up OK to water (demonstrating, I believe, the water-proofing qualities of the enzymes in manure; there is not enough manure in the Light Manure recipe to get this effect).
Second Water Test (aimed at brush damage) Results
Least damage to most- Recipe 2 (Lime), Recipe 1 (Light Lime), Recipe 5 (Earth-Lime), Recipe 4 (Light Manure), Recipe 3 (Manure)
Analysis:
- Recipe 5 (Earth-Lime) clearly edged out both manure mixes, meaning manure is a poor base at these ratios, possibly better as an amendment.
- Recipe 2 (Lime), the mix heaviest in lime, had the least damage, supporting Hypothesis 1.
Overall Analysis
Point 1: The lime made an excellent plaster, the more the merrier, Hypothesis 1 confirmed.
Point 2: The fiber content of manure alone isn't enough for a stable plaster; the straw clearly made the difference in Recipe 4 (Light Manure) outperforming Recipe 3 (Manure), and showed strong anti-abrasive qualities in the brush test in Recipe 1 (Light Lime), Recipe 4 (Light Manure), and Recipe 5 (Earth-Lime). Therefore I will make no more manure plasters without added straw.
Point 3: The only recipe without wheat-paste, Recipe 2 (Lime), was the best. Not sure if this is important given limes' dominance here, but noted.
Revised Hypothesis
H1- Per Point 1, a revised Earth-Lime recipe without lime will fail.
H2- Per point 1, a revised Light Manure recipe with lime added might allow it to compete with the Recipe 5 (Earth-Lime), or even get it back into comparable range of the lime plasters.
H3- Per point 3, any recipe might improve with lime used instead of wheat paste as a binder.
Decision Tests: Thoughts, Revised Recipes, Results, Analysis, Conclusion
Thoughts from Discovery Tests
Since Recipe 2 (Lime) clearly won, the decision round should try to find a manure or earth-lime plaster mix with lower embedded energy costs that will compare. The Lime Plaster and the Earth-Lime plaster should be altered in ratios to find the best mix. I won't give up on manure, but add lime to create variations of Recipe 4 (Light Manure) to attempt to find a mix that beats out the Earth-Lime recipe. For the manure recipes, my gut tells me to throw in some borax as an anti-mold/fungal/insect amendment, but that this won't be necessary in the recipes with lime.
Revised Recipe 2 (Lime Plaster) Recipes
2.) 3/4 cup lime putty, 2 1/4 cup sand, 1/2 volume straw, water to hydrate to a wet plaster consistency;
2.1) (add clay, reduce lime) 1/2 cup lime putty, 1/4 cup clay, 2 1/4 cup sand, 1/2 volume straw, H2O to hydrate;
2.2) (add manure, reduce lime) 1/2 cup lime putty, 1/4 cup manure, 2 1/4 cup sand, 1/2 volume straw, H2O to hydrate;
2.3) (add wheat-paste) Follow recipe 2, add 1/8 cup wheat-paste;
2.4) (increase straw) Follow recipe 2 but instead of 1/2 straw by volume add 3/4 straw by volume;
2.5) (reduce straw) Follow recipe 2 but instead of 1/2 straw by volume add only 1/4 straw by volume;
2.6) (increase sand) 3/4 cup lime putty, 2 1/2 cup sand, 1/2 volume straw, H2O to hydrate;
2.7) (reduce sand) 3/4 cup lime putty, 2 cup sand, 1/2 volume straw, H20 to hydrate;
2.8) (increase straw and sand, add wheat-paste) 3/4 cup lime putty, 2 1/2 cup sand, 1/8 cup wheat-paste, 3/4 volume straw, H20 to hydrate;
2.9) (reduce straw and sand) 3/4 cup lime putty, 2 cup sand, 1/4 volume straw, H20 to hydrate.
Decision Test Results for Lime Plasters
Results After Brush Test
Least Damaged to Worst- 2; 2.9; 2.5; 2.7; 2.8; 2.1 & 2.6 tied; 2.3 & 2.4 tied; 2.2.
Results After 1st Water Test
All undamaged (!), except 2.1 & 2.6 are barely damaged, 2.2 significantly damaged in corner that wasn't blasted, got wet though where a crack appeared when the plaster first dried out, this corner broke off.
Analysis: 2.2 was worst in both tests so will eliminate from second round of water tests, 2.1 and 2.6 also eliminated because tied at 3rd worst in brush test and 2nd worst in first water test.
Results After 2nd Water Test
2 is still barely damaged at all, followed by 2.5 then 2.9 as close second and third.
Analysis: 2.5 and 2.9 both have more lime than 2 so represent a higher embedded energy cost, I would think not to use them, going for 2 the best overall, however, 2.9 was second place after the brush test, and it came out smoother on the surface to look and touch so I might use this recipe as inspiration for a finish/top coat.
Revised Manure Plaster Recipes
4.) 3/4 cup clay, 3/4 cup sand, 3/8 cup manure, roughly 3/8 cup straw, 1 pinch wheat-paste, 1 pinch borax, water to hydrate to a wet plaster consistency;
4.1) (add lime, remove borax) 3/8 cup clay, 1/4 cup manure, 3/8 cup lime putty, roughly 3/8 cup straw, 3/4 cup sand, 1 pinch wheat-paste, H20 to hydrate;
4.2) (add lime, remove wheat-paste & borax) [checks H3] Follow recipe 4.1, but do not add wheat-paste;
4.3) (increase manure to clay, add lime, remove borax) 3/8 cup clay, 3/8 cup manure, 3/8 cup lime putty, roughly 3/8 cup straw, 3/4 cup sand, 1 pinch wheat-paste, H20 to hydrate;
4.4) (increase sand & straw, add lime, remove borax) [this recipe adds dry material and is tested as a possible Scratch/Key (1st) coat] 3/8 cup clay, 1/4 cup manure, 3/8 cup lime putty, roughly 1/2 cup straw, 7/8 cup sand, 1 pinch wheat-paste, H20 to hydrate;
4.5) (increase straw & manure, add lime, no borax) [adds 1/8 cup dry material, another possible Scratch coat] 3/8 cup clay, 3/8 cup manure, 3/8 cup lime putty, roughly 3/4 cup sand, 1 pinch wheat-paste, H20 to hydrate;
4.6) (increase sand, straw & manure) 3/8 cup clay, 3/8 cup manure, 3/8 cup lime putty, 7/8 cup sand, roughly 1/2 cup straw, 1 pinch wheat-paste, H20 to hydrate, [another possible Scratch coat].
Decision Test Results for Manure Plasters
Results After Brush Test
Least Damaged to Worst- 4.5; 4.3; 4.4; 4.6; 4.1; 4.2; 4
Results After 1st Water Test
- 1; 4,3; 4.4; 4.5 all undamaged by water, 4.6 slightly damaged followed closely by 4.2, 4 very damaged.
Analysis: 4 came out worse in both tests so it was easy to eliminate, because it contained no lime it well supports H2. 4.2 & 4.6 were the only others to show damage from the water, as well as fall below the bottom half on the brush test so these too were eliminated from round 2 of the water test.
Results After 2nd Water Test
- 5 was badly damaged so is easily eliminated, 4.4, 4.5, & 4.6 showed minor damage whereas 4.3 remained the only undamaged manure plaster and with its' second place in the brush tests shows itself to be the best overall manure plaster.
Analysis: The possible scratch coats did not perform well enough to warrant use.
Revised Earth-lime Plaster Recipes
5.) 3/4 cup clay, 3/4 cup sand, 3/4 cup lime putty, roughly 3/4 cup straw, 1 pinch wheat-paste, water to hydrate to a wet plaster consistency;
5.*) (no lime to check H1) 1 cup clay, 3/4 cup sand, roughly 3/4 cup straw, 1/2 cup wheat-paste, 1/8 cup borax, H20 to hydrate;
5.1) (no wheat-paste, check H3) Follow recipe 5 but add no wheat-paste;
5.2 (increase clay to lime ratio) 7/8 cup clay, 3/4 cup sand, 5/8 cup lime putty, roughly 3/4 cup straw, 1 pinch wheat-paste, H20 to hydrate;
5.3) (increase lime to clay ratio) 5/8 cup clay, 3/4 cup sand, 7/8 cup lime putty, roughly 3/4 cup straw, 1 pinch wheat-paste, H20 to hydrate;
5.4) (clay-manure instead of clay) 3/8 cup clay, 3/8 cup manure, 3/4 cup lime putty, 3/4 cup sand, roughly 3/4 cup straw, 1 pinch wheat-paste, H20 to hydrate;
5.5) (clay, manure & lime in even proportions) 1/2 cup clay, 1/2 cup manure, 1/2 cup lime putty, 3/4 cup sand, roughly 3/4 cup straw, 1 pinch wheat-paste, H20 to hydrate;
5.6) (increase straw) 3/4 cup clay, 3/4 cup sand, 3/4 cup lime putty, roughly 1 cup straw, 1 pinch wheat-paste, H20 to hydrate;
5.7) (increase sand) 3/4 cup clay, 3/4 cup lime putty, 1 1/4 cup sand, roughly 3/4 cup straw, 1 pinch wheat-paste, H20 to hydrate.
Decision Test Results for Earth-lime Plasters
Results After Brush Test
Least Damaged to Worst- 5.7; 5.1; 5.2; 5 & 5.4 tied; 5.6; 5.8; 5.3; 5.5; 5*
Analysis: 5* broke apart completely so strongly supports H1; 5.1 in second place lends credible support to H3.
Results After 1st Water Test
5* is significantly damaged, 5.2 & 5.8 show slight damage, all others undamaged.
Analysis: 5* is worse on both tests so H1 is still strongly supported and 5* will be eliminated from the 2nd round. 5.8 also warrants elimination as it tied for 2nd worst on the water test and came in the bottom third with the brush. 5.1 is doing well, still supporting H3.
Results After 2nd Water Test
All remain fairly undamaged.
Analysis:
- 7, as clear winner in the brush test wins this tight round.
Overall Decision Test Results
Mix # 2, the rawest lime recipe came out best overall. 4.3 and 5.7 took their respective categories but are too close in final appearance to call a winner between them. Further testing was warranted so I tried at first just scratching the still wet surfaces with my fingernail- inconclusive. I next decided to try the wire brush again over the now wet previous brush marks, after 10 strokes no difference, after 15 4.3 went all the way through, after 19 5.7 went through, after 20 strokes 4.3 looked worse than 5.7. My decision came down to 5.7 being best in these tie-breaker tests.
Final Decision Test Results: Best to worst- 2, 5.7, 4.3
Overall Analysis
Plaster 2, my original lime plaster was best overall.
- 7 beat out 4.3 but just barely. 4.3 uses only half as much lime for a much lower embedded energy cost. Therefore I chose 4.3 to go up for the wall. I felt the difference was slight enough that I could trade durability, my top criteria, for lower embedded energy- very valuable to CCAT in particular, and Appropriate Technology in general. I figured my tests, while relevant and revealing, were not after all really what Arcata weather would throw at the wall, and there was a chance that things would come out very differently under real conditions; this thought justified to me making a go with the lower energy alternative: the 4.3 manure mix.
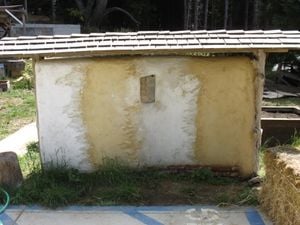
Plasters chosen for CCAT Wall: 2 (Lime Plaster) and 4.3 (Revised Manure Plaster)
Overall Experimental Conclusion
I was somewhat doubtful about my tests coming in because being a non-engineer, I don't know much anything of the physics and mechanics involved. However, as I proceeded it became obvious that my results were finding relevant differences between the competing plasters performance. The framework of scientific methodology: hypothesis, tests, conclusions, again, and etc., provided a clear way to advance my observations of the tests into clear improvements in the plaster recipes. Given that research and history demonstrate such technologies to work, and I've now seen it myself, I now feel quite confident to build with these materials. I'd had my hands in them and liked how they felt. These experimental procedures gave me the confidence that my final formulas didn't just feel like plaster, but acted like it too.
See also[edit | edit source]
- CCAT Natural Exterior Wall Plaster and Paint, part 1
- CCAT Natural Exterior Wall Plaster and Paint, part 2
References[edit | edit source]
Thanks to Pennelys Goodshield of Sustainable Nations for invaluable training and advice, as well as to, Myles Danforth and Lonny Grafman.
- ↑ Mallinckrodt Baker, Inc. (2009, September 23). Material Safety Data Sheet, Calcium Oxide. (Environmental Health & Safety, Producer) Retrieved December 19, 2010, from [1]. Technical specifications of lime from a chemical / industrial standpoint.
- ↑ Guelberth, Cedar Rose & Dan Chiras. The Natural Plaster Book: Earthen, Lime, and Gypsum Plasters for Natural Homes. Gabriola Island, BC, Canada: New Society Publishers, 2003. Of all the books I read through, only one did I find myself drawn back to over and again.... This book seemed to have, compared to others, the most agreed upon and middle-of-the-road recipes; I derived all my basic formulas from it and barely scratched the surface.
- ↑ Goodshield, P. (2009). Workshop Director, Sustainable Nations, (http://sustainablenations.org/). (K. S. Perry, Interviewer) Arcata, CA. First I took I work-shop with Ms. Goodshield on natural plaster and lime-wash. Then I was able to interview her several times and she stopped by the site to consult once.
- ↑ Goodshield, P. (2009). Workshop Director, Sustainable Nations, (http://sustainablenations.org/). (K. S. Perry, Interviewer) Arcata, CA.
- ↑ Guelberth, Cedar Rose & Dan Chiras. The Natural Plaster Book: Earthen, Lime, and Gypsum Plasters for Natural Homes. Gabriola Island, BC, Canada: New Society Publishers, 2003.
- ↑ Goodshield, P. (2009). Workshop Director, Sustainable Nations, (http://sustainablenations.org/). (K. S. Perry, Interviewer) Arcata, CA.
- ↑ Danforth, Myles. (2009, Spring). (K. Scott Perry,Interviewer) Arcata, CA. Myles was knowledgeable and had plenty of helpful advice.
- ↑ Ceramics Department Faculty.(2006, Spring Semester.)(K. Scott Perry Interviewer.) Cal Poly Humboldt, Arcata, CA. These folks helped me get my bearings with the mineral pigments, I made several trips to see them.
- ↑ Mallinckrodt Baker, Inc. (2009, September 23). Material Safety Data Sheet, Calcium Oxide. (Environmental Health & Safety, Producer) Retrieved December 19, 2010, from [2].