
CASA Student Farm seed vault

| Type | Seed Storage |
|---|---|
| Authors | Noah Mannion RubyM Luhanae Christian Arenas |
| Location | Arcata, California, United States |
| Environment | Farm Land |
| Status | In progress |
| Years | 2026 |
| Made | Yes |
| Replicated | No |
| Uses | education, science |
| Map | |
|---|---|
| Location | Arcata, California, United States |
| Coordinates |
Our seed vault is a project we built in our Design Engineering 205 class at Cal Poly Humboldt for the CASA farm. It is a simple acrylic box designed to store seeds so they can be kept safe and used later if needed. We created it to help protect seeds in case of emergencies and to support the farm’s future. It is meant for students and staff who work at the CASA farm and need a reliable way to store seeds.
Background
[edit | edit source]The background of our project in Engineering 205 is centered around supporting the CASA Student Farm at Cal Poly Humboldt. Our client, Renee Byrd, who manages the farm, expressed a need for a reliable way to store seeds long-term. In response, our team is designing and building a seed storage container made out of acrylic. The container will be divided into sections to help organize jars of different types of seeds.
The purpose of this project is to create a durable, sealed storage system that protects seeds and preserves them for future use. This is important because it allows the farm to maintain a supply of seeds in case they are needed later, supporting sustainability and long-term planning.
This project is being completed during the Spring 2026 semester as part of our Engineering 205 coursework. Once finished, the seed storage containers will be placed in the back area of the CASA student farm at Cal Poly Humboldt. They are intended to remain there long-term as a secure and organized seed vault for the farm.
Literature Review
[edit | edit source]The Svalbard global seed vault[1], invented by the CropTrust organization, was built for the purpose of safekeeping seeds so they aren't at risk of going extinct from natural causes, or man-made ones. It is made to secure the foundation of food supply and variety. The Bay Builders seed vault needs to be put on the new CASA farm, the dimensions being an open box of 2'x2'x2'. The budget for this project is $250 minimum, but with personal contributions can rise to a maximum of $550.
The Svalbard Seed vault works by having an internal temperature of -18°C (-0.4°F), and by using permafrost and thick rock, it ensures that the seeds stay perfectly frozen even without power. The seeds are put into vials and sealed in a three-ply foil package, before being put into boxes and stored in the seed vault. The mix of low temperature and humidity levels lowers the metabolic activity in the seeds, keeping them in better condition for longer.
The process that the CropTrust uses to store these seeds has many advantages, using the seeds' chemical nature and altering it so that it can have a longer lifespan, as well as using temperature to help.
As for disadvantages, the only ones would be that it might be difficult to replicate this method because of the bigger budget and wider variety of resources CropTrust has. Location is also a big thing, the city the vault is in is the farthest North you can fly on a commercial flight, and their seed vault is implanted 100 meters into the side of a snowy mountain, already helping the overall temperature of the vault. Their seed vault prioritizes the outside conditions just as much as the inside, which makes it harder to replicate.
Science Direct, a publishing website that piece different main topics from books and textbooks, gives three different methods of seed storage: Orthodox, Recalcitrant, and Intermediate.
Orthodox seed storage allows seeds to be dried and kept at very low temperatures, which slows down deterioration and enables long-term preservation, sometimes for decades. This makes it highly effective for seed banks because it is efficient, reliable, and supports the conservation of genetic diversity. Over time, it is also cost-effective because seeds do not need to be constantly replaced. Recalcitrant seed storage is useful for seeds that cannot tolerate drying or freezing, as it keeps them in moist, warmer conditions similar to their natural environment. This makes it possible to preserve certain tropical or sensitive plant species that would otherwise be lost using standard storage methods. Intermediate seed storage is more of a middle ground, these seeds can tolerate some drying and can be stored longer than recalcitrant seeds. They are easier to manage than fully moisture-dependent seeds and do not require as strict conditions.
One drawback from Orthodox sees storage is that not all seeds can survive drying or freezing, so this method can't be used for every plant species. In addition, maintaining low-temperature storage requires the proper tools and energy, which may not be what our seed storage can provide.The seeds that are used for Recalcitrant storage have very short storage lives, often lasting only weeks or months, making long-term preservation difficult. They also require careful control of moisture and temperature, increasing the risk of mold, rot, or other forms of damage. Intermediate seed storage cannot be stored as long as orthodox seeds and are still sensitive to very low temperatures. This makes storage conditions harder and less reliable, because the wrong handling can easily reduce seed viability.
ASME References
“Svalbard Global Seed Vault.” Crop Trust - Securing our food, forever. Accessed April 15, 2026. https://www.croptrust.org/what-we-do/programs/svalbard-global-seed-vault/.
Seed storage - an overview | sciencedirect topics. Accessed April 16, 2026. https://www.sciencedirect.com/topics/agricultural-and-biological-sciences/seed-storage.
Problem statement
[edit | edit source]The objective of this project is to provide the farm with a safe place to store seeds in case of emergency. The vault will be designed to seal once, and should keep the seeds viable indefinitely.
Criteria
[edit | edit source]These are the criteria we used to decide on the seed vault.
| Criteria | Description | Weight (1-10) |
|---|---|---|
| Cost | Has to be less than or equal to $550 total (our total budget including personal contributions) | 9 |
| Simplicity | Needs to be simple enough for students/staff to understand and repair | 6 |
| Environmentally Conscious | Structure should have minimal environmental impact | 7 |
| Portability | Should be/have a component that can be reasonably transported too and from the farm | 5 |
| Low Maintenance | Should work majority of the time without intervention | 8 |
Prototyping
[edit | edit source]
Our first prototype consisted of 3 pieces of acrylic, bonded together with an acrylic solvent. This prototype did not reflect our design plans and was purely to test the strength of the joints. As we felt the joints were strong enough, we constructed the shell of our vault and sealed it, testing the seal with small amounts of water to make sure there were no leaks.
Final product
[edit | edit source]
The seed vault is a 2x2x1 ft box made of 1/4" inch acrylic sheets, bonded together with a solvent, and sealed with silicone caulk. Wooden triangles are attached to the sides with more silicone, providing support for the sides and lid. A hinge connects the lid to the vault, which is sealed closed with more caulk and locked before the vault is buried. In our case, the vault is partially buried leaving 1-2 inches exposed, with a reflective tarp staked over it to protect it from the sun and keep temperatures down.
Seeds are stored within the vault in separate vacuum sealed mason jars. Each jar has one or more silica gel packets to absorb any moisture that may be left. This vault is not a complete seed storage system, its purpose is to provide an environmental barrier. Additional seed storage techniques should be applied to the jars inside the vault, as well as the storage location of the vault itself.
Construction
[edit | edit source]Step 1: Cutting the Acrylic
Description: We cut the acrylic panels to form the walls and base of the vault.
Measurements: 4 side panels: 2 ft × 1 ft, 1 bottom panel: 2 ft × 2 ft
Process:
- Measure and mark acrylic sheets
- 2. Cut using table saw with acrylic blade
- 3. Smooth edges if needed
Step 2: Assembling the Box
Description: The acrylic panels were joined to create a sealed box.
Process:
- Position panels upright around base
- Use clamps to hold pieces in place
- Apply Weld-On 4 using syringe along seams
- Let adhesive flow into joints
- Dry Time: Let sit for ~4 days
Step 3: Sealing the Interior
Description: Extra waterproofing was added.
Process:
- Apply 100% silicone along all seams
- Smooth sealant evenly
- Allow to dry
- Dry Time: ~2 days
Step 4: Building Internal Supports
Description:
Reinforce the structure and prevent the top from bowing.
Process:
- Construct a wooden support system in a cross shape
- Add vertical legs extending to all four sides of the box
- Install additional corner supports
- Secure supports using wood glue and a nail gun
Step 5: Creating the Locking System
Description:
Add a secure locking mechanism to protect the contents.
Process:
- Laser cut three rectangular acrylic pieces
- Two pieces include holes for locks
- Attach these pieces to the box using Weld-On 4 and a syringe
- Allow adhesive to cure
- Dry Time: ~3 days
Step 6: Installing the Hinge and Lid
Description:
Attach the lid securely using a hinged system.
Process:
- Attach a plexiglass hinge (with rubber lining) to the box using Weld-On 4
- Use clamps to hold hinge in place while drying
- Once dry, attach the top lid to the hinge
- Place weight on top to ensure a tight bond
Dry Time: 2-3 days
Step 7: Burial and Placement
Description:
Install the vault underground for long-term storage.
Process:
- Bury the box with approximately 4 inches above ground
- Choose a shaded area to reduce heat exposure
Step 8: Final Sealing
Description:
Seal the vault completely
Process:
- Ensure interior is completely dry
- Fill box with labeled mason jars of seeds
- Each jar labeled with seed type
- Include silica packets in each jar
- Apply 100% silicone around the top rim of the box
- Close lid and apply pressure to create a seal
- Cover with a reflective tarp
- Secure tarp using stakes through eyelets to prevent movement in weather
-
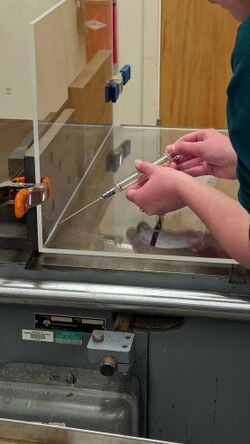 Applying Weld On 4 with metal syringe
 -
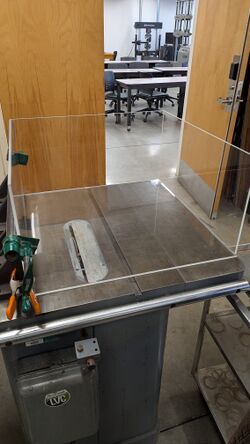 Clamping Box after applying Weld On 4 to keep in place while acrylic sheets bond
 -
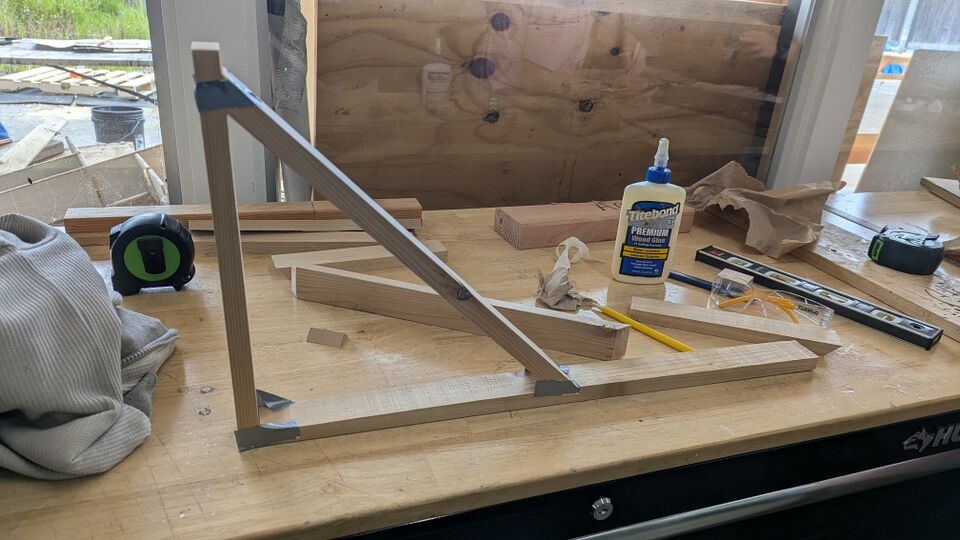 Building Internal Wooden Supports
 -
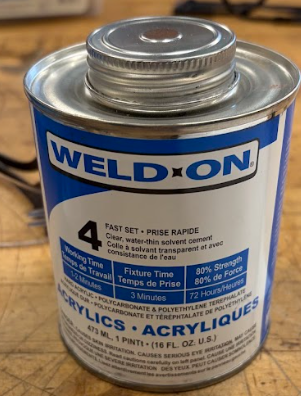 This is the product used to bond sheets of acrylic.
 -
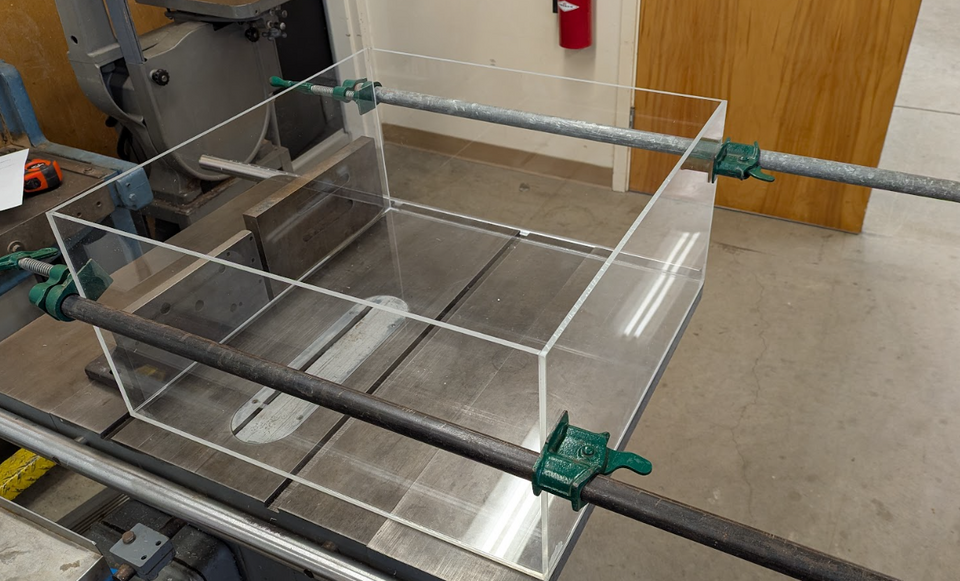 Clamping the box while it sets
 -
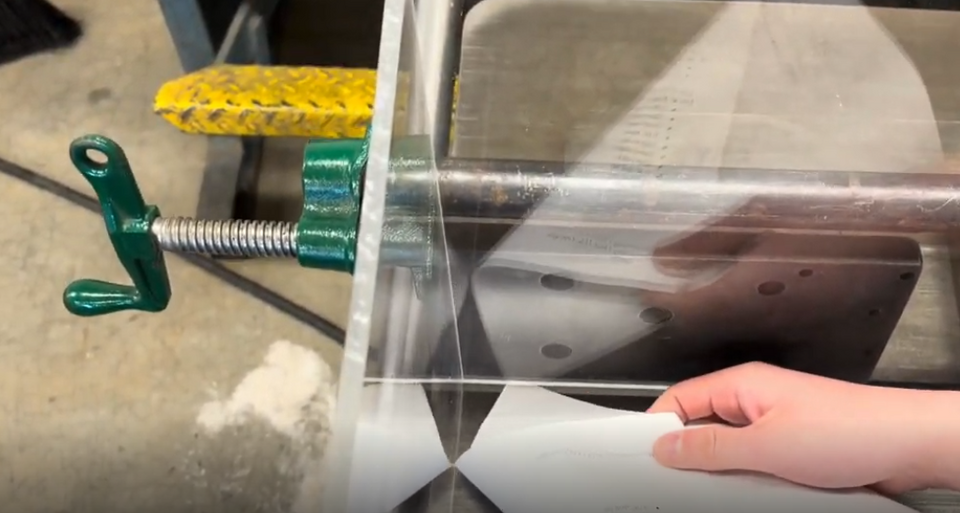 Testing joints with paper
 -
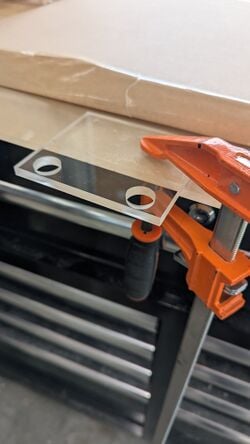 Applying Lock Attachment
 -
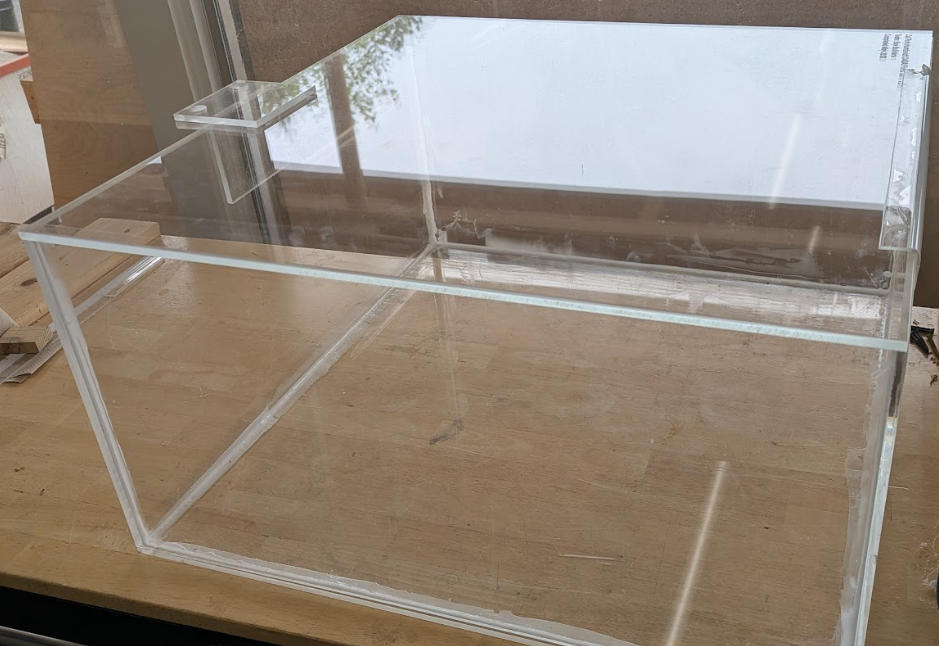 Final Empty Seed Vault
 -
 Seed Vault Laser Engraving
.jpg)


Bill of materials
[edit | edit source]This section outlines the estimated costs of materials. Approximately $200 worth of materials were donated.
| Item | Amount | Cost per unit | Total |
|---|---|---|---|
| Clear Scratch- and UV-Resistant Cast Acrylic Sheet | 3 | USD 94.25 | USD 282.75 |
| Weld On 4 Cement | 1 | USD 29.50 | USD 29.50 |
| Mason Jars (12 pack) | 3 | USD 16.49 | USD 49.47 |
| Silica Packets | 1 | USD 21.88 | USD 21.88 |
| 100% Silicone Caulk | 1 | USD 10.99 | USD 10.99 |
| Heavy Duty Reflective Tarp | 1 | USD 17.99 | USD 17.99 |
| 12 Inch Rebar Stakes | 1 | USD 24.99 | USD 24.99 |
| Grand total | USD 437.57EUR 376.31 <br />GBP 319.43 <br />CAD 542.59 <br />MXN 9,123.33 <br />INR 32,752.11 <br /> | ||
Operation
[edit | edit source]The seed vault, which was made from acrylic sheets of glass, and connected with Weld-On Acrylic Cement, has a set shelf life of 2-3 years, but once applied and sealed completely, it is a permanent bond that does not deteriorate. If there is a case where two or more walls need to be resealed, use the Weld-On and a glass syringe to cement the sides back together, more information on cementation will be explained in further detail in the instructional guide.
The sealing was done with silicone caulk; the purpose of it was to have an extra layer of support to seal all the inner corners. For the purpose of keeping it in its best condition, keep the sealant away from water; water will cause the silicone to deteriorate much faster than if it were dry. If it deteriorates, use the silicone applicator to reapply the silicone to the corners, making sure it’s completely spread on and dried.
The supports were made using a pyramid design and structure. Triangle and pyramid designs are the most stable design choices because of how the weight is distributed. As the years pass, there might be concerns about extreme pressure on the box and the supports because of dirt collapsing inwards, and the possibility of people accidentally stepping on the seed vault. The seed vault has a 10-year life span, but it is best to take a quick glance at it monthly, and at least halfway through (5 years) or two times (every 3-4 years) make sure that the pressure isn’t collapsing the seed vault by thorough evaluation. If 10 years have passed with no problems it would be time to remake the seed vault for another 10 years of use, to make sure that the seeds stay as safe as possible, and in the best condition they can be in.
Some concerns to look out for on the interior of the box include the following:
- Mold on the inside of the jars
- Mold on the inside of the box
- Seeds sprouting
All of these problems are moisture-based, and can be solved by adding more silica packets wherever the problem is, so that they can take all the moisture in. Also, make sure to thoroughly clean the box if that’s the problem; if it’s the seeds, replace the seeds with new ones, and add an additional silica packet to whatever number of packets were originally there.
Conclusion
[edit | edit source]Testing results
[edit | edit source]The CASA Farm Seed Vault was a big success, the vault is currently ready to be inserted into the ground, the supports are implemented and sealed onto the interior of the box, and the lock mechanism is on and working perfectly.
Discussion
[edit | edit source]The testing was very trial and error, but in the end we agreed that it was decided that there was more learned than lost, and that with our struggles came success.
Lessons learned
[edit | edit source]We've learned that it's okay to pivot from original ideas, we've also learned new skills as engineering students, like learning how to cut, bond, and laser engrave plexiglass. We learned how to use silicone to seal the plexiglass together as well. As for the team as a whole, we've learned that teamwork is the most important when it comes to finishing the project on time, as well as building connections and bonds with your teammates.
Next steps
[edit | edit source]As the project goes on into the future, we as a team advise the farm to check on the seed vault monthly, as well as an evaluation every couple years to make sure the vault is in pristine condition.
Troubleshooting
[edit | edit source]| Problem | Suggestion |
|---|---|
| Mold in box | Replace all silica packets, clean mold thoroughly and let it dry out, replace with new silica packets. |
| Mold in Mason Jars | Throw away seeds or try to plant depending on mold condition, do not continue to store. Clean mason jars thoroughly and let dry before replacing with new seeds and silica packets. |
| Seeds Sprouting | Plant seeds that are effected immediately after noticing conditon |
Team
[edit | edit source]References
[edit | edit source]- ↑ “Svalbard Global Seed Vault.” Crop Trust - Securing our food, forever. Accessed April 15, 2026. https://www.croptrust.org/what-we-do/programs/svalbard-global-seed-vault/.
| Authors | |
|---|---|
| License | CC-BY-SA-4.0 |
| Organizations | Cal Poly Humboldt |
| Cite as | Qualla, Luhanae, RubyMay, Noahpmannion (2026). "CASA Student Farm seed vault". Appropedia. Retrieved July 22, 2026. |