
CASA Student Farm handwashing station

| Type | |
|---|---|
| Authors | Cian Ryan PepperStella Adison Gartenlaub |
| Status | Deployed |
| Years | |
| Made | Yes |
| Replicated | No |
| Uses | education, science |
| Map | |
|---|---|
| Location | Arcata, United States |
| Coordinates |
A greywater-recycling handwashing station designed for the Critical Agriculture Studies & Agroecology (CASA) Program off-campus farm. This project was created by team Three Amigos of Cal Poly Humboldt's Engineering 205: Intro to Design course in the Spring semester of 2026. The purpose of this project is to provide the CASA farm with a suitable sanitation facility that mitigates environmental impacts and promotes stewardship.
Background
[edit | edit source]The Cal Poly Humboldt campus farm is a site for hands-on sustainable agriculture, yet it lacks a permanent station for washing hands. Our team, Three Amigos, made up of Cian Ryan, Stella Pepper and Adison Gartenlaub was tasked with designing and constructing a greywater sink to address this infrastructure gap during the Spring 2026 semester. This project is necessary to prevent untreated runoff from creating mud and to demonstrate appropriate technology by reusing waste water to support the farm's soil.
Literature Review
[edit | edit source]Before formulating design ideas extensive research must be conducted in order to determine the materials that should be used, the scale of the project, federal safety regulations, and how to balance both functionality and artistic intention.
This section is an analysis of the conducted research that will discuss the most relevant and important information related to the building of a handwashing station that allows for grey water reuse.
Client Information
[edit | edit source]Our client has tasked us with the creation of a handwashing station with a tank to catch grey water for potential reuse. It is extremely important that this hand washing station meets OSHA (Occupational Safety and Health Administration) requirements because this farm will be a place of learning. The students at this farm will be handling produce as well, which makes proper sanitation even more crucial.
The farm currently has a station for washing produce, but does not have a handwashing station in close proximity to the acres of land the farm currently resides. There is a handwashing station that is being rented from B&B along with portable toilets, but it is towards the parking area, a short walk from the plot. Having a handwashing station on the plot the farm occupies will allow for proper sanitation, as well as satisfy the requirement for the number of sinks needed by people on the farm at any given time.
The scale of this project is dependent on the number of students who will be at the farm simultaneously. Currently there is no clear number, but as the project develops the design of the handwashing facility can be expanded. There is potential for two handwashing stations on the farm on opposite sides of the lot because there is a water source on each side.
There are two possible water sources for the handwashing stations. Imported water from a local business that is stored in a large tank on site and a rainwater catchment system designed by a previous ENGR 205 class. The water tank stores potable water that is ready for use. On the other hand, the raincatchment system is not properly sanitized.
Practicality and Functionality in Design
[edit | edit source]As far as design, there are two important factors any team must take into consideration: practicality and functionality. When looking over hundreds of designs, the most successful ones are those that balance strong performance with visual appeal. In a school farm setting, the handwashing station must first meet health and safety needs. It should allow to wash their hands quickly after working with soil, plants, or animals, especially during busy class transitions. Clear signage, simple controls, and an accessible height for different age groups will increase ease of use. At the same time, the structure can reflect the natural character of the farm through the use of wood, metal, or other materials that blend with the surrounding environment. By combining safety, efficiency, and thoughtful design, the station can feel like a natural extension of the farm rather than an out-of-place addition.
Durability and Sanitation in a Farm Environment
[edit | edit source]Because the farm environment involves soil and is located in a rural setting, the station will need to be durable, sanitary, and easy to operate. “Materials should resist rust and moisture damage, ensuring the structure remains safe and functional over time.” (University Of Minnesota 2020). A “foot-pump” or “hands-free faucet” system could improve sanitation by limiting contact with shared surfaces (CCGA 2020), which is especially important in a school environment. The basin should be wide enough to prevent splashing onto the ground, reducing mud buildup around the station and keeping the surrounding area safer for foot traffic. Proper drainage, such as a gravel bed or greywater system, would prevent standing water and help maintain a clean and stable surface. Together, these practical features would support both hygiene and long-term durability.
Environmental Responsibility in Engineering Design
[edit | edit source]In the book “Ecohouse 2: A Design Guide” by Sue Roaf, many points are made about bringing environmental consciousness into design decisions. As engineers, it is our responsibility to balance moral obligations with ethical design and construction practices. Incorporating sustainable principles into our handwashing station would demonstrate this commitment in a visible and meaningful way. For example, using locally sourced materials would reduce transportation-related environmental impacts and support the local economy. Designing the station to rely on gravity rather than electricity would also lower energy use and reduce maintenance needs over time. By prioritizing sustainability from the beginning, the project can align with broader environmental values while still meeting practical requirements.
Rainwater Integration and Resource Conservation
[edit | edit source]By connecting the rain catcher created by the previous 205 team to the handwashing station, we could funnel water directly into the system. This approach would conserve potable water and make use of a resource that is already naturally available on-site. A “simple filtration system” could ensure the water is safe for handwashing while keeping the design straightforward and low-maintenance (Sue Roaf 2001.) Additionally, displaying a small educational sign explaining how the rainwater system works would connect the station to the farm’s broader mission of sustainability and hands-on learning. In this way, the structure would not only serve a functional purpose but also reinforce environmental awareness.
Learning from unsuccessful design
[edit | edit source]It’s important to consider unsuccessful design examples in order to avoid common mistakes. Some outdoor washing stations fail because they do not account for drainage, leading to muddy and unsanitary conditions that discourage use. Others rely on complicated plumbing systems that are difficult and costly to maintain in rural areas where technical support may be limited. Stations built without weather protection may “deteriorate quickly due to constant exposure to sun and rain”, reducing their lifespan. (CCGA 2020.) By carefully analyzing these shortcomings, our design can focus on long-term durability, straightforward construction, and consistent functionality. Learning from past failures strengthens the overall quality of the final product.
Seasonal Adaptability and Weather Protection
[edit | edit source]The farm environment changes with the seasons, and the station should be able to function year-round. Materials should withstand heavy rain in the winter and prolonged sun exposure during warmer months without warping, cracking, or fading. If freezing temperatures are a concern, the design might include a way to drain pipes to prevent cracking and internal damage. Shade structures or small overhangs could protect both users and equipment while also making the station more comfortable to use. Planning for seasonal changes in advance will help prevent unnecessary repairs and extend the overall lifespan of the structure.
Educational Value and Student Engagement
[edit | edit source]A design can serve an educational purpose in addition to its practical function. Because the station will be located on a school farm, it offers an opportunity to demonstrate engineering principles and environmental responsibility in a real-world context. Students could learn about water conservation, gravity-fed systems, filtration methods, and sustainable material choices simply by interacting with the structure. Including labeled components or a small diagram explaining how the system works would reinforce the farm’s mission as both a working agricultural space and an active learning environment. In this way, the handwashing station becomes more than just a utility—it becomes a teaching tool that supports the educational goals of the farm.
Metal Materials
[edit | edit source]Metal sinks, mainly stainless steel and copper are some of the most functional yet durable materials. Stainless steel is an alloy made of lots of different metals, mainly iron. Copper sinks are usually made up of nearly pure copper. Both copper and stainless steel are antimicrobial and very durable. However, stainless steel and copper have very different properties. Copper is very unique and colorful but this comes at a cost; copper like stainless steel is very durable, however it is a lot more expensive and requires a lot of maintenance such as frequent polishing and gentle cleaning. Copper is also prone to color changes. Stainless steel on the other hand also has antimicrobial properties with really low maintenance. This is why stainless steel sinks are the industry standard. They are cheaper than any other material of similar quality, being easy to clean with just mild soap makes it the easiest sink to take care of. Stainless steel does have some disadvantages as it can be very loud whenever anything is dropped inside and it also shows water spots. (Ozark River Manufacturing 2024).
Greywater System Fundamentals
[edit | edit source]Greywater is defined as wastewater from bathtubs, showers, bathroom washbasins, clothes washing machines, and laundry tubs. A functional greywater system consists of several hardware elements: the source (such as a sink), collection plumbing, optional surge tanks or filters, distribution plumbing, and a receiving landscape. The "hardware" must be carefully coordinated with the site's specific context, as there are no universal principles that apply to every design; for example, elevation relationships between the water source and the irrigated area are a limiting factor for gravity-fed systems. The primary benefit of greywater use is the significant reduction in freshwater consumption, effectively allowing a household to use its water twice. This practice reduces the hydraulic load on septic tanks or municipal treatment plants, extending their service life and efficiency. Furthermore, greywater is highly effective for outdoor irrigation because the soil’s top layer acts as a powerful biological purification engine, turning potential waste into nutrients for plants and fruit trees. A major disadvantage of these systems is the complexity of legal requirements and "permit hassles," which can be an exasperating barrier for many builders. Health concerns necessitate strict design standards to prevent greywater-to-human contact or surface ponding before natural purification in the soil has occurred. Additionally, systems can be economically impractical if existing plumbing is entombed in concrete slabs or if the site consists of unsuitable, impermeable soil with poor percolation rates (Ludwig 2006).
Receiving Landscape and Mulch Basin Design
[edit | edit source]The receiving landscape is a critical, yet often overlooked, component of the system where the greywater is actually purified and utilized. A common design for outdoor sinks involves a "Mulch Basin," which is a doughnut-shaped hole filled with wood chips or mulch that contains and filters the greywater. These basins must be sized to accommodate the surge volume of the water source and are typically located at the dripline of trees to ensure roots can access the water without being damaged by the basin's construction. Mulch basins are a "quick and dirty" solution that can be slapped together with minimal technical difficulty or cost. The mulch serves as a biological filter that speeds up the movement of runoff and provides a habitat for beneficial organisms that break down organic matter in the water. This method is particularly forgiving and effective for fruit trees, as the mulch helps maintain soil fertility and moisture levels. Basins require ongoing maintenance to ensure they do not become clogged with solids or fine particles, which can dramatically reduce their infiltration capacity. If the soil has a very slow percolation rate, as determined by a "perc test", the water may take hours to drop, leading to potential health risks or stagnant water. Furthermore, using high-carbon mulch can sometimes temporarily tie up nitrogen in the soil, which might "starve" young plants if not managed correctly (Ludwig 2006).
Sink Fixture Connections and Plumbing
[edit | edit source]The functionality of an outdoor farm sink depends on the mechanical integrity of its fixture and waste connections. Faucets, typically constructed from materials like chrome-plated brass, control water flow through internal valve stems that press a washer against a seat to create a seal. Below the basin, the "patent overflow" or P.O. plug provides the primary waste connection for lavatories, consisting of a plug section passing through the basin and a bottom section acting as a locknut. These components are joined to the drainage system using various specialized connections, such as slip joints for waste lines and ground joints for pressure-rated supply lines. Modern plumbing fixtures offer diverse connection methods tailored to specific functional needs. For instance, the ground joint is highly effective for high-pressure supply lines because its surfaces are machined at an angle to create a perfect, watertight fit without requiring extra washers or pipe dope. For drainage, slip joints on brass tubing allow for easier installation and maintenance, as they can be quickly disassembled if the line becomes clogged. Additionally, flexible lavatory supplies permit connections at various offsets, simplifying the design process for custom-built outdoor sink units. A notable disadvantage of standard plumbing connections is their potential for failure if used in the wrong application; for example, a washer joint is not recommended for high-pressure lines because it can be pushed apart by water force. Slip joints are also restricted by code for use only on the house side of traps, as a leak in an unvented location could admit harmful sewer gas into the immediate area. Furthermore, mechanical components like faucet seats and washers are subject to wear and must be regularly maintained or replaced to prevent consistent leaking and wasted water (Slater and Smith 1979).
OSHA Standards
[edit | edit source]OSHA was created by the Occupational Safety and Health Act under the Department of Labor. The purpose is to ensure workers safe and healthy working conditions (Peterson and Cohen 2).
OSHA has a list of standards that covers numerous types of facilities and work environments. Penalty for each violation of these standards could be up to $7000 in 1995. Though, depending on the classification of the citation the penalty may be decreased by 95% (Peterson and Cohen 70). The following subsections pertain to relevant OSHA standards the hand washing station must adhere to.
Standard 1928.110(c)(2)(ii)
[edit | edit source]“One toilet facility and one handwashing facility shall be provided for each twenty (20) employees or fraction thereof, except as stated in paragraph (c)(2)(v) of this section (Occupational Safety and Health Administration).”
Adequate toilet and handwashing facilities are already on site at the farm. But this standard offers a guideline as to what number of handwashing stations per number of people should be installed. Depending on the size of classes the farm may need additional facilities, then the station we are designing and the station that is being rented. This means that the design for the hand washing facility should be easily duplicated. With materials that are easily accessible and low in cost.
2.2.2.3 Standard 1928.110(c)(3)(iii)
[edit | edit source]“Handwashing facilities shall be refilled with potable water as necessary to ensure an adequate supply and shall be maintained in a clean and sanitary condition; (Occupational Safety and Health Administration)”
Here it is explicitly stated that the water used for these handwashing facilities must be potable water. On site there is a large tank of potable water. So far it looks that this tank will serve as the source of water for the handwashing station. Because the secondary source of water on the farm has not been properly sanitized it cannot be considered potable.
Other Considerations
[edit | edit source]One of the main functions of this sink is that the greywater from the sink is intended to be recycled. The following codes pertain to proper reuse and handling of greywater.
Greywater Reuse
[edit | edit source]Code 1503.1(E) of the 2019 California Plumbing Code Title 24, Part 5 states, “Greywater may be released above the ground surface provided at least two (2) inches (51 mm) of mulch, rock, or soil, or a solid shield covers the release point. Other methods which provide equivalent separation are also acceptable (California Building Standards Commission 312).”
This code states that greywater may be released into the environment as long as sufficient means of separation are provided. Adhering to this code may be possible due to the characteristics of this site.
Code 1503.1(F) states, “Gray water shall not contain hazardous chemicals derived from activities such as cleaning car parts, washing greasy or oily rags, or disposing of waste solutions (California Building Standards Commission 312).”
To ensure no hazardous chemicals contaminate the greywater including informational signs may be beneficial. Biodegradable soaps should be used as well to limit the potential impact of greywater release.
Code 1503.1(I) states, “A gray water system shall not be connected to any potable water system without an air gap, reduced-pressure principle backflow preventer, or other physical device which prevents backflow and shall not cause ponding or runoff of gray water (California Building Standards Commission 312).”
The system designed for the handwashing station will collect the greywater from the drain. The faucet and drain will be separated by an air gap; this guarantees there will be no backflow from the greywater.
Permitting
[edit | edit source]The City of Arcata or Humboldt County Planning Department should be consulted for specific permits; as well as relevant code for the development of this project.
Problem statement
[edit | edit source]The objective is to design, build, and test a low-cost greywater sink that facilitates the repurposing of the wastewater for use by the CASA student farm. The project will be considered a success if the final design is sustainable, functional, and satisfies the needs of the farm.
Criteria
[edit | edit source]A criteria consists of the individual components of a design problem. It allows an engineer to consider which aspects are the most important in the battle of right versus right. Each element of a design is essential to the success of a project, but determining which are the most crucial allows an engineer to prioritize. The criteria for the greywater handwashing station include cost, environmental impact of material, flow rate, volumetric capacity, water recovery rate, longevity, and weight.
| Criterion | Constraint | Description | Weight (0-10 high) |
|---|---|---|---|
| Cost | Total cost of all materials is $200 or less |
|
8 |
| Environmental Impact
of Materials |
At least 35% of materials are reused or recycled |
|
6 |
| Flow rate | Between 1.0-2.2 gallons per minute |
|
8 |
| Volumetric capacity | At least 3.0 gallons |
|
4 |
| Water recovery rate | At least 95% of water is recovered through the outlet |
|
9 |
| Longevity | Minimum of 5 years |
|
7 |
| Weight | Weighs no more than 125 pounds |
|
3 |
Prototyping
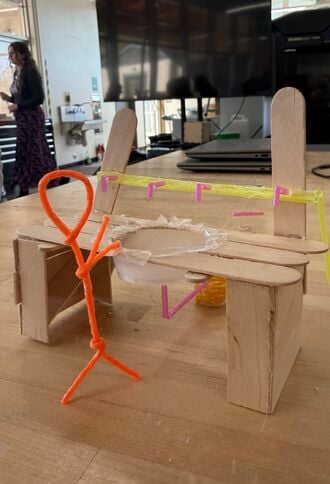
[edit | edit source]For our first few prototypes, we focused on understanding the basic layout and overall structure of our design so we could better visualize how the final project might hold up structurally. To do this, we built an initial prototype using simple materials like popsicle sticks, straws, and hot glue. This early model helped us see a rough version of our layout and gave us a clearer idea of how everything might come together.
As we moved forward, we wanted to explore how plumbing and a water faucet might function in our design. For our second prototype, we used materials such as PVC, duct tape, hot glue, and an attachable plastic faucet. Through this version, we learned that low water pressure could be a significant issue, as it directly affected the flow of water. A sharp increase in water pressure was observed immediately after the spigot was closed. This brought to attention the importance of having pipe fittings correctly sealed to ensure the system does not leak. This helped us identify potential problems we will need to address in future versions of our project.
- Sample gallery
-

Final product
[edit | edit source]Describe your final product here with image and labels. Start with the biggest overview first.
Construction
[edit | edit source]
Pick your two prettiest pallets and measure 34" by 25.5". One from the bottom left and one from the bottom right corner. Make sure to mark each top deck board, so the dimensions are easily visible while cutting. Using your choice of saw, cut through the top deck, bottom deck, and stringer boards. Our team found both a pull saw and jigsaw to be effective. Next, sand the boards using an orbital sander with 80 grit until the wood is splinter-free or until desired look is achieved.
Start by carefully removing the top deck boards from two or more pallets. The length of the pallet will be the length of the bench top, which is 48". You will need enough boards to lay seamlessly side by side for the entire length. Use a hammer and mallet to pry the boards off of the pallet. Then, use the hammer to remove the nails. Surface one face of every board using a planer. This ensures all of the boards are the same thickness, making the bench top seamless. If you do not have access to a planer, sanding the face of the boards will be be just fine
Lay the surfaced boards side by side across the pallet, with little to no gap in between them. Make sure you have the surfaced face up. Pre-drill two holes through the board into both the center stringer and one outer stringer. Because the width of the bench top is 25.5" it is not necessary to do the same to the second outer stringer. Next, screw in 4 screws into the pre-drilled holes, securing the board. Repeat this process until all the boards are secured. Measure 25.5" across the width of the pallet and use a saw to cut every board to this width. Sand the bench top to ensure it's splinter-free.
Stand the two legs upright parallel to each other, with the top deckboards facing outwards. Rest the bench top over the two legs. The outer stringer of the bench top should be in of those of the legs. This will set the center stringer of the bench top on the inside of the center stringers of the legs. Drill a hole down through the top deckboard of the bench top into the stringer of the leg. Follow this hole with a screw to secure it. Repeat 3 times for the other leg stringer boards. From the side drill a hole through the upright stringer board of the leg and the horizontal stringer board of the bench top. Follow this hole with a screw and repeat 3 times, for the other stringer boards.
Sand the base of the handwashing station with 220 grit. Once it has been sanded thoroughly, use stain color natural 209 stain the entire work bench once. The pine wood did not show a difference in color if the stain was layered, so it is unnecessary to stain it more than once. Follow the instructions on the can to ensure it is done properly. After the stain has dried completely, coat the entire base in a polyurethane finish. Let the finish dry for about 2 hours before gently sanding it with 320 grit. Repeat this process once more covering the entire base, and twice more covering only the bench top.

Measure the diameter of the drain and draw a circle with the same diameter in the center of the washtub. Our team used a kitchen drain with a diameter of 3.5". Drill a hole in the center of the circle. Use tin snips to cut along the radius of the circle in multiple directions. Imagine slicing a pizza, but starting from the center. After multiple thin triangles have been cut use pliers to pry the triangles to the outside of the washtub. Using the tin snips cut the base of each triangle so a hole is left. If necessary use an angle grinder to clean up the edges of the circle. In order to place your drain in the washtub you may need to force it through a bit. It is better it is a tight fit than loosely being set in the washtub. Line the inside and outside rim of the hole with plumbers putty and insert the drain. Tighten the drain until it is secure and remove the excess plumbers putty.
The basin must be traced out onto the top of the handwashing station and cannot be in the way of any existing 2x4's and preferably not in the way of the plywood support layer. Using a jigsaw roughly cut out the shape of the basin within the traced marking, leave around a 16th of an inch on the inside of the tracing to ensure the basin doesn't fall out the bottom. If the basin does not sit flush with the tabletop then either use a Dremel or the jigsaw to gradually widen the hole wherever there is excess pressure on the basin. Finally use 80 grit sandpaper to ensure there is no sharp edges. If any of the table top was not entirely glued onto the plywood support then use wood glue and a clamp to ensure they are properly glued together.
The P trap and other fixtures are secured to the drain via a rubber gasket, the p trap is not to be glued directly to the drain as the p trap may need to be cleaned out in case of it being clogged, a 3/4 inch male threaded pvc fixture is then glued to the end of the p-trap to allow a drainage hose.
The faucet is by first drilling a hole large enough for the 3/4 inch pvc to fit through, then the pvl bends and faucet must be properly primed and glued together to the correct height of the spigot. The input must have a female 3/4 inch pvc fixture that allows the end of a garden hose screwed in.
Starting with the PVC pipe elbow that is half threaded, use purple primer to line the inside of the non-threaded side of the elbow and the outside of the 3/4" PVC pipe that will be inserted. Follow the instructions on the can to ensure you do this properly. Next, line the PVC pipe and elbow with clear PVC cement directly on top the primer. Insert the PVC pipe into the elbow, holding it tight for about 30 seconds while the glue sets. Follow the instructions on the can to ensure this is done properly. Repeat this process for the second PVC elbow that goes on the opposite end of the pipe. This PVC elbow will not be threaded on either end. It is important that this second elbow free end is facing the opposite direction of the first elbow. It should resemble an S or zigzag shape, NOT a [ shape. You also want to make sure the elbows are lined up straight. Once this is done repeat the priming and gluing process to the second end of the second elbow and second PVC pipe. Repeat again to attach the second PVC pipe to the male threaded 3/4" PVC pipe adapter. Allow the faucet system to dry according to the wait time on the glue can before use.
Video instructions
[edit | edit source]Bill of materials
[edit | edit source]
.
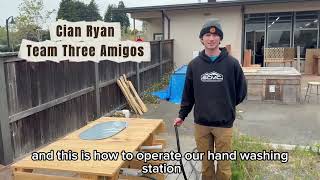
Operation
[edit | edit source]The handwashing station created by team Three Amigos has a simplistic design that allows for easy operation. There are only 4 straightforward steps to it!
Screw the input hose, which is connected to the water source, into the faucet. Ensure the hose is screwed tight to avoid leaking.
Screw the drain hose to the drain connection point.
Lay the hose out straight and ensure there are no kinks. If the hose is not laid properly it will not drain.
Verify the drain plug has been removed, turn on faucet, and enjoy clean hands.
Maintenance
[edit | edit source]Maintaining the handwashing station is essential to ensure hygiene, prevent wood rot, and keep the plumbing functional in an outdoor agricultural setting. Regular actions are required, ranging from daily surface cleaning to multi-year sealant applications. Daily and weekly upkeep can be performed by everyday farm users or student farm volunteers. Monthly, yearly, and long-term maintenance involving plumbing checks or structural sealing should be performed by the farm managers or designated maintenance leads.
Maintenance schedule
This is when to maintain what. Please keep the format the same as it populates the kiosk at the student farm.
Daily
- Wipe down the galvanized sink basin to prevent water spots, rust, and soil buildup.
- Clear any dirt, leaves, or agricultural debris from the sink drain hole to prevent clogging.
Weekly
- Inspect the PVC P-trap and drain lines for any slow draining or blockages from mud or farm debris.
- Wipe down the pallet wood top deck to remove standing water, soil, or grime.
Monthly
- Inspect the brass spigot and water supply connection for leaks, tightening if necessary.
- Check the screws and underside plywood support to ensure the structure remains stable and secure in the outdoor elements.
Yearly
- Flush the P-trap thoroughly to prevent long-term buildup of sediment.
- Inspect the galvanized tub for signs of deep rust and treat the metal if necessary.
Every 2 years
- Lightly sand and reapply a waterproof, outdoor-grade finish to the wooden pallet structure to prevent rot and weather damage.
- Inspect and replace the rubber gasket on the sink drain flange if it shows signs of cracking or leaking due to sun or temperature exposure.
Conclusion
[edit | edit source]Testing results
[edit | edit source]Testing was conducted in order to determine if the handwashing station is fully functional. To start, the basin was plugged and filled with water. The wash tub basin held the water without leaking and remained stable in the bench top. The drain system was then tested twice. The system did not experience any leaks, but only drained out of the output when the hose was laid straight and without kinks. Next, the faucet system was tested twice. Originally the faucet experienced leaks at two points. The connection point from spigot to PVC pipe and the connection point from PVC to the hose. When the second test was performed the connection point to the hose was tightened and no more leaking occurred.
Discussion
[edit | edit source]The handwashing station is deemed a success. The wash tub basin does not leak and holds the weight of the water easily. The drain system does not leak and drains well when it is laid properly. The hose must be laid flat because the drain system does not have enough pressure to flow out of a coiled hose. Shortening the hose would reduce the distance the water must flow before exiting the system; this is another solution to the problem as well. The small leak at the connection point from faucet to hose was sealed using glue meant for PVC pipes.
Lessons learned
[edit | edit source]Our group learned about the importance of clear communication while working as a team. It's important that thoughts, ideas, and opinions are directly and clearly shared among team members. Communication furthers progress by ensuring everyone knows their role and what is expected from them, increasing collaboration, and working more effectively as a team. Next time, emphasizing the importance of communication early on in the design process would create a lasting environment that would make it easier to share ideas and opinions.
There was an instance where our group made an unnecessary purchase of a PVC pipe fitting. It was intended to fit the p-trap to the PVC piece that connects the to hose, but it turned out the p-trap fit directly to the PVC connector. Next time we will bring the specific piece we are finding a fitting for with us. That way we can avoid spending money on an unnecessary piece.
Next steps
[edit | edit source]This project is fully complete. There are no future steps that need to be taken.
Troubleshooting
[edit | edit source]| Problem | Suggestion |
|---|---|
| Leak at water input hose connection point | Tighten the hose |
| Leak at either hose connection point | Wrap the external threads with plumbers tape |
| Output hose does not drain | Lay hose out straight and remove all kinks |
| Sink basin does not drain | Remove p-trap and unclog drain |
| Water won't flow through faucet | Ensure water source has enough water pressure |
| A part breaks | Refer to the materials list and find replacement at hardware shop |
Team
[edit | edit source]Introduce team and semester in the following format:
References
[edit | edit source]
| Authors | |
|---|---|
| License | CC-BY-SA-4.0 |
| Organizations | Cal Poly Humboldt |
| Cite as | PepperStella, Qualla, 25cryan (2026). "CASA Student Farm handwashing station". Appropedia. Retrieved July 20, 2026. |