
BPF solar fan

| Type | |
|---|---|
| Authors | Shaely Sullivan Nathan Worley Katie Wilkinson Jack Lucas |
| Location | Bayside Park Farm, Arcata, California, United States |
| Status | |
| Years | |
| Made | yes |
| Replicated | No |
| Uses | agriculture, energy generation |
| Map | |
|---|---|
| Location | Humboldt, United States |
| Coordinates | 40° 35' 59.07" N, 123° 53' 59.18" W |
This article describes the solar fan built for a greenhouse at Bayside Park Farm in Lonny's 2023 Engineering 305 class. The team designed and built a solar-powered fan for a plant nursery to increase the farm's sustainability. This page describes the team's steps and process for building the solar-powered snap fan. Extensive research was done into how greenhouse air flows work and into solar panel wiring before purchasing the team's materials. The team used prototyping to gain perspective for the other locations with similar fans. The construction process incorporated a point-positive design, which allows for easy dismantle. The page also describes the maintenance and troubleshooting process. The testing results meet the team's criteria, equaling 342 watts and 1501 CFM, which is plenty enough to power the fan and cool the greenhouse. In conclusion, this page describes the step-by-step process of building, maintaining, operating, and troubleshooting, the amount of time it took, and the budget for the whole project.
Background
[edit | edit source]Bayside Park Farm (BPF) is an educational and community-based farm established in 1993 and located in Arcata, California. The farm strives to incorporate students and community members to learn about sustainable and organic practices. For 30 years, BPF has practiced Community Supported Agriculture, where the community, buys farm shares, receives fresh vegetables through the spring and fall. Throughout the years of the farm's existence, students from Cal Poly Humboldt ENGR 305 class, have done appropriate technology projects. This spring in 2023, a group of students for ENGR 305, calling themselves the Solar Fans, are working on a project to build a solar power greenhouse fan at BPF. The farm has two greenhouses; one already has a solar power fan. The plant nursery, one of the important aspects of the farm, does not. The farm uses the electricity-powered fan to use ventilation within the plant nursery. The Solar Fans' goal is the make the BPF more sustainable by using the powerful energy from the sun to power a fan.[1]
.jpg)
Problem statement
[edit | edit source]This project will build a solar powered fan for the plant nursery to increase sustainability and install a more efficient system for the greenhouse the Bayside Park Farm.
Criteria
[edit | edit source]The criteria for installing the Bayside Park Farm solar fan shows each aspects order of importance. Ten being the most important and one being the least important for our criteria.
| Criteria | Constraint | Weight (1-10) |
|---|---|---|
| Airflow Rate | Fan must circulate greater than or equal 1457 Cubic feet per minute. (CFM) | 10 |
| Waterproofing/Durability | Requires maintenance less than two times per year. Must handle less than or equal to 10 inches of rain in one month. | 9 |
| Size of setup/Aesthetics | Doesn't intrude less than three feet from the walkway or garden. Looks at least as good as the large greenhouse fan setup. | 8 |
| Usability | Must be operable by someone with greater than or equal to six months of farm experience. | 8 |
| Operation | Must run greater than or equal to six hours per day during growing season. | 7 |
| Cost | Less than or Equal to $1200. | 6 |
| Educational | Visitors must be able to obtain greater than or equal to a baseline understanding of how the system functions. | 6 |
| Reproducibility | Must be reproducible by people with less than one year of photovoltaic experience. | 5 |
Literature Review
[edit | edit source]Greenhouse Fans
[edit | edit source]Horizontal Air Flow Systems
[edit | edit source]Greenhouses are a standard technology used in farm settings. However, fans are just as essential to maintaining suitable environments for growing crops. Horizontal air flows through the greenhouse to provide optimal temperatures. Providing enough friction loss and turbulence in the air to achieve HAF keeps motion essential to “kick it along.” Air in a greenhouse weighs one pound for every square foot of floor. That is where fans come in hand because as soon as the air moves, it will coast along like a car on a level road.” HAF systems or fans will help to reduce plant diseases because temperatures remain steadier. Constant air circulation reduces plants' moisture levels, creating a drier microclimate. At night, leaf temperatures can reach air below temperature causing condensation to breed disease. However, the HAF system will help to reduce this effect. When there is no airflow in the greenhouse, air remains static next to plant leaves, reducing carbon dioxide. HAF will keep the air moving by allowing a continuous supply of carbon dioxide for photosynthesis.[2]
Greenhouse Fans Energy Use
[edit | edit source]Fans provide an excellent method for greenhouses to practice the HAF method. Fans bring air from the outside in and through the greenhouse and out the other end. However, leaving fans up and running daily uses a great amount of energy which can be provided too costly for a farmer. On average, a greenhouse fan runs 2,000 hours per year. Every square foot of a greenhouse takes 0.5 to 1 kilowatt hour of electricity per year. Depending on the size of the greenhouse, it could add 150- 250 dollars to the electricity bill every year. Replacing electricity-powered fans with solar panels is a viable way to use energy costs and maintain the environmental sustainability. Replacing electricity-powered fans with solar panels is a viable way to use energy costs and maintain the environmental sustainability.[3]
Solar Energy in Agriculture
[edit | edit source]Agriculture is an energy-intensive business, consuming swath amount of electricity to produce food for the world to eat. However, climate change is causing more severe impacts on the global and farming industries. The push for sustainable agriculture has led to scientists finding new technologies, such as solar energy, to replace fossil fuels generated by power.[4]
Greenhouse Powered Fans
[edit | edit source]Replacing electricity-powered fans with solar panels is a viable way to use energy costs and maintain environmental sustainability. Using solar panels to power greenhouse fans does not affect the maximum crop yield and has been improved to give the same effect of leveling temperatures as fossil-fueled powered fans. Solar panels are great for farm situations in rural areas with limited access to electricity or, in the cases of this project hard, access to electricity. [4]
Examples of Greenhouse Powered Fans
A solar dryer system was installed in a greenhouse in Thailand. It was used to maintain the temperature to dry the fruit and it worked better than traditional methods. They used three 50 Watt PV panels on the roof to accomplish this.[5]
A farm in India started using solar fans to cool down their greenhouses in extreme heat. They installed six 100 Watt panels with a battery system for days with no solar energy. 304 Watts of power from the AC output was used to power two exhaust pumps and a cooling fan while the rest went to the battery.[6]
Snap Fans
[edit | edit source]In the project, the team will be using a snap fan, which is a greenhouse fan branded that was once located in Arcata. The other greenhouse located at BPF uses snap fans which have proven to be durable for Humboldt County weather[7]
Photovoltaics
[edit | edit source]Basic structure
[edit | edit source]Modern today photovoltaic panels use band gap semiconductor technology, which creates electrons to move in a certain direction.[8] Solar panels are made up of many photovoltaic cells called solar cells. When multiple solar cells are placed together, they are called photovoltaic arrays (solar panels). In order for photovoltaic arrays to be used as an energy source, the solar radiation captured must be converted to DC power through an inverter which produces alternating current.[9]
Panel Efficiencies
[edit | edit source]Peak Watt stands for the ultimate output for a panel is 1000 W/m^2. To achieve peak watts, place the panel in the sun facing the direction of the sun; this will likely be at noon on a good day. Commercial solar panels' average efficiencies have a capacity of 10% to 20%.[8]
Calculating Solar Panel Rating
The necessary solar panel rating to power an appliance can be found by multiplying the watts of the appliance by the number of hours it will be used. The resulting watt hours can then be divided by the number of peak solar hours to find the solar panel rating in watts.[10] Peak solar hours is the time where the sun's rays are perpendicular to photovoltaic modules.[11] This concept is useful when determining the panel rating needed to power something. Depending on the panel, the efficiency of the solar panel needs to be taken into consideration as well.
Panel Types and Advantages
Monocrystalline panels have high performance values. Polycrystalline panels are cheaper in comparison and more robust than their monocrystalline counterparts. Thin-film solar panels are mass produced and less affected by high temperatures.[12] Thin-film panels typically take up more space.
Wiring Panels to DC loads
[edit | edit source]Solar panels output DC current which can be used to power DC loads[13]. Powering DC loads with solar panels can be as simple as connecting to negative and positive wires of a solar panel to the DC load.
MC4 Connectors
MC4 Connectors are electrical connectors that are commonly used for connecting solar panels to a solar powered system. They provide a convenient way to connect and disconnect different parts of a solar system. They are the most common failure point in a solar electrical system[14].
Parallel Wiring of Photovoltaic Panels
Photovoltaic panels can be wired in parallel by connecting the positive wires of one panel to the positive wires of the other panel and then connecting the negative wires of one panel to the negative wires of the other panel. Photovoltaic panels wired in parallel will add additional current to the system as a combination of each panel's current[15].
Effects of Weather on Photovoltaic Panels
Photovoltaic panels are affected by dust, bird feces, moisture, precipitation, wind, solar radiation, and temperature. Solar panel selection should consider the average temperatures in the area that it will be placed.[16] Thin film solar panels have a temperature coefficient of -0.0984% while monocrystalline and polycrystalline panels have a temperature coefficient of -0.109% and -0.124% respectively. The temperature coefficient details the percentage of output lost by a solar panel if the temperature rises above 25°C.[17] Solar panels function more efficiently in colder weather as long as they are not covered by snow or reflective ice.[18]
Solar Radiation Variability
Solar radiation has high variability. Cloud cover is the primary source of solar radiation variability. “In high latitude maritime climates, overcast skies may persist day after day in winter with only rare breaks of sunshine.”[19] Light reflected by clouds will not make it to photovoltaic panels. The power output of solar panels can be reduced by cloud cover.
Panel angle and placement
Open rack mounts for solar panels give a performance advantage because they keep the solar panel from exceeding 25°C.[20]
Panels need to face directly into the sun at solar noon which means it needs to face south. To find the ideal angle for the panel, you need to look at the angle of the sun during the solar equinoxes(March and September) and the two solstices (June and December). Then, you need to look at your latitude to know the exact angle for your area but there are also online resources that will tell you the same information (www.solarelectricityhandbook.com). For year round performance, you want it angled toward the solar equinoxes, for summer performance you want it toward the summer solstice and for winter performance you want it toward the winter solstice.[21]
Bayside Park Farm
[edit | edit source]Bayside Park Farm is a city owned 3-acre farm that opened in 1993 as a CSA (community supported agriculture) where people are allowed to rent plots on the farm or sign up to receive food grown on the farm weekly. The farm has two greenhouses on the property, one larger than the other. The larger greenhouse has a solar fan setup already and we are modeling this project similarly. The smaller greenhouse needs a more stable frame in order to install the fan system which we will build before installation. This will allow the farm to grow more crops that need warmer climates like tomatoes and peppers.[22]
Prototyping
[edit | edit source]In the initial prototyping stage, we focused on the layout of the project so that we could begin designing the individual components of the photovoltaic system. This process involved drawing the entire system to scale as well as leveling each component to make the drawing more understandable for our client. The design was largely based off of a similar system on a larger greenhouse nearby on the farm.
Later, but still early on in the project, we decided to draw up a diagram showing how we would connect the panels in parallel to the fan in the greenhouse.
Additionally, we visited a solar powered greenhouse fan setup located in Potawot Community Garden to see how their setup differed from the setup used on the larger greenhouse.
-
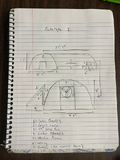 Prototype of the photovoltaic system designed for the smaller greenhouse on Bayside Park Farm. This prototype was intended to show the overall layout of the project.
 -
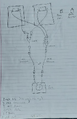 Early prototype of the wiring diagram that was to be implemented in the solar powered fan system constructed on Bayside Park Farm.
 -
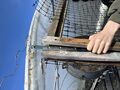
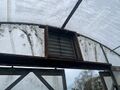 Fan frame used in solar fan setup in the larger greenhouse on Bayside Park Farm.
 -
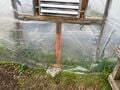
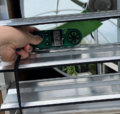
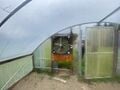 Inside view of solar fan setup used on Potawot Community Garden.
 -
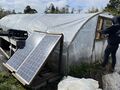
 Outside view of solar fan setup at Potawot Community Garden.


We were hoping to figure out which setup would work best for the smaller greenhouse. The setup used on the larger greenhouse in Bayside Park Farms made more sense for the scale of our project.
Construction
[edit | edit source]When building our project, we focused on keeping our materials local and resourced to be as sustainable as possible. We sourced almost all of our lumber from local construction sites' trash piles and our Campus Center for Appropriate Technology (CCAT) at Cal Poly Humboldt. We only ended up purchasing one piece of 8ft wood. We also sourced our solar panels from CCAT, they were used solar panels so we are providing them a longer life cycle than anticipated. We did have to purchase our snap-fan and exhaust shutters. We tried to locally source a used a snap-fan from the Beneficial Living Center here in Arcata, CA but unfortunately it did not work so we returned it, and bought the new snap fan.
-
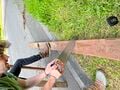
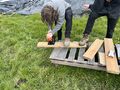 Cutting wood for the Fan/Exhaust Shutter Frame.
 -
 Screwing Fan and Exhaust Shutters into Frame.
 -
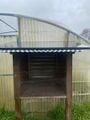
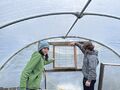 The Fan Frame fits in the Greenhouse.
 -
 Reinforcing the Greenhouse with a bracket.
 -
 Reinforcing the bottom of the greenhouse to be able to hold the fan and exhaust shutters.
 -
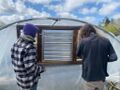 Fan and Exhaust Shutters are Attached to Greenhouse.


-
 Designing solar panel frames.
 -
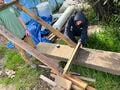
 Cutting wood for solar panel frames.
 -
 Screwing wood together for solar panel frames.
 -
 Measuring angle to 40 degrees for solar panel frame.
 -
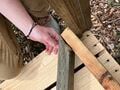 Cut the angle needed.
 -
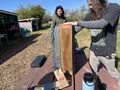
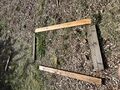
 Solar Panel Frames are complete.


-
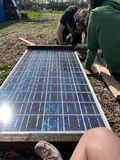
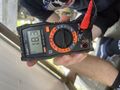 Checking voltage and current (not pictured) of panels (both).
 -
 Wire panels together (done).
 -
 Feeding wires through Greenhouse plastic to plug in together.
 -
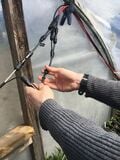 Plugging wires in together.


-
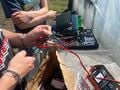 Stripping the wire to connect it to the fuse.
 -
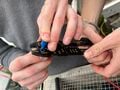 Crimping the fuse to the wire.
 -
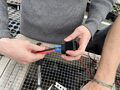 Connecting the wire to the USB port.
 -
 The USB Port works! It is charing the phone!


See Video Instructions and Steps below for more in depth information.
Point Positive Design
[edit | edit source]A point positive design is about encouraging people to do your desired action using visual cues. We integrated point positive design into our project in various ways to make it manageable for the farm to keep up with maintenance and ease to use. Our main focus was making sure our client (the farm manager) was involved in our decisions when building and designing to make her job at the farm as easy as possible.

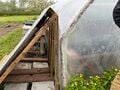
The first way we integrated point positive design was through adding a small window on both sides of the fan/exhaust shutters so the farm workers are able to open up the greenhouse when more ventilation is desired. Before the solar fan was installed, they used to have a removable window so we wanted to make sure they still had a similar design. we made the window removable by drawing an arrow on the wooden latch to show which way it can be moved. First you must move the latch, which allows you to pull the plastic window down. Under the plastic window, we added chicken wire to prevent birds and animals from entering the green house when the window is down.

The second way we integrated point positive design was hanging up a multimeter and a tool used for disconnecting MC4 connectors. We attached this to the snap fan frame using the pouch the multimeter came in. This pouch is visible and is placed next to our wiring and MC4 connectors which make it the best placement for our point positive design. To clear confusion we write instructions on the green house frame which adds more point positive aspects to our design. Leading with an arrow our writing tells the user that the multimeter and MC4 disconnector tool are located in the black pouch.

The third way we integrated point positive design was through our solar panel frame design. We designed the frames so that it is easy to remove and put back. The easy removal panel design is beneficial for any maintenance that will be needed in the future. To remove the panels, you first disconnect the wires so you can pull the panels out from the bottom. The removal process should be preformed gently. We made this point positive by painting arrows on the bottom of our frames and writing “pull out panel."
Video instructions
[edit | edit source]Inspirational Video
[edit | edit source]Steps
[edit | edit source]
The team started by measuring the length and height of the greenhouse. The measurements that were found were entered into snap-fan.com to find fans of the correct size. The right fan size for the BFP greenhouse is a 20-inch Brushless Snap Fan. Once the fan size was chosen, the team calculated the needed energy to power the fan. Snap Fan website gave helpful documents such as CFM charts, current, and voltage required for the fan to run.

Once the fan size was chosen, the team began sourcing used solar located at CCAT. The fan size calculations required two solar panels for the system to run. During this step, the team also researched, brought writing, and sourced wood locally.

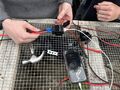
Before using the solar panels, the team did a quick test using a multimeter. The team unscrewed the black box on the back of each panel, exposing the blue and red wires. Touching the multimeter to one blue and red wire gave the current and voltage. The current and voltage for each panel were about 4 amps and 19 to 17 volts.

To build a good fan, the team looked up a Snap Fan frame blueprint (website) to get the right demonstrations since the Snap Fan was still in delivery. We measured twice and cut once to ensure the angles and length were perfect. Luckily our team's frame fit the Snap Fan and shutter as planned.

Now that our Snap Fan is connected to its frame, we focused on improving the structure connecting it to the greenhouse. Brackets were installed on the metal greenhouse framing and the wood frame to ensure stability. We added a supporting two-by-four piece of wood to the bottom of the greenhouse fan, which the fan would be resting on. On either vertical side of the fan, we added supporting pieces. Our team added four more brackets to connect the Snap Fan to the greenhouse wood frame. Finally, we added an additional foundation to the bottom to build strength.

The team removed the metal framing connecting the solar panels together. Our team analyzed Bayside Park Farm's solar panels for their big greenhouse and used Potawat community farm solar setup knowledge. Using these sources, we created our unique solar panel frame with a point-positive design. The top piece of wood on the solar panel has a groove in the middle, allowing panels to slide out. The bottom piece of wood uses a two-by-six, which allows panels to rest on the wood with the ability to be pulled out. With our team's point-positive design, we can quickly access the solar panel and could remove it from the frame in one easy step.

After researching the right angle for solar panels, the team did additional calculations, prototyping, and drawing at BPF to check that we had the right angle. We only had a hand saw for cutting the 40 degrees, so it took some time. Once all the wood was cut, we began to screw the piece together. After the frames were up and standing, we put the solar panels in and put them in the final resting spot by the greenhouse.

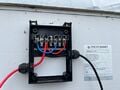
We unscrewed the black box on the back of each solar panel where the blue and red wires were exposed. By unscrewing the blue and red wire, shoving the 12 gauge cables in, and screwing the wires in place. We connected the blue with black and red with red wire. We have our solar panels wired in a parallel configuration to receive enough voltage to power the fan when it is sunny or not. The black and red wires were connected to positive and negative MC4 connectors, which connect to the black and white wire for the snap fan.

When the fan was mounted to the greenhouse, there were open holes on either side. First, we placed landscaping fabric over the open holes to increase air flow. The tighter the plastic is the greater chance the fan's airflow will reach and pull air though out the entire greenhouse. Before we started construction, the greenhouse had a removal plastic window for extremely hot days. We remodeled ours off of the original window to still allow excess air flow during intense heatwaves. The only difference is cutting a hole where the fan is but adding a movable wooden latch to hold the window flap tight enough so the window doesn't compromise airflow. In other words the flap is flush with the rest of the green house plastic ensuring there are no gaps that would decrease airflow while allowing the window to be open when desired.

We used an anemometer to measure the CFM in all four fan corners. The measurement we recorded was an average of 1501 CFM which meets our criteria.

We installed a USB port to allow farm workers to listen to music or charge their phones while working in the greenhouse. We connected two T-Branches to the existing wiring step to the additional wire to the USB port. The USB port was mounted to the side of the fan frame.

We tested the whole system's voltage and current. Using a multimeter at the positive and negative adapter connections when unplugged. We got our whole system-powered capability.
Timeline
[edit | edit source]This is a tentative timeline showing the progress made and estimated dates of completion of the tasks for building the solar fan. We met the dates we original planned out in the timeline.
| Dates | Week | Task |
|---|---|---|
| 2/20-2/26 | Week 1 | Alternative Solutions & their budgets, measure greenhouse & amount of airflow needed, set up gofundme. |
| 2/27-3/5 | Week 2 | Chose solution with client; purchased used fan but realized it was broken so had to return it and increase our gofundme and chose a different solution. |
| 3/6-3/12 | Week 3 | Prototyping and observing another system. |
| 3/20-3/26 | Week 4 | Order Snap Fan and exhaust shutter, went to construction sites around town and acquired lumber they weren't using. |
| 3/27-4/2 | Week 5 | Test Solar panels at CCAT and brought them to the farm, building frame for Snap Fan and exhaust shutter. |
| 4/3-4/9 | Week 6 | Building solar panel frames, ordered all wiring, and testing materials. |
| 4/10-4/16 | Week 7 | Install Snap Fan and exhaust shutter into greenhouse. |
| 4/16-4/23 | Week 8 | Install solar panel next to greenhouse, wire fan and panels together, begin testing. |
| 4/23-4/30 | Week 9 | Keep testing and fix any problems that arise, finalize project. |
| Weekly Occurances |
|---|
| Client meetings on Friday |
| In class or at farm meetings with class instructor |
| Updating appropedia |
Bill of materials
[edit | edit source]When we first started this project, we wanted it to be as appropriate tech as we could and wanted to source everything locally, but we quickly realized we would not be able to. We started a gofundme to be able to buy the Snap Fan materials. We were, however, able to source our solar panels from CCAT and our lumber from construction sites. We are installing a USB connecter into the system to allow the farm workers to charge their phones and anything else when needed in the green house. We used linseed oil to treat and protect the wood. Attached is a picture of our gofundme.
With transfer fees, we ended up breaking even with what we raised and spent!

| Item | Amount | Cost per unit | Total |
|---|---|---|---|
| Solar Fan — Tried to buy used at the Beneficial Living Center in Arcata but the fan did not work. We ended up sourcing from snap-fan.com | 1 | USD 596.75 | USD 596.75 |
| Solar Panel — Sourced from our Campus Center for Appropriate Technology at Cal Poly Humboldt. | 1 | USD 0.00 | USD 0.00 |
| Exhaust Shutters — Sourced from snap-fan.com | 1 | USD 153.56 | USD 153.56 |
| Lumber, Nails, Brackets, & Other Assorted Materials — sourced from Ace Hardware & trash piles from local construction sites. | 1 | USD 108.23 | USD 108.23 |
| Wiring — (3) MC4 12AWG 10FT solar extension cable with male and female connector, (4) Y Branch Parallel Adapter cable Wire Plug, (2) T Branch Connector Y Connector MMF + FFM Parallel Connection, (2) RENOGY Solar Panel Connector Assembly Tool. All sourced from Amazon. | 1 | USD 128.27 | USD 128.27 |
| Linseed oil & shop towels — used to treat the wood to protect it, used the towels to rub it in. Sourced from Ace Hardware. | 1 | USD 25.37 | USD 25.37 |
| USB Port & Mounting Panel — mounting panels are only $1.911 and they require you to purchase at least 5 in one order. Sourced from waytekwire.com | 1 | USD 74.94 | USD 74.94 |
| Sanding Materials — we purchased a sheet of sandpaper and a sandpaper sponge to sand down the wood we were using. Sourced from Ace Hardware. | 1 | USD 5.00 | USD 5.00 |
| Grand total | USD 1092.12EUR 939.22 <br />GBP 797.25 <br />CAD 1,354.23 <br />MXN 22,770.70 <br />INR 81,745.18 <br /> | ||
Operation
[edit | edit source]The operation of the greenhouse fan is automatic and does not require input from an outside party to operate. The fan turns itself on with sunlight and off as the sun disappears during the evening.
Maintenance Instructions
[edit | edit source]During winter months after the growing season has ended, remove the fan from the wooden fan frame in order to protect it from winter conditions. On a daily basis, make sure to keep objects from shading the solar panels because the fan will only work at half capacity.

Disconnect connection between the fan and associated negative/positive cables using the tool provided in the small pouch on the right of the fan frame.

Locate the four screws on the corners of the fan shroud and remove them using a drill.

Remove fan from the wooden frame and store in conditions safe from weather.
When the fan needs to be re-installed during growing season, reverse the previous steps.

Reconnect and reinstall the fan by reversing steps 1.2, and 3.
Conclusion
[edit | edit source]Testing results
[edit | edit source]| Voltage (V) | Current (A) | Power (W) | Average Air Flow Rate (CFM) |
|---|---|---|---|
| 18.3 | 18.7 | 342.21 | 1501 |
-
 Voltage of Parallel circuit on BPF at 18.3V
 -
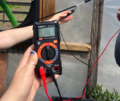 Current of Parallel Circuit on BPF at 18.7 Amps
 -
 Airflow of fan at BPF: 1525 CFM


Discussion
[edit | edit source]The systems Voltage and Current were tested on a relatively sunny day in Arcata, Ca. The power output of the system at the time was around 342 Watts. The air flow rate was tested on a day with moderate cloud cover which leads us to believe that this is on the low end of average for the air flow rate of the system. 1501 CFM exceeds our desired minimum air flow rate criteria by about 44 CFM. Arcata is often cloudy, so it is ideal that the fan can meet our criteria during cloudy periods.
Lessons learned
[edit | edit source]Our team learned that investing or using power tools would have sped up our building process. Our cutting process would have been smoother, allowing us to make more accurate woodcuts and saving hours of time. Having a powered hand saw would have also allowed us to make framing prototypes. This would have allowed us to experiment with designs to find the most beneficial one for our project. We learned that we could have done more prototyping before building the fan frame and solar panels. We did a lot of prototyping by drawing however we could have built some prototypes making the final product even better.
Next steps
[edit | edit source]The solar powered fan system was built using reclaimed materials and designed in such a way that it should not need replacing for at least a decade. The system is simple and requires very little input from outside sources to work. The next steps for the project are using it as an example of how impactful projects can be made using reclaimed and reused materials. One does not need to be an expert in woodworking for electrical components to design and construct a project such as this. It is important to spread that information to others who don't know they have the capability to do so. Lastly, the project can now assist in providing produce through community based agriculture. This project not only promotes sustainability in its use of renewable energy and reused materials, but it also promotes sustainability through the growth of locally sourced crops.
Troubleshooting
[edit | edit source]Listed below are a few basic troubleshooting operations. For more complex issues, contact Lonny Grafman (lrg3@humboldt.edu).
| Problem | Suggestion |
|---|---|
| Snap Fan spinning at lower speed than normal | Check voltage of Solar panels and connections. Check voltage between connectors. |
| lSnap Fan brand solar panel does not have enough watts to power the airflow needed for the greenhouse due to panel failure | Source panel elsewhere, but still use Snap Fan fan |
| USB No Longer Working | Check voltage at metal terminals on the back of the USB. If voltage is low or zero, check the MC4 Connections to positive/negative T-Branch MC4 connectors. |
Team
[edit | edit source]References
[edit | edit source]Energy Saving and Solar Electricity in Fan-Ventilated Greenhouses. https://publications.aston.ac.uk/id/eprint/17954/1/Energy_saving_and_solar_electricity_in_fan_ventilated_greenhouses.pdf.
- ↑ https://www.cityofarcata.org/440/Bayside-Park-Farm
- ↑ Bartok, John W. Jr. "Horizontal Air Flow Is Best for Greenhouse Air Circulation." University of Massachusetts Amherst, ag.umass.edu/greenhouse-floriculture/fact-sheets/horizontal-air-flow-is-best-for-greenhouse-air-circulation.
- ↑ Bartok, John W. Jr. "How to Reduce Ventilation Energy." Greenhouse Management, www.greenhousemag.com/article/gmpro-0410-reduce-ventilation-energy/#:~:text=Fans%20usually%20operate%20about%202%2C000,per%20square%20foot%20per%20year.
- ↑ 4.0 4.1 Aroonsrimorakot, S, et al. "Solar Panel Energy Technology for Sustainable Agriculture Farming: A Review." International Journal of Agricultural Technology, vol. 16, no. 3, 2020, pp. 553-562, http://www.ijat-aatsea.com/.
- ↑ Janjai, Serm. “International Journal of Energy and Environment .” A greenhouse type solar dryer for small-scale dried food industries: Development and dissemination 3, no. 3 (2012): 383–98. https://www.ijee.ieefoundation.org/vol3/issue3/IJEE_05_v3n3.pdf.
- ↑ Sharma, P.K., and D.V.K. Samuel. “Solar Photovoltaic-Powered Ventilation and Cooling System of a Greenhouse.” Current Science 106, no. 3 (2014): 362–64. https://www.currentscience.ac.in/show.issue.php?volume=106&issue=3.
- ↑ https://snap-fan.com/
- ↑ 8.0 8.1 Yogi Goswami, D. Principles of Solar Engineering. 4th ed., CRC Press, 2023.
- ↑ Tiwari , G N., and Swapnil Dubey. Fundamentals of Photovoltaic Modules and Their Applications. The Royal Society Of Chemistry, 2010.
- ↑ “How Much Watts Solar Panel Do You Need for Home Appliances?” ELECTRICAL TECHNOLOGY, September 5, 2021. https://www.electricaltechnology.org/2019/10/how-much-watts-solar-panel-you-need.html.
- ↑ Markvart, Tom, and Luis Castaner. “Energy Production by a PV Array.” Essay. In Practical Handbook of Photovoltaics: Fundamentals and Applications, 518–19. Oxford: Elsevier, 2006.
- ↑ Newak, Chris. “Advantages.” Essay. In Off-Grid Solar Power Made Simple: A Simple Guide to Building and Installing Solar Power Panels for Homes, Cabins and Vehicles, 33–36. Chris Newak, 2020.
- ↑ Solar Panels: Comparing AC and DC Systems. Novergy Solar. (2023, February 27). Retrieved April 15, 2023, from https://www.novergysolar.com/better-solar-dc-ac/
- ↑ Brearly, D. (2020, September 22). PV connector mating and intermatability in NEC 2020. Solar Power World. Retrieved April 15, 2023, from https://www.solarpowerworldonline.com/2020/09/pv-connector-compatibility-rules-are-likely-coming-to-the-national-electrical-code/
- ↑ Alternative Energy Tutorials. (2022, February 11). Parallel connected solar panels for increased current. Alternative Energy Tutorials. Retrieved April 15, 2023, from https://www.alternative-energy-tutorials.com/solar-power/parallel-connected-solar-panels.html
- ↑ Farahmand, Mahsa Z., M. E. Nazari, S. Shamlou, and Miadreza Shafie-khah. “The Simultaneous Impacts of Seasonal Weather and Solar Conditions on PV Panels Electrical Characteristics.” Energies 14, no. 4 (2021): 845. https://doi.org/10.3390/en14040845.
- ↑ Adeeb, Jehad, Alaa Farhan, and Ahmed Al-Salaymeh. “Temperature Effect on Performance of Different Solar Cell Technologies.” Journal of Ecological Engineering 20, no. 5 (2019): 249–54. https://doi.org/10.12911/22998993/105543.
- ↑ Folk, Emily. “- Effectiveness of Solar Panels during the Winter Months.” Renewable Energy Magazine, at the heart of clean energy journalism. Emily Folk, December 23, 2020. https://www.renewableenergymagazine.com/emily-folk/effectiveness-of-solar-panels-during-the-winter-20201223.
- ↑ Markvart, Tom, and Luis Castaner. “Part 1: Solar Radiation.” Essay. In Practical Handbook of Photovoltaics: Fundamentals and Applications, 10–26. Oxford: Elsevier, 2006.
- ↑ Burdick, Joesph, and Philip Schmidt. “Sizing Your System with PVWatts.” Essay. In Install Your Own Solar Panels: Designing and Installing a Photovoltaic System to Power Your Home. Storey Publishing, 2017.
- ↑ Boxwell, Michael. “Detailed Design.” Essay. In Solar Electricity Handbook: A Simple, Practical Guide to Solar Energy: Designing and Installing Solar PV Systems, 81–96. Birmingham, United Kingdom: Greenstream Publishing, 2022.
- ↑ “Bayside Park Farm.” Bayside Park Farm | Arcata, CA. Accessed February 12, 2023. https://cityofarcata.org/440/Bayside-Park-Farm.
| Authors | |
|---|---|
| License | CC-BY-SA-4.0 |
| Organizations | Cal Poly Humboldt, Bayside Park Farm |
| Cite as | Katiedoublev, Lonny, Shaely, Jdl105, Naw54 (2023–2026). "BPF solar fan". Appropedia. Retrieved July 19, 2026. |