
A hand-powered hay and leaf baler/ro

Acest articol oferă o modalitate detaliată de construcție și utilizare a acestui baler și are un design. De asemenea, este inclusă o discuție despre aplicarea acestui sistem și a balotilor acestuia, precum și o scurtă introducere a mașinilor alternative.
Balotarea materialelor pe fân, paie sau frunze are multe avantaje, deoarece aceste baloturi sunt de obicei folosite pentru a stoca excesul de materiale sau a hrăni animalele. Baloții de paie sunt, de asemenea, folosiți ca material de construcție pentru construcții. Această practică a început în America de Nord încă din anii 1800 și a cunoscut recent o renaștere ca parte a mișcării de construcție ecologică și naturală. Baloții de paie sunt materiale de construcție ieftine și disponibile, deoarece paiele sunt un produs secundar agricol omniprezent. Aceste baloturi pot asigura atât izolarea clădirii, cât și suport structural. Disponibilitatea acestui potențial material de construcție consideră că este considerat o tehnologie adecvată. Costurile mari asociate combinelor mecanice și fermierilor cu loturi mici de teren necesită o alternativă cu costuri reduse. Există multe opțiuni disponibile și acest articol examinează O mașină de balotat pentru fân și frunze alimentată manual de Larry McWilliams care se află pe CD3WD . Scopul proiectului CD3WD este de a ajuta Lumea a 3-a să se ajute, conținutul poate fi găsit aici . Acest articol oferă o modalitate mult mai detaliată de construcție și utilizare a acestui bailer și are un design. De asemenea, este inclusă o discuție despre aplicarea acestui sistem și a balotilor acestuia, precum și o scurtă introducere a mașinilor alternative.
Considerații
Acces la materiale de balotat
Materialele de balotat există în toate părțile lumii unde aceasta este agricultura. Plantele de cereale cresc în toate părțile lumii, cu excepția deserturilor foarte uscate și a polilor acoperiți de gheață. [ 1 ] Dar mai precis, paiele sunt un produs secundar al plantelor de cereale. balotii din paie sunt folosiți ca material de construcție. Paiele sunt ceea ce rămâne după ce boabele și pleava au fost îndepărtate; este cunoscută și sub numele de tulpina plantei. Africa găzduiește multe plante de cereale native, iar colonizarea a adus multe alte specii în zonă. [ 2 ] Cu alte cuvinte, această tehnologie poate fi utilă în aproape orice parte a lumii.
Acces la materialele de construcție și capacitatea de a construi
Presa de balotat care este detaliată mai jos a fost realizată cu scule electrice și lemn nominal. Acest lucru se datorează faptului că acestea sunt materialele și instrumentele care sunt disponibile și cele cu care mi-am dezvoltat abilitățile de lucru. Acestea nu sunt disponibile în întreaga lume, dar este posibil să se facă această structură din diferite materiale folosind instrumente mai simple. În secțiunea de construcție există un tabel pentru instrumentele sugerate și potențiale pentru construirea acestei prese de balotat. Un meșter priceput ar fi capabil să recreeze această structură. În cazul în care un grup se deplasa într-o zonă în care aceste unelte și materiale nu erau disponibile, o soluție simplă ar fi să le predecupăm și să le transportăm lăsând asamblarea finală până la locul final. O analiză completă a preselor alternative trebuie efectuată înainte de a se produce acest lucru.
Aplicabilitatea baloturilor
Baloții de paie pot fi utilizați în construcții, iar aplicația obișnuită este pentru locuințe cu cost redus, cu impact redus asupra mediului. Locuința este o prevedere aparent de bază, care oferă familiilor un loc în care să se încălzi, să doarmă, să interacționeze între ele, precum și un loc pentru a se adăposti de potențiale pericole din mediu, inclusiv boli. A avea o casă are multe beneficii, iar deținerea uneia servește ca o piatră de temelie către succesul viitor. Clădirile din baloți de paie reprezintă o utilizare ieftină și eficientă a resurselor regenerabile și locale. Paiele sunt, de asemenea, un produs secundar care este ard în mod obișnuit, [ 3 ] folosindu-l ca material de construcție pentru a capta carbonul care ar putea ajunge în atmosferă. Baloții au și scopuri agricole, deoarece aceasta este o sursă potențială de hrană sau așternut pentru animale. Depozitarea baloturilor poate fi utilă în lunile de iarnă sau în perioadele de secetă în aplicații agricole. Este important de reținut că, indiferent de utilizare, balotii trebuie păstrați uscati și fără insecte, deoarece vor putrezi.
Principii de inginerie
Utilizarea balotului pentru aplicații structurale se bazează pe câțiva parametri. [ 4 ] Conținutul de umiditate, deoarece balotii trebuie să fie uscati pentru a preveni putrezirea, în timp ce densitatea uscată determină rezistența balotului. Ecuația pentru densitate, [kg/m 3 ] se găsește aici:
ρ=mV
Densitatea unui balot se bazează pe compresibilitatea materialului și efortul exercitat de piston. Studiile au arătat că atunci când sunt așezate plat, balotii cu o densitate mai mare eșuează la o sarcină finală mai mare. [ 5 ] Studii ulterioare au arătat o corelație între densitatea și modulul balotului, dar orientarea are un efect mai mare asupra proprietăților mecanice. [ 6 ] Baloții de paie sunt folosiți pentru a forma un perete compozit cu tencuială pe ambele părți ale balotului. Atunci când acești pereți tencuiți sunt supuși unei sarcini de compresiune concentrică, acesta acționează ca o coloană compozită, tencuiala preia cea mai mare parte a sarcinii. Paiele asigură în primul rând contravântuiri laterale pentru pieile de ipsos, în timp ce preia o mică parte din sarcina de compresiune. Dacă contravântuirea laterală este insuficientă, flambajul local al stratului subțire de tencuială va cauza defecțiuni. Baloții de paie asigură, de asemenea, izolație în aceste sisteme compozite. [ 4 ] Pentru fabricarea baloților, lucrul important de reținut este că o forță mare a pistonului va duce la baloți mai denși, ceea ce oferă baloți mai solidi structurali. Baloții mai denși ar trebui să aibă proprietăți de izolație reduse din cauza apropierii apropiate a moleculelor, dar sunt necesare teste suplimentare în acest domeniu.
Ceilalți factori care influențează utilitatea sunt istoria, deoarece balotii nu ar fi trebuit să fie aproape de umiditate sau mucegai, lungimea fibrei și compoziția materialului. Baloții de paie sunt mai potriviti pentru construcție, deoarece carbohidrații au fost îndepărtați. Fânul, care conține carbohidrați, va putrezi în mod natural pe măsură ce insectele și animalele se hrănesc cu el.
Pentru această structură, toate sarcinile sunt neglijabile în raport cu rezistența oferită de aria secțiunii transversale a elementelor. Design guvernat de utilitate, mai degrabă decât rezistența sau funcționalitatea.
Constructii
Un prototip al presei de balotat manual pentru fân și frunze a fost realizat folosind instrumentele enumerate în tabelul de mai jos. Figura 1a, arată o imagine a prototipului care a fost construit pe lângă desenul original și aspectul recomandat. Au fost aduse modificări la designul original pentru simplificare, iar modificările suplimentare sunt reflectate în designul prezentat în Figura 1b.
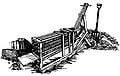 Fig 1: Original
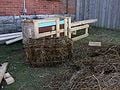 Fig 1a: Prototip
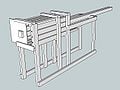 Fig 1b: Recomandat


Tabelul de mai jos prezintă uneltele utilizate pentru construirea prototipului, precum și instrumentele de bază care pot fi utilizate pentru a produce aceeași presa de balotat. În ciuda faptului că prototipul a fost construit cu unelte electrice, uneltele de bază în mâinile unor meșteri pricepuți vor fi suficiente pentru a îndeplini această sarcină.
| Instrumente preferate | Instrumente de bază |
|---|---|
| Ferăstrău circular | Ciocan |
| Burghiu | Fierăstrău de mână |
| Ciocan | Bandă de măsurare |
| Bandă de măsurare | Banc de lucru/clemă |
| Pătrat | |
| Banc de lucru/clemă |
Lista de piese
| Parte | Nume | Dimensiunea nominală | Lungimea prototipului | Cantitate | Lungimea recomandată | Cantitate |
|---|---|---|---|---|---|---|
| 1 | Fund | 2X4 | 6' 10" | 2 | 6' 10" | 2 |
| 2 | Suport lateral | 2X4 | 2' 1 ¼" | 8 | 4' | 6 |
| 3 | Conector de sus | 2X4 | 1' 6 ½" | 4 | 1' 6 ½" | 4 |
| 4.a | Partea Camerei | 2X4 | 3' 4" | 4 | 3' 4" | 4 |
| 4.b | Partea Camerei | 2X4 | 3' 10" | 4 | ||
| 5 | Cameră Top | 2X4 | 2' 4" | 4 | 2' 4" | 4 |
| 6 | Partea de jos a camerei | 2X4 | 4' 8" | 3 [1] | 4' 8" | 3 [1] |
| 7 | Conector de jos | 2X4 | 1'3 ½" | 4 | 1'3 ½" | 3 |
| 8 | Suport spate | 2X4 | 39½" | 2 | 39½" | 2 |
| 9 | Reţinere | 2X4 | 3' 9 ½" | 2 | 3' 9 ½" | 2 |
| 10 | Suport pentru usa | 2X4 | 1' 6 ½" | 1 | 1' 6 ½" | 1 [2] |
| 11 | Piston | 2X4 | 8' | 2 | 8' **2 | 2 |
| P1 | Spate piston | Strat de ½" | 12" x 14" | 1 | 12" x 14" | 1 |
| P2 | Inserție de piston | Strat de ½" | 12" x 12" | 1 | 12" x 12" | 1 |
| P3.a | Bloc piston | 2x2 | 4" | 8 | 5" | 8 |
| P3.b | Bloc piston | 2x2 | 3" | 8 | 3" | 8 |
| P4 | Suport piston | 2x6 | 14" | 2 | 14" | 2 |
| Uşă | Strat de ½" | 18"x18" | 1 | 18"x18" | 1 |
Procedura
Pentru a accelera procesul de construcție, cel mai bine este să tăiați în prealabil multe dintre piese. Deși acest lucru este recomandat, asigurați-vă că construiți pistonul odată ce camera și celelalte piese au fost asamblate. Acest lucru se va asigura că pistonul se potrivește cu ceea ce ați construit. Dacă au existat modificări în proiectarea sau asamblarea pieselor, acestea vor deveni evidente când este timpul pentru asamblarea finală a presei. Pe parcursul pașilor, extindeți imaginile pentru a vedea numele părților și spațierea mai detaliat.
Pentru toți pașii, folosirea unui pătrat va asigura că piesele individuale sunt realizate corect, ceea ce face asamblarea mai ușoară. Se pot folosi cuie sau șuruburi, dar șuruburile au fost folosite pentru preferință personală și pentru că sunt mai îngăduitoare dacă se comit greșeli sau în timpul procesului iterativ de prototipare. Piesele mai mici, precum cele găsite pe capul pistonului, sunt, de asemenea, mai ușor de atașat cu șuruburi. Factorii de mediu intră în joc atunci când se determină durata de viață a acestei structuri. Dacă urmează să fie utilizat pe o perioadă nedeterminată, șuruburile de exterior și o vopsea sau o pată vor păstra dispozitivul de evacuare și vor preveni intemperii și alte uzuri de mediu.
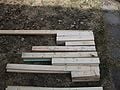 Fig 2: Lemn pretăiat
 Fig 2a: Utilizarea unui pătrat și marcarea lemnului


Aceasta poate fi realizată de un meșteșugar intermediar, un muncitor mai priceput va putea să o facă mai rapid și mai precis. Indiferent de familiaritatea cu instrumentele, vă rugăm să urmați procedurile de siguranță adecvate. Dacă nu sunteți la fel de calificat, lucrul cu un partener sau găsirea pe cineva cu mai multă experiență vă va asigura că presa de balotat este realizată cu precizie și în siguranță.
Vă rugăm să citiți toți pașii înainte de a încerca construcția.
Construiți partea superioară a camerei. Există o distanță de 1/2 inch între piese, deoarece sfoara va trece prin aceste goluri.


Construiți cele două laturi ale camerei. Piesa 2, suportul lateral, se află pe partea opusă pentru a doua parte a camerei. În rest cele două piese sunt identice. Există, de asemenea, un spațiu de 1/2 inch între piese. În desenele recomandate, suporturile laterale au fost mărite la înălțimea medie la un om obișnuit. Acest lucru permite utilizatorului să se ridice în timpul balotării și legării, reducând cantitatea de stres asupra spatele utilizatorului.


Construiți partea inferioară a camerei similar cu partea de sus. Locațiile conectorilor sunt etichetate în figura 7 și ar trebui să se alinieze cu suporturile laterale odată asamblate. Cele două piese de jupuire din laterale pot fi realizate prin ruperea unui 2x4 în jumătate. Piesa de jos a prototipului, prezentată în figura 8, nu include modificări de design ale structurii.


Asamblați camera punând piesa superioară între cele două părți. Odată ce acest lucru este finalizat, fundul poate fi aruncat prin întoarcerea structurii cu susul în jos. O clemă se va asigura că camera este pătrată. Figura 10 arată unde a fost utilizată clema în timpul construcției prototipului.

.JPG)
După întoarcerea presei în poziție verticală, construiți partea din spate a presei prin atașarea suportului din spate, a reținerii și a conectorului superior în această ordine. În acest fel piesele noi nu vor cădea în timpul construcției. Un ajutor este util pentru a ține piesele în sus, dar dacă unul nu este disponibil, utilizați un cui sau un șurub pentru a lipi o piesă aproape de locul unde trebuie să fie și apoi fixați celălalt capăt în mod corespunzător și apoi atașați în final partea originală.

Există două opțiuni pentru a construi ușa. Se poate instala o ușă cu balama, dar dacă balamalele nu sunt disponibile, încercați opțiunea prezentată în prototip. O secțiune a suportului ușii trebuie tăiată pentru a ține ușa. Dacă este luată această a doua opțiune, conectorul superior trebuie îndepărtat și o secțiune decupată de-a lungul fantei ușii. Odată tăiate, aceste două bucăți trebuie atașate astfel încât să fie la nivel de piesele existente, permițând atât ușii să se deschidă, cât și balotului să iasă liber din cameră. Crestăturile din aceste piese de susținere a ușii trebuie tăiate cu o toleranță adecvată, astfel încât ușa să poată aluneca o crestătură de ¾ inch a fost folosită pentru o ușă de ½ inch. Aceste tăieturi trebuie făcute cu un ferăstrău, o daltă poate fi folosită pentru a îndepărta materialul din Între tăieturi, resturile de lemn pot fi folosite ca mâner de ușă.


Dacă sunt disponibile 2x2s, ar trebui utilizată opțiunea mai complicată pentru capul pistonului. Blocurile de piston permit folosirea unei inserții (nefigurate) în timpul procesului de epuizare. Când balotul este gata pentru a fi legat, această inserție poate fi îndepărtată, iar blocurile lasă loc mâinilor pentru a ajunge în camera de balotat. Blocurile pot fi ajustate pentru dimensiunea mâinii utilizatorului. O toleranță în decupările din P3.a ar trebui să asigure că inserția poate fi îndepărtată cu ușurință. Sfârșitul lui P3.b ar trebui să se potrivească și cu începutul dacă decupările din P3.a. Pentru a realiza această tăiere, dispozitivele pot fi plasate împreună într-un dispozitiv similar cu cel prezentat în Figura 15.
Blocurile ar trebui să fie atașate din spate, așa cum puteți vedea în figura 16. Două șuruburi vor rezista blocurilor de la întoarcere. Fixarea unui șurub și strângerea celui de-al doilea va asigura că blocurile rămân acolo unde sunt semnele. Găurirea găurilor pilot va asigura că placajul și blocurile nu sunt împărțite în acest pas. Alternativ, spatele pistonului poate fi folosit singur, dar va fi mai dificil să păstrați capătul balotului compact.


Suporturile pistonului trebuie găurite înainte de a fi atașate la spatele pistonului. Ca și blocurile, acestea ar trebui să fie atașate din spate, după ce este găurită o gaură pilot. Șuruburile ar trebui să fie amplasate în spațiile mari dintre blocuri, pentru a ușura construcția.

Cele două bucăți de piston trebuie tăiate și găurite conform desenelor. Decupajul, situat la 47" din față, permite pistonului să se blocheze în loc în timp ce sfoara este legată. Acest lucru asigură că balotul rămâne comprimat în cameră. Tăierea unghiului din față permite o gamă largă de mișcare în timpul procesului de balotare .

Atașați ambele pistoane la capul pistonului prin plasarea unui șurub de transport sau o axă între cele două piese. La toate interfețele (între lemn și nuci) trebuie folosite șaibe. O bucată de resturi de lemn trebuie pusă direct sub pistoane odată ce este atașată. Acest lucru împiedică căderea capului pistonului. Alternativ, dacă nu sunt disponibile șuruburi, piulițe și șaibe, pistonul poate fi atașat direct la capul pistonului. Aceasta elimină caracteristica de pivotare.


Cost
| Articol | Cantitate | Preț unitar | Pret intreg |
|---|---|---|---|
| 2"x4"x8' | 20 | 1,77 USD | 35,40 USD |
| 2"x6"x8' | 1 | 4,29 USD | 4,29 USD |
| 2"x2"x8' | 1 | 2,26 USD | 2,26 USD |
| ½" strat | 3 tăieturi | 3 dolari | 9 USD |
| Șurub de 4" 5/16". | 2 | $.69 | 1,38 USD |
| Șaibă de 5/16". | 6 | $.11 | $.66 |
| Piuliță de 5/16". | 2 | $.14 | $.28 |
| Total | 53,27 CAD | ||
Costurile estimate pentru construirea presei de balotat recomandate din lemn complet nou au ajuns la aproximativ 55 USD. Costurile reale pentru prototipul care a fost construit au fost mult mai mici. Acest lucru se datorează faptului că prototipul a fost construit folosind materiale reciclate. Dacă acesta ar fi construit într-o fermă, este probabil să existe exces de cherestea care va reduce costurile. În comparație, cricurile agricole , care este doar o componentă în tehnologiile alternative, încep în jurul acestui preț de 55 USD. La fel ca toate proiectele de construcții, ar trebui inclusă o alocație pentru potențiale greșeli de tăiere sau pierderi de materiale, cheresteaua enumerată mai sus include acest lucru. O altă modalitate de a reduce drastic costurile este să vă uitați prin secțiunile tăiate din magazine (dacă sunt disponibile). Reducerile din alte proiecte oferă o sursă ieftină de materiale mici și, de asemenea, deturnează materialele din deșeuri. Șuruburile sau cuiele nu sunt incluse în această estimare de cost, deoarece sunt de obicei cumpărate în vrac.
Baloarea
Procedură:
- Treceți sfoară prin goluri
- Se pot folosi 2, 4 sau 6 bucati in functie de material
- Înfilați sfoară numai prin ușă
- Tăiați suficientă sfoară pentru a înfășura întreg balotul, se recomandă 6 pi, dar asigurați-vă că este suficientă inițial, deoarece adăugarea de sfoară suplimentară este dificilă.
- Închideți ușa și începeți balotarea împingând pistonul
- Utilizați cantități mici pentru a asigura o compactare bună
- Scoateți inserția când a fost balotat suficient material
- Treceți sfoară în jurul balotului și legați
- Deschide ușa
- Scoateți balotul împingând pistonul
Vă rugăm să vedeți următorul videoclip pentru procedura de balotare:
Vă rugăm să rețineți: acest videoclip arată prima dată când am creat un balot pe prototip. Întregul proces a durat mai puțin de 20 de minute. Cu un ajutor și mai multă practică, acest timp se va reduce foarte mult, astfel încât într-o zi se pot face destui baloti pentru o casă mică. Materialul care este balotat este, de asemenea, vechi și umed, ambele proprietăți nu sunt utile. Acest lucru a fost făcut pur și simplu pentru că acest material este ceea ce era disponibil.
Recomandări specifice mașinii
După cum a arătat videoclipul, este posibil ca o persoană să opereze această presa de balotat, dar este mai eficient să aibă două. O persoană poate încărca materialul care urmează să fie balotat, în timp ce a doua operează pistonul. Comutarea reduce monotonia procesului, asigurându-se în același timp că niciunul dintre lucrători nu se obosește.
Îmbunătățirile ulterioare ale presei de balotat ar include mobilitatea acesteia prin adăugarea de roți. Aceste roți ar trebui să se ridice în timpul procedurii de balotare pentru a se asigura că dispozitivul nu se mișcă. Acest lucru ar permite presei de balotat să fie mutată în jurul unui câmp la material suplimentar care trebuie să fie balotat. Plasarea a două roți la capătul ușii ar permite acestui instrument să fie împins sau tras de oameni sau, de preferință, de un animal. Deoarece se aplică o forță mare în timpul procedurii de balotare, întreaga structură este predispusă să se miște în această direcție. Dacă aceasta este o pacoste sau îngreunează procesul de salvare, greutatea moartă poate fi adăugată la baza structurii, ceea ce mărește forța de frecare rezistentă la mișcare. Alternativ, pene sau vârfuri care sunt atașate structurii ar rezista acestei mișcări, deoarece acţionează ca ancore.
Baloții se extind odată ce au părăsit camera de evacuare, dacă este necesară o anumită dimensiune a balotului, pot fi efectuate experimente sau lucrări suplimentare pentru a potrivi dimensiunile camerei cu dimensiunile reale ale balotului. Toate baloturile fabricate din metode neconvenționale sau prese de balotat mecanice trebuie să fie supuse unor teste pentru a se evalua adecvarea lor pentru construcție. Indicatorii de conținut de umiditate, densitatea uscată, istoricul de umectare, lungimea fibrei și constituția materialului sunt toți necesari pentru a determina utilitatea ca material de construcție. [ 4 ] Probleme suplimentare apar atunci când se utilizează baloți produse de mașini ca acesta pentru aplicații structurale. Natura mașinii produce baloți cu o oarecare variabilitate. Modificările în densitatea balotului pot fi atribuite diferitelor forțe de ambalare a pistonului și cantității de material balotat la un moment dat. Legarea mâinilor într-o zonă închisă introduce, de asemenea, variabilitate. Informații suplimentare despre construcția de baloturi de paie pot fi găsite aici pe appropedia, în timp ce Wikibookul despre construcția de baloturi de paie este o resursă puțin mai cuprinzătoare.
Tehnologii alternative
Există instrumente alternative de balotare cu costuri reduse. Preluarea cu baloți este o metodă simplă, cu o metodă care se explică de la sine. Pe CD3WD se găsește o presă simplă de balotat de fân . Un studiu de cercetare realizat de Departamentul pentru Dezvoltare Internațională din Regatul Unit , ca parte a Programului de producție a animalelor, a oferit dovezi cu privire la beneficiile furajelor de cutie pentru producătorii de lapte din Tanzania. Există dispozitive precum presa de balotat mobil de pin de la Clark Dorman , dar aceasta, deși semnificativ mai mică și mai ieftină decât combinele, este încă alimentată de un motor pe benzină. Cea mai bună alternativă este folosită și dezvoltată de organizația Pakistan Straw Bale and Appropriate Building (PAKSBAB). PAKSBAB se străduiește să aplice metode de construcție adecvate în această regiune de activitate seismică pentru a crea case rezistente la cutremure. Pentru fabricarea baloturilor de paie se folosește o matriță de compresie și un cric de fermă cu motor uman. Acest dispozitiv este probabil mai scump decât designul lui Larry McWilliams, deoarece este din oțel, dar este mai simplu, mai rapid, necesită mai puțin efort uman și reduce variabilitatea balotilor.
Referințe
- ↑ BBC. Știați? Cereale. http://www.bbc.co.uk/gardening/gardening_with_children/didyouknow_cereals.shtml (accesat la 13 aprilie 2010).
- ↑ Board on Science and Technology for International Development, Biroul pentru Afaceri Internaționale, Consiliul Național de Cercetare. Culturi pierdute din Africa: Volumul I: Cereale . Washington, DC: National Academy Press, 1996.
- ↑ Guvernul Alberta. „Folosirea paielor ca combustibil pentru încălzirea fermei”. Agricultura si Dezvoltare Rurala. 6 ianuarie 2010. http://web.archive.org/web/20170109090115/http://www1.agric.gov.ab.ca:80/$department/deptdocs.nsf/all/eng3127 (accesat 13 aprilie, 2010).
- ↑Salt la:4,0 4,1 4,2 Regele, Bruce. Proiectarea clădirilor din baloturi de paie. San Rafael, CA: Green Building Press, 2006.
- ↑ Bou-Ali, G. Straw Bales and Straw Bale Wall Systems. M.Sc. Teză, Tucson: Universitatea din Arizona, 1993
- ↑ Tattersall, Graeme H. EFECTELE DENSITĂȚII ASUPRA PROPRIETĂȚILOR MECANICE ALE baloturilor de paie. Teză, Kingston: Queen's University, 2010.