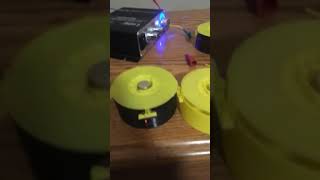
3D printed speaker demo
| Manufacturing files | https://www.myminifactory.com/object/3d-print-3-d-printable-speaker-107278 |
|---|---|
| Hardware license | CERN-OHL-S |
| Certifications | Start OSHWA certification |
3-D Printable Speaker Demo
Project developed by Ben Hubbard
Abstract
This page contains the instructions and files necessary to 3D-print a loudspeaker. This isn't the best sounding speaker on the planet - it could definitely use some tuning, a better suspension, and a real enclosure, but it serves as a very low-cost (~$1.25) solution for producing audio. The original intention of this design is as an educational aide - a speaker is one of the most effective ways to illustrate the interactions between electricity and magnetism. A lesson plan will be included at a later date to guide this education.
Bill of Materials
- 3D Printed Components
- Enclosure - Holds the suspension and the magnet.
- Voice coil - Moving part of the speaker, produces sound
- 2-3 12mmx3mm N52 disc magnets (top/bottom polarized). These are available for $10 on Amazon, with enough magnets for many speakers, or other projects. (the three magnets for this project thus total to $0.75) - Forms part of the motor structure
- 12-14 feet (around 4 meters) 28 AWG enameled copper wire (often marketed as inductor wire). This is available in 500 ft rolls on Amazon for $7. The wire used by a single speaker costs around $0.20 - Used to create the voice coil
(files here)
Tools Needed for Assembly
- MOST Delta RepRap or similar RepRap 3-D printer
- Wire cutters/Diagonal cutters
- Super glue or another quick-setting adhesive to prevent the voice coil from unwinding or buzzing
- Knife or Lighter to strip enamel from wire ends
- Audio amplifier to power the speakers. Aim for one that accepts bare wire. A low cost option from the US is Lepai. A Chinese company called Lepy sells cheaper copycats of Lepai amps on Amazon for around $25.
- A multimeter, if you would like to check the impedance of your speaker. For the amount of wire and diameter of the coil specified, it should be around 2 ohms DC Resistance.
Skills and Knowledge Necessary
- None
Technical Specifications and Assembly Instructions
3D Printing
~40 minute print time for a single speaker
- High quality in the print is not required here. This will take around 20g total of filament, costing around $0.40
- The cone is at a 40 degree angle and requires support material. I used a 10% zigzag support. Support is not necessary anywhere except under the cone.
- Unless you're going for an aesthetic, removing the support is not critical for the sound quality. Future redesign would potentially switch up the cone design - it's unclear how much this helps or hurts the frequency response of the speaker.


Mechanical Assembly
10 - 15 minutes, depending on adhesive set time
Use
- Connect the speaker to an amplifier, and play music, or do a demo to get kids excited about speakers! (lesson plan to come)
- Most amps want 4 or 8 ohm speakers. If you built according to these directions (and didn't double the amount of wire), you have a 2 ohm speaker. I recommend you build a second speaker and wire them in series.
- When using multiple speakers, polarity is important (messed up polarity will make your speakers very quiet, particularly on the high frequency side of things). You'll notice that polarity wasn't a detail of interest during construction. Simply grab a battery (I used a AA), and press one lead against the negative end of the battery, and the other end against the positive lead of the battery.
- If the speaker moves up, mark the wire contacting the positive lead of the battery with red tape.
- If the speaker moves down, mark the wire contacting the negative lead of the battery with red tape.
- Repeat this for each speaker. The leads marked with red tape are your positive leads. When connecting in series, connect a positive lead to the positive terminal on the amplifier, the negative lead to the positive lead of the next speaker, then the negative lead of that speaker back to the negative terminal on the amplifier, making a big loop.
- I recommend turning the bass way down - these things are sensitive to low frequencies. Set them on a table or inlay them into a larger baffle to get a better bass effect, thanks to half space acoustics
Common Problems and Solutions
- Be sure your wiring is correct. Connect positive leads to the positive terminal of the amp, and negative leads to the negative terminal of the amp.
- If you're not getting audio out of your amp, test it with a known functioning speaker. It's pretty difficult to build these and not have any sound produced.
- Check that the enamel is completely stripped off. I twist my stripped leads together end-to-end with 16 AWG stranded wire before connecting to the amp. This gives better odds that everything will make electrical contact.
- There are many sources for buzzing in these speakers. Be sure that the voice coil is well glued down, as well as the suspension and the magnet in the middle. Other buzzing may come from resonance in the suspension (its not very well damped) and misalignment of the voice coil with the standoff holding the magnet. This may require tolerance adjustments and new prints.
- Be sure to turn the
Cost savings
- The cost of this comes in around $1.25 per speaker, depending on where parts are sourced. It's easy to use these for educational demos or even computer speakers if you're living on a budget. Comparable (admittedly better sounding, but less useful for educational purposes) speakers typically go for around $20, making these about 5% of the cost.
| Demo of the speaker playing Chin Up by Puppet |
|---|