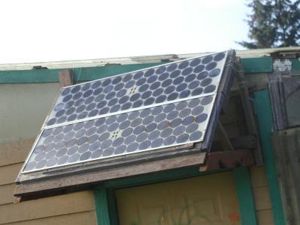
As a student in Lonny's Engr. 305 class, I carried out a project that involved troubleshooting, repairing, testing and maintaining a preexisting off-grid photovoltaic system located at the Arcata Educational Farm, on Old Arcata road, Arcata, CA.
This project was carried out over the 2009 spring semester. The goal of the project is to provide AEF with a renewable source of off-grid electricity. The electricity powers an answering machine and a portable stereo system for the enjoyment of the farmers.
The AEF provided a binder full of literature on the photovoltaic system; including operating manuals for the inverter, charge controller, and answering machine, as well as troubleshooting guidelines and performance monitoring checklists. These papers as well as additional technical literature provided the basis for the troubleshooting process.
The previous system used a single panel and powered both the answering machine, and a fan for the disassembled compost toilet. This project involved adding an additional panel in parallel to the original system, providing additional power. This Project Involves
- Determine how AEF would best benefit from Photovoltaic Power.
- Research into literature regarding sizing and design, components, installation, testing and maintenance of the photovoltaic system
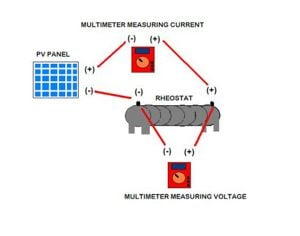
- Testing of panels to determine the current-voltage curve using a rheostat and two millimeters.
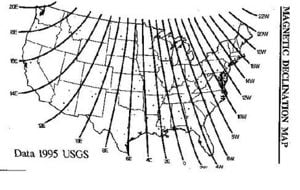
- Use a compass and an azimuth chart to determine the direction of true south
- determine insolaton, using peak hours for Arcata to estimate the power produced by system.
- Follow a troubleshooting process to identify which components of the system are not working
- Replace all malfunctioning parts with appropriate replacements
- Wire additional panels in parallel to the existing system
- Build upon the preexisting mounting system so it can support an additional panel
- Carry out monitoring and testing to determine system performance.
Literature Review[edit | edit source]
follow link for literature review
Criteria[edit | edit source]
| Critera | Constraint | Success |
|---|---|---|
| Cost | Under $800 | yes |
| Sustainable | provide an off-grid source of electricity | yes |
| Renewable | the sun provides a renewable source of energy | yes |
| Educational | the system is an example of a photovoltaic application and parallel wiring | yes |
| User friendly | the system comes with troubleshooting guide and component manuals | yes |
| Appropriate | the system provides electricity to an off grid location and powers useful appliances | yes |
Timeline[edit | edit source]
| task | deadline | on time |
|---|---|---|
| Visit Arcata Educational Farm and assess project, make materials list | February 26 | yes |
| Carry out testing with amp/voltmeter and other tools to determine problem | March 15th | yes |
| Test panels, acquire needed parts | March 27th | yes |
| Attach additional panel, make mounting structure | April 7th | yes |
| test complete system | April 20th | yes |
Research[edit | edit source]
Problem Assessment[edit | edit source]
The first step was to collect as much information as possible about the preexisting system from AEF. This includes manuals for system components, individual opinions about could be wrong with the system, as well as any existing literature written on by other students who had previously worked on the photovoltaic system.
System Wiring[edit | edit source]
- The panels of the system provide direct current (DC) power to the inverter. DC systems use lower voltage and the current flows only in one direction.
- The inverter supplies alternating current(AC), which is used by household appliances.
- Working on a photovoltaic system requires the use of a multi-meter to check continuity, current, and voltage, for both AC and DC parts of the circuit.
| Table 3: Color Coding of Wires | |||
|---|---|---|---|
| Alternating Current (AC) Wiring | Direct Current (DC) Wiring | ||
| Color | Application | Color | Application |
| Black | Hot | Red | Positive |
| White | Neutral Ground | Black | Negative |
| Green or bare | Equipment Ground | Green or Bare | Equipment Ground |
| Red | Ungrounded Hot | ||
Safety[edit | edit source]
Safety is a crucial aspect of working on electrical systems. The following precautions were taken while working on the photovoltaic system.
- Always wear safety glasses when working with electrical circuitry
- Do not work alone on electrical circuits
- do not handle the instrument, its test leads, or the circuitry while high voltage is being applied
- Turn off the power and discharge any capacitors in the circuit before connecting to or disconnecting from the circuit.
- Do not change switch settings or test lead connections while the circuit is energized.
- Locate all voltage sources and accessible current paths before making connections.
- Check and double check switch positions and jack connections before applying power to instrument
- Make certain that the equipment you are working with is properly grounded and fuses are of the proper type and rating
Parallel Wiring[edit | edit source]
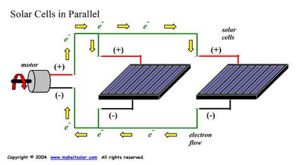
By adding an additional panel, the system provides more power and is useable for a wider array of applications. By having two panels in parallel, their output voltage remains equal, however the current is the sum of both the panels’ individual currents.
Solar Site Analysis[edit | edit source]
- Solar insolation is solar radiation striking the earth’s surface at a particular time and place. On a clear day, solar insolation is equal to 1000 watts/ square meter of surface.
- Peak sun hours are the number of hours per day where the solar insolation is equal to 1000 watts/square meter (A watt is equal to a Joule per second)
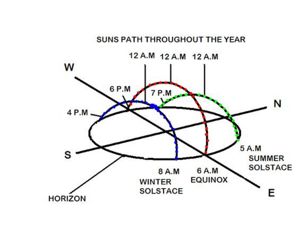
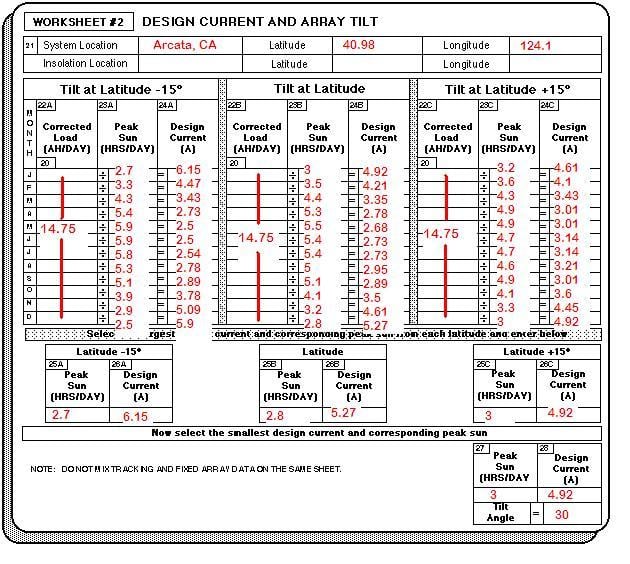
It is important to remember that magnetic south is not the same as true south. A compass aligns with the earth’s magnetic field, which is not necessarily aligned with the earth’s rotational axis. This magnetic declination from true south is known as the azimuth, and varies depending on specific location. The optimal tilt occurs when the panels are oriented perpendicular to the suns rays. The highest average insolation will fall on a panel with a tilt angle equal to the latitude of that specific area. (Arcata has a latitude and longitude of 40.98 by 124.1.) By using the chart below, the best orientation the panels is determined to be about 17 degrees east of magnetic south, with a 41 degree tilt. (year round loads should have a tilt angle equal to the latitude of that location.)
System Components[edit | edit source]
The main parts of the photovoltaic system include the charge controller, circuit breaker, inverter, and battery. The operating manuals of inverter, charge controller, and answering machine provide more specific information such as performance limits which are used to size the system.
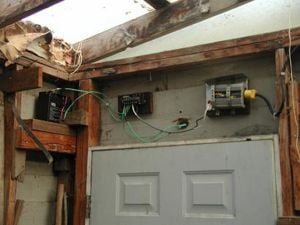
Charge Controller[edit | edit source]
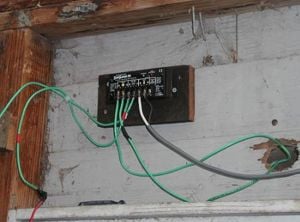
The photovoltaic control is a voltage regulator.
- The primary function of a controller is to prevent the battery from being overcharged by the array.
- Many PV controls also protect a battery from being overly discharged by the load.
- The charge controller used in this system is a Sun Saver-10 by Morningstar Corporation with the specifications shown on the table below.
| Table 4: Technical Specifications of Charge Controller | System Volts | (V) | 12 |
|---|---|---|---|
| Maximum PV Volts | (V) | 25 | |
| Rated PV Input | (A) | 10 | |
| Rated Load | (A) | 10 | |
| Maximum Array Short Circuit Current | (A) | 12.5 | |
| Setpoint for Sealed PWM Batt. | (V) | 14.1 | |
| Setpoint for Flooded PWM Batt. | (V) | 14.4 | |
| Low Voltage Disconnect (LVD) | (V) | 11.5 | |
| LVD Reconnect | (V) | 12.6 | |
| Ambient Temp. Range | Deg.C | (-40 to 60) | |
| Temp Compensation | mV/Deg.C | (-28) |
Battery[edit | edit source]
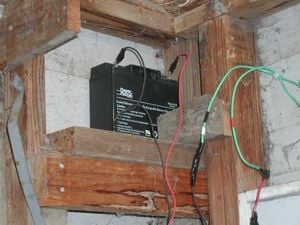
Batteries store direct current electrical energy in chemical form for later use. In a photovoltaic system, the energy is used at night or during cloudy or rainy weather.
- This system uses a Power Patrol absorbed glass mat (AGM) 12 volt 18 amp-hour battery.
- AGM batteries are sealed saturated absorbent glass (boron silicate) mats between the plates instead of an electrolyte fluid. This makes them resistant to freezing and leaking.
Inverter[edit | edit source]
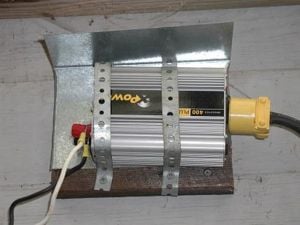
Inverters take DC current electricity and convert it to the AC electricity commonly used by appliances.
- In principle, inverters use transistors to abruptly switch the polarity of the direct current electricity from positive to negative at a very vast rate. This creates a sine wave form.
- A transformer is then used to step up the voltage for AC appliances.
- Modern inverters use sophisticated multi step process variable timing cycles to create AC voltage.
Below is a table of the Xantrex Xpower400 inverter Inverters technical specifications.
| Table 5: Technical Specifications of Inverter | AC output voltage | (V) | 120 |
|---|---|---|---|
| DC output voltage | (V) | 10-15 | |
| Continuous AC output power | (W) | 320 | |
| 5 minutes AC output power | (W) | 400 | |
| Max.AC output surge power | (W) | 600 | |
| AC output frequency | (Hz) | 56-64 | |
| AC output waveform | Modified sine wave | ||
| Batt. drain with no load | (A) | 0.2 | |
| Efficiency | % | 90 | |
| Low battery alarm | (V) | 10.7 | |
| Low battery shut down | (V) | 10 | |
| High battery shut down | (V) | 15 |
Solar Panels[edit | edit source]

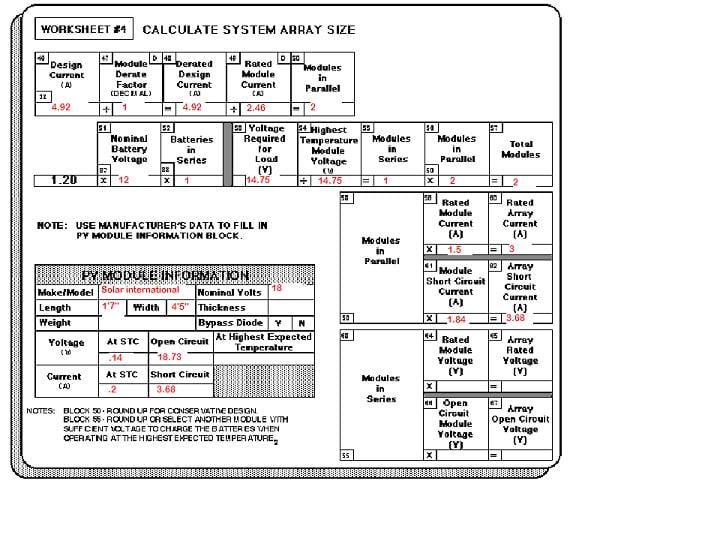
Photovoltaic panels consist of semiconductor wafers beneath a sheet of glass. The panels in this system were manufactured by Solar International Inc. They were originally rated at 20 watts, and due to wear and tear they now produce around 18.5 watts.
- photons in the light pass through glass and hit semi conductive PV cells
- Electrons are released and absorbed by the silicon material which allows electron flow in one direction
- The parallel arranged cells within the module provide DC power
Design[edit | edit source]
System Sizing[edit | edit source]
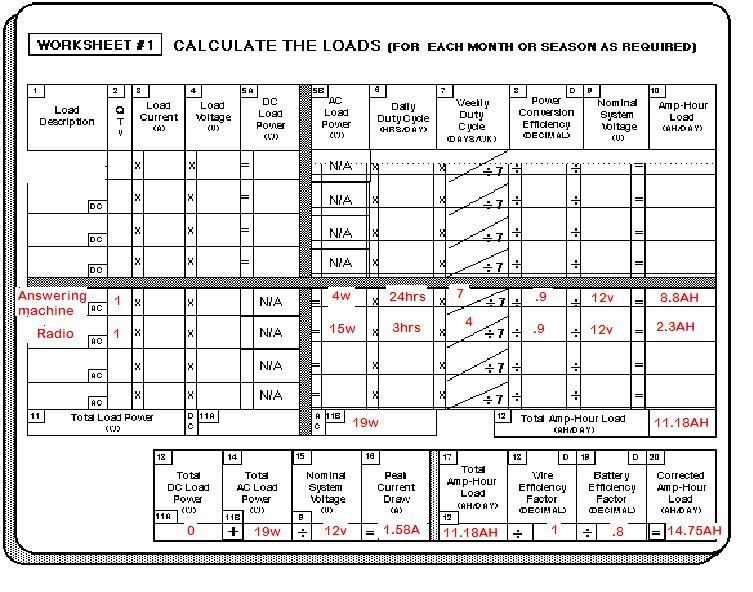
The previous photovoltaic system powered an answering machine and a fan for the composting toilet, however the compost toilet is no longer in use. After asking various people involved with the AEF what electrical appliances would be most useful on the farm they mentioned the need for a radio.
- In addition to a radio, the system can charge cell phones, provide lighting and supply power tools.
- The system must provide a constant small amount of power for the answering machine and large amounts of power over a short time for other appliances.
- By adding an additional panel, the system can recharge the battery faster during the daytime when the sun is shining and appliances are most likely to be used.
The battery is more likely to be fully charged when the sun goes down and power must be provided throughout the night for the answering machine.
- According to the charge controller owner’s manual, the maximum allowable array voltage is 25 volts. By wiring a second panel of the same model in parallel the overall panel output is below 25 volts while amperage output is doubled, providing enough power for more energy demanding appliances.
To size the photovoltaic system requires these basic steps:
- Estimating the electrical load
- Design current and array tilt
- Sizing and specifying batteries
- sizing and specifying array
It is important to note that while this approach sizes the system around the energy demand of the loads, the sizing of the AEF system was constrained within the parameters of the pre existing components of the system. The cost of having AEF buy completely new components to get optimum system performance would outweigh the overall benefit of the project. Actual performance of the system is found in the testing & infrastructure section.
Sizing Worksheets[edit | edit source]

Construction[edit | edit source]
- The first task to be completed was to determine what was wrong with the system. Initially I was under the impression that the battery was the major cause of the problem. However when I measured it on the site it had a charge of a little over 12 volts. Later on it was charged from an ac source with a trickle charger up to a voltage of 12.8 volts and used again in the system.
- When connecting the panels to the system, voltage appeared at the terminals of the charge controller. After hooking up the test battery directly to the charge controller, bypassing the fuse on the positive battery wire, the charge controller and inverter seemed to work fine. However in my own folly I overlooked the importance of having a fuse in front of the battery. By accidentally having the wires touching the battery terminals to their opposite ends, causing the system to reverse polarize and destroying the inverter.
- The next step was to buy some replacement fuses, wire splice caps, a new ac power outlet, electrical tape and a new inverter. I found a newer model of the same inverter on eBay. Once the replacement inverter and the new power outlet were installed, the system seemed to operate.
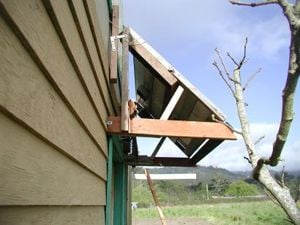
- Now that a new panel was part of the system, it was necessary to find a way to secure it to the building. The only reasonable way to connect it to the other panel in parallel without long unnecessary wiring was to integrate it into the preexisting mounting structure for the PV system. This was accomplished by using lumber found on site at the AEF to extend the beams from the house and secure it to the upper part of the building. Some metal bracing also found on site was used to reinforce the structure to the frame of
the shed.
Materials and Cost list[edit | edit source]
| Amount | Item | Cost |
|---|---|---|
| 1x | Xantrex 400 inverter | $60 |
| 1x | 12V 15AH test battery | Borrowed |
| 1x | AT&T answering machine | on site |
| 1x | electrical outlet | $2.50 |
| 2x | multi-meters | borrowed |
| 1x | roll of 10 gauge wiring | donated by AEF |
| 1x | wire splicer | borrowed |
| 1x | box of galvanized 1.25"wood screws | $1.50 |
| 1x | hammer | borrowed |
| 4x | 2x4" beams of wood | donated by AEF |
| 2x | solar panels | donated by CCAT |
| 1x | 12V 18AH AGM Battery | on site |
| 1x | Sunsaver charge controller | on site |
| 1x | portable radio | donated by AEF |
| 1x | rheostat | borrowed |
| 1x | roll of Romex wiring | on site |
| 1x | Roll of 12 gauge wiring | on site |
| 1x | screwdriver | borrowed |
| 6x | wire splice caps | $1.50 |
| 1x | box of galvanized 2" nails | $2.50 |
| 1x | hand saw | borrowed |
| 1x | box of assorted fuses | $6.35 |
| 2x | 2x2" beams of wood | donated by AEF |
| 1x | battery tester | borrowed |
| total cost | $74.35 |
Troubleshooting[edit | edit source]
Routine Maintenance[edit | edit source]
- Test system meters using a device where you know the voltage and verify it is working and correct
- Test array/panel voltage with a multi-meter to measure the voltage/amperage(in full sun) in an array/panel and record
- Measure battery voltage before and after connecting array and record
- Check status indicators on charge controller and inverter if available
- Check all wiring to see if any is live by testing voltage and/or current at all points before and after a component
- Check all terminals and wires for loose, broken, corroded or burnt connections or components
- Test system under full sun and re-test each point and component for common voltage/amperage
Troubleshoot individual components[edit | edit source]
- Battery
If trouble occurs, turn off then back on. If problem persists, take home to try in different outlet. For programming, see enclosed user manual.
- Charge Controller
For hook up and wiring instructions, please see enclosed diagram. For basic troubleshooting, test all three connection points with a voltmeter. If they are bad, it may need replacement. If they are good (have all the same voltage), the problem is most likely something else.
- Battery
Check all points for corrosion and test each terminal with a voltmeter. If the voltage is below 12 volts and/or the Low Voltage Disconnect light is lit on the Charge Controller, unplug the answering machine and wait until you have two hours of full sun, then re-test. If not charging, the battery may be bad.
- Inverter
Using a voltmeter, test points on both sides of the inverter(one is AC and the other DC), during full sun if possible. For more troubleshooting, see the enclosed manual.
- Panel
Test panel by disconnecting from charge controller during full sun and using a voltmeter to test the voltage. It should be around 18 volts DC. The chart on the following page is a table of common faults and possible remedies.
Troubleshooting Table[edit | edit source]
| Battery is not charging | Measure PV array open circuit voltage and confirm it is within normal limits. If voltage is low or zero, check the connections at the PV array itself. Disconnect the PV from the controller when working on the PV system.
Measure PV voltage and battery voltage at charge controller terminals if voltage at the terminals is the same the PV array is charging the battery. If PV voltage is close to open circuit voltage of the panels and the battery voltage is low, the controller is not charging the batteries and may be damaged. |
|---|---|
| Battery voltage is too high | Disconnect PV array, disconnect lead from the battery positive terminal and leave PV array disconnected. The green charging light on charge controller should not be lit. Measure the voltage at the solar panel terminals of the charge controller. If green light is on, or battery voltage is measured at the terminals the controller may be damaged. |
| Load not operating properly | Check that no fuses are defective or circuit breakers have been tripped. |
| Low voltage shutdown | Shorten cables or use heavier cables, recharge battery, allow unit to cool, improve air circulation, locate unit to cooler environment. |
| Fault light on, AC load not working | AC products connected are rated at more than the inverters power rating, overload shutdown has occurred
The AC products connected are rated at less than the inverters continuous power rating. The product exceeds the inverters surge capacity. |
| Reverse Polarity connection on inverter | Check connection to battery, the inverter has likely been damaged and needs to be replaced. |
| Loads disconnecting improperly | controller not receiving proper battery voltage, check battery connection.
Adjustable low voltage disconnect is set too high. Reset Adjustable low voltage disconnect using a variable power supply |
| Array fuse blows | Array short circuit test performed with battery connected. Disconnect battery to perform test.
Array exceeds rating of controller, add another controller in parallel if appropriate or replace with controller of greater capacity. |
Testing & Infastructure[edit | edit source]
testing[edit | edit source]
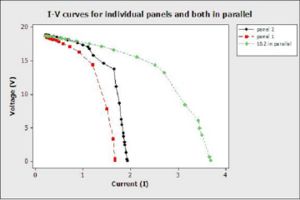
It is important to test the performance of the panels so that the system power output can be calculated. The performance of a photovoltaic panel are measured by its short circuit current, its open circuit voltage, and the maximum power point, all of which are expressed by graphing the panels current against its voltage, known as an I-V curve. To determine the current-voltage curves, it was necessary to learn how to configure multi-meters, a rheostat, and photovoltaic panels in a way such that current and voltage readings can be taken incrementally as the rheostat is adjusted.
recording data for each individual panel and both panels wired in parallel, Minitab software was used to create a graph of the current-voltage curve.
A battery tester was used to determine that the battery was functional.
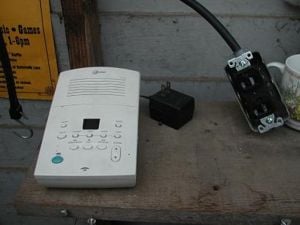
- The battery was charged to 14.4 volts and attached through spark plug and allowed to discharge the battery fully. the answering machine stayed on for almost 2 whole days
- When the battery was hooked up to the answering machine through the inverter which only lets the battery charge drop to 10.7 before sounding an alarm. the answering machine stayed on for about 10 hours before being disconnected by the inverter.
- When the charge controller is hooked up to both the battery and the answering machine, the fully charged battery lasts 9 hours before being disconnected by the inverter
infrastructure[edit | edit source]
To prevent damage to the system, a sign is posted stating the following information
- Always refer to troubleshooting guides, operating manuals before taking apart or maintaining system
- Always turn off inverter before disconnecting battery or any other components of system.
- when reattaching components to the charge controller use the following order, with negative first:
- battery
- PV array
- load
- do not attach anything to the last screw
- the inverter cannot recharge nickel-cadmium batteries or rechargeable tool batteries
- Never attach black wires to red terminal or vice versa