


Introduction
Rain catchment systems can be constructed in many areas, both to increase the regeneration of the local aquifer with rainwater and to reduce the soil erosion from rainfall. Rain catchment during wet periods can also help full fill needs during dry periods. Rainfall can be used for drinking water, but here at Pedregal it is mainly used for irrigation and use in aquaculture. This is one project in a series of soil conservation, groundwater recharge, and farming demonstration projects at Pedregal a Permaculture Demonstration Center in San Andres Huayapam, Mexico.
Utilizing Sloped Terrain
System Components of Sloped Terrain Catchment
Storm water or creek water is guided to the place by gravity flow, but rather then following its natural path, artificial basins, channels and ditches are dug so that the rainwater is diverted from its natural path and into the tank. Tanks can be made of a shallow pan of rammed earth, an artificial pond, or a cistern of ferrocement. The tanks at Pedregal are artificial ponds where they have added plant cover to synthesize a pond habitat.
Canals
Should divert water and be placed so that water can easily flow down into the tank.
Microfilter Dams
Microfilter dams are small walls of loose rock wrapped together by fencing or strong mesh and placed in canals. No mortar is used and water is supposed to be able to flow freely through the small dam, while preventing soil, silt, and pebbles from going through the canal and into your tank. This can help reduce maintenance issues with your tank by reducing the need to drain your tank and shovel out sediment. Click on the link for more information on Micro filter dams.
Tank
Placement
The tank's placement is one of the most important aspects of the system. You want the tank to be placed above the site of use, to diminish costs and to eliminate the energy demands of a pump. If your tank is below your area then there are a variety of water pumps.
Size Requirements:
The dimensions of your tank depends on the volume of water you need to use. The following dimensions and capacity are based on cylindrical ferocement tanks.
| diameter | depth | capacity |
| 2m | 2m | 6,280 liters |
| 2.20m | 2.20m | 8,360 liters |
| 2.40m | 2.20m | 9,950 liters |
| 3m | 2.40m | 16,960 liters |
| 3m | 3m | 21,205 liters |
Open or Closed Storage:
If using the water for domestic use it is suggested to have a closed container. Closed containers offer the benefit that garbage, organic matter or other pollution sources for fresh water do not accumulate inside. It also helps prevent algae or bacteria that rots quickly from growing inside your fresh water container.
If using the water for irrigation then an open container is very functional as well as cut down on the costs of storage and hold large amounts of water. If the container is open it is very desirable to have the water frequently moving to oxygenate the water and prevent mosquito problems. Rather then using pumps to circulate the water, animals like ducks and fish can provide the movement necessary to keep water moving as well as help control mosquito populations and through their waste they can add a high nitrogen fertilizer to your crops. Read more onaquaculture practices. At Pedregal they have one open storage container that is a fish hatchery, another one is a pond with water loving plants, and the last two are positioned so that fresh creek water is constantly moving in and old water out.
Ferrocement Tanks
The following is for a tank with the capacity of 9,950 liters.
Materials:
- 7 packages of cement
- 48 sheets of sand sifted
- 25 meters squared of chicken wire (or double if necessary
- 190kg of electro-welded mesh with a thickness of 3/8 (but the tank size will dictate the necessary size of the mesh.
How to Build a Ferrocement Tank for Closed Storage:
#Foundation: Start with a level foundation. Choose the right place - preferably a non-sandy or rocky terrain. Dig a cylindrical hole, leaving the preparation to build a parapet on the top edge. If the the foundation is uneven one needs to refine it with a mixture of soil, lime and a little cement. To make the cylindrical walls the chicken mesh will be placed on top of the electro-welded wire and tied together with a thinner metal wire. #Walls: Once tying the electro-welded wire to the chicken wire, you want to lift the wire frame into place and set it on top of you foundation, wrapping it into a cylindrical shape with an open top and no mesh for the bottom. On top of the metal frame you apply one part cement by two sand. This mixture should have a thick consistency and pressure should be applied with the back of the trowel. The cement mix should completely fill the holes and cover the metal frame. The cylindrical shape gives it more resistant walls, so a layer 3 cm thick is sufficient to resist collapse from pressure exerted by a full tank. To avoid cracking the mixture must stay moist, so it is recommended protect it from the sun, while drying. #Top: After the walls, the tank is covered with a slab of cement, which has an opening for the water to enter and an opening that allows for continued maintenance and interior cleaning of the tank when needed.
-
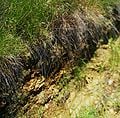
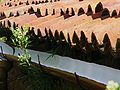
Ditch along Road way on top of Hill
-
-
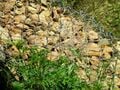
Mesh fencing around loose pile of rocks to make the micro filter dam
-
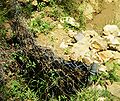
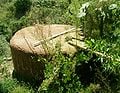
Storm water run off runs into this cement lined tank by gravity
-
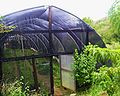
The Tank is high enough for there to be enough pressure for use in sprinkler system in the plant nursery.
-
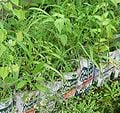
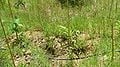
Happy nursery plants
-
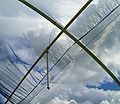
Pressurized Sprinkler System
-
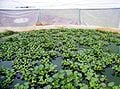
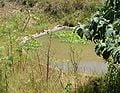
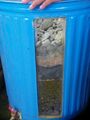
Water is also used for maintaining water levels in the aquaculture pond full of baby fish.


Utilizing Roofs
System Components of Roof Catchments
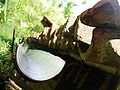
The system design should include a sloping roof with a fixed gutter of PVC, galvanized steel laminas, or some other materials in the lower part, so you can collect the water that falls on the roof. This gutter must have a small slope and its lower end should lead into a hose or tube which will allow the water to flow into a storage tank. To find the slope of your gutter, first figure out the slope of your land, do not rely on the slope of your roof to tell you this. A small self cleaning filter can be installed between your gutters and your PVC to prevent problems of leaf litter or other things from clogging the system, however Pedregal does include this component. The system can also include a first flush in order to clean the roof of unwanted accumulated debris, leaves, and bird excrement, without having to store it in you tank. This first flush allows the first ten to fifteen minutes of rain to pass your system without going into your storage tank. The remaining water goes to the tank, which in this case is made of ferro-cement. If the end use is drinking water, then some type of extra filter should be added. At Pedregal they created a carbon filter, with alternating layers of sand and charcoal for the drinking water. The rest of the water is used for drip irrigation and aquaculture ponds.
Components of Pedregal Roof System
- Canals both of galvanized sheeting and of PVC
- PVC tubes
- First Flush
- Ferro-cement Tank
- Carbon Filter
- Drip Hoses for Irrigation
-
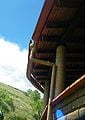
PVC Gutters are great for straight walls and easy to make
-
PVC Gutter in the back of the building
-

Gutter attached to roof with wire shaped into hook
-
Front gutters made of galvanized sheeting to fit curves of the rounded front of the building. These gutters empty into an open PVC pipe.
-
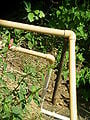
The top PVC pipe goes to the tank and the bottom is the First-flush, emptying back into the creek.
-

Roof gutters heading into PVC then into tank at right
-
Ferrocement Tank
-
Water Used for Irrigation.
-
Water used for Drinking first goes through a carbon filter


