- needs more advanced ink description to be practical
Charcoal Pen: Maker Information
Project developed by [Max Pletcher Mackspletch (talk) 10:07, 5 December 2016 (PST)]
Template:Statusboxtop Template:Status-design Template:Status-prototype You can help Appropedia by contributing to the next step in this OSAT's status. Template:Boxbottom
Abstract
- This charcoal pen is useful in developing countries as some school supplies cannot be found and afforded in low class towns and villages. This pen was designed as a benchmark design for solving that problem! This project is in response of the OSAT project, projects that are meant to change the world for the better. It is still in development and should be tested more as well as possibly edited in its design if need be.
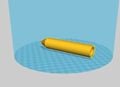
2. Photo
- Image of Printed Charcoal Pen
-

Bill of Materials
- Filament:
- Bolt: 20g @ $20.1294 / kg - $0.40
- Pen Shaft: 14g @ $20.1294 / kg - $0.28
- Total Filament: 34g @ $20.1294 / kg - $0.68
- Charcoal from a fire or some type of colored powder or paste. (Darker the better)
- Total Cost: ~$0.68
SOURCE AND STL FILES
- All source and stl files can be found here: | Youmagine Link
- File:Charcoal Pen.FCStd
- To get a Blender File of this project, go to link above
- To get STL's of project, go to link above
Fabrication of the OSAT: Tools
- MOST Delta RepRap or similar RepRap 3-D printer
- Spool of PLA or similar printing plastic
Skills Needed to Build OSAT Project
- No Special Skills or knowledge required
Technical Specifications and Assembly Instructions
- Print Settings
- Bolt: 60% infill, 0.2 mm layer height, important to have high infill for maximum strength. Print Vertically for best results
- Pen Shaft: 10% infill, 0.2mm layer height, Print Vertically for best results
- Print Times (Varies)
- Bolt and Pen Shaft Printed Together: 1 hour 55 minutes
- Overall Time: 1 hour 55 minutes
- Assembly
- Assembly Time: time ~5-15min
- Take any charcoal or coal that you have available and crush it into a semi chunky powder/paste. Make sure that it retains its color so that it will show up on paper. Next take the charcoal and insert it into the end of the pen. Once this is completed, take the Bolt and begin threading it into the pen. Once the charcoal/ powder leaves the vessel, it is ready to use.
Common Problems and Solutions
- Make sure to print the bolt with a high infill for maximum strength. This helps break down the charcoal as well as keep the pen in shape.
- If there is a file on this project is unsatisfactory to your liking, please edit the attached files to your liking and upload to this page!
References
- Part of Design uses part from user ForrestChandler on Thingiverse, you can find his part here:| Thingiverse Link
- Software Packages used include and are limited to Blender and FreeCad
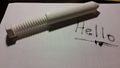
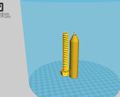
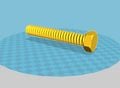
Gallery
- Miscellaneous Images of Project and Files
-
-
-