
Tourniquet Simulator
General Information
[edit | edit source]
This set of build instructions was adapted from the Simple Tourniquet Simulator developed by CrashSavers. The original instructions may be found at the CrashSavers Tourniquet Simulator page and the accompanying Step-by-Step Building Manual (PDF).
| Field | Details |
|---|---|
| Features / Basic Operation | The simulator uses a spring-compression mechanism beneath a PVC half-pipe surface to provide tactile feedback during tourniquet application. A hand-operated fumigator pump circulates water through a latex hose threaded under the PVC surface. When a tourniquet is applied to the PVC half-pipe, the springs compress and squeeze the hose, reducing or stopping fluid flow — simulating arterial occlusion. This provides real-time visual feedback: successful tourniquet application stops the flow; insufficient tightening allows continued flow. |
| Current Development Status | Simple Version (fully mechanical, no electronics). An Advanced Version incorporating VR/Arduino components exists but is excluded from this page per project scope (fully hands-on requirement). |
| Build Time / Cost | Source estimate $41 USD. Approximate cost $75–150 USD when purchasing individual items from online retailers (hardware items typically sold in minimum pack quantities). Local hardware stores or materials already on hand may reduce cost significantly. Build time not specified in source material. |
| Specialized Tools | Hand saw, drill with 3.2 mm (1/8 in), 15.9 mm (5/8 in), and 7.9 mm (5/16 in) bits, C-clamp. An optional rotary tool (Dremel) can speed certain cuts. Standard workshop hand tools otherwise. |
| Version | Simple Version 1.0 |
| Development Team Contact | CrashSavers (CrashSavers Appropedia page) |
-
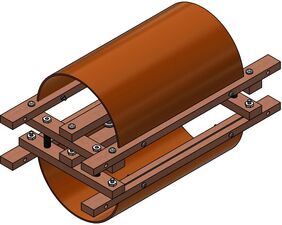 Mechanical system isometric view
 -
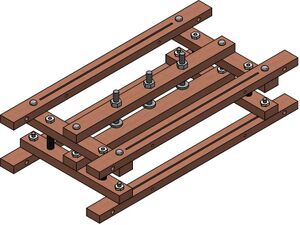 Top-down view
 -
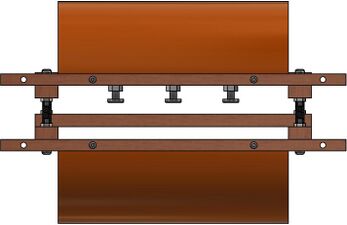
 Front side perspective
 -
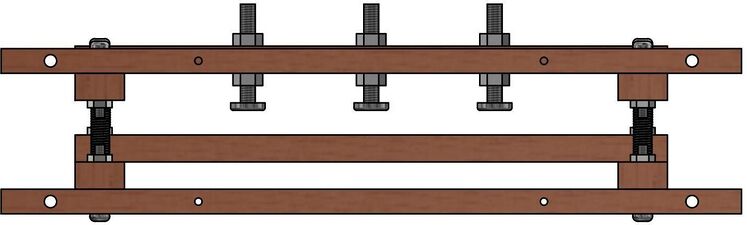
 Full front view


Tissues
[edit | edit source]| Tissue | Quantity | Material | Vendor/Cost | Notes |
|---|---|---|---|---|
| Skin | 2 | PVC pipe, 10 cm (4 in) diameter (halved lengthwise) | $10-25 | Simulates the external limb surface. Two half-pipe sections cut from a single 10 cm (4 in) PVC pipe. Forms the contact surface onto which the tourniquet is applied. Provides realistic tactile feedback during application. |
| Blood vessel | 1 | Latex plastic hose, 5 mm (3/16 in) diameter, 1 m (39 in) length | $7-12 | Simulates arterial blood flow. Threaded through the compression zone beneath the PVC half-pipes. When tourniquet pressure is applied, spring compression squeezes the hose and reduces or stops fluid flow, providing real-time feedback of successful vascular occlusion. |
| Blood | 1 | Water | $0 (free) | Simulates blood flow. Circulated through the latex hose via hand-operated pump. Visual and tactile feedback indicates successful tourniquet application when flow stops. |
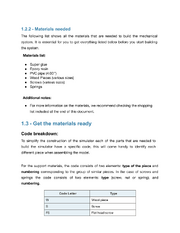
Structural Parts
[edit | edit source]- Parts Reference
-
 Complete materials reference
 -
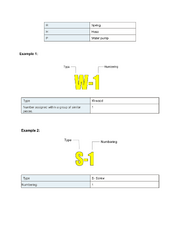 Component code reference (W=Wood, S=Screw, FS=Flat head screw, R=Spring)
 -
 Hardware specifications: screws, nuts, springs, and PVC sections


| Structural Parts | Quantity | Material | Approximate Cost | Notes |
|---|---|---|---|---|
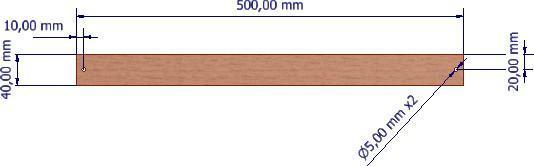
| Frame long sides (W-1) | 4 | Wood strips | $3-8 | 300 × 20 × 10 mm (12 × 0.8 × 0.4 in) each. Two holes Ø5.0 mm (3/16 in) at 50 mm (2 in) and 250 mm (10 in) from one end. Can be cut from common pine or basswood stock along with other W-pieces. |
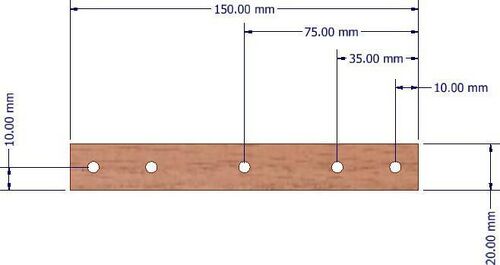
| Frame short sides (W-2) | 4 | Wood strips | $3-8 | 150 × 20 × 10 mm (6 × 0.8 × 0.4 in) each. Five holes Ø5.0 mm (3/16 in). Can be cut from same stock as W-1. |
| Sliding mechanism guide (W-3) | 1 | Wood strip | $2-5 | 240 × 20 × 10 mm (9.5 × 0.8 × 0.4 in). Three holes Ø6.0 mm (1/4 in) + two holes Ø5.0 mm (3/16 in) (5 total). Larger holes accommodate sliding mechanism hardware. |
| Vertical supports (W-4) | 2 | Wood strips | $4-10 | 500 × 40 × 10 mm (20 × 1.6 × 0.4 in) each (wider than other pieces). Two holes Ø5.0 mm (3/16 in). Main structural height members supporting the PVC half-pipes. Requires 40 mm (1.6 in) wide stock. |
| Spring compression guides (W-5) | 4 | Wood strips | $3-8 | 175 × 20 × 10 mm (6.9 × 0.8 × 0.4 in) each. Two holes Ø5.0 mm (3/16 in). Guide plates for the spring compression mechanism. |
| Base board (W-6) | 1 | Wood board (wood slice) | $8-20 | 600 × 400 × 10 mm (23.5 × 15.75 × 0.4 in). Features a notch at top (60 mm (2.4 in) deep, 145 mm (5.7 in) + 110 mm (4.3 in) inner spacing). Serves as the simulator base / mounting board. Can be cut from a standard plywood sheet. |
| Secondary guide/brace (W-7) | 1 | Wood strip | $2-5 | 240 × 20 × 10 mm (9.5 × 0.8 × 0.4 in). Two holes Ø5.0 mm (3/16 in). Notch/cutout on one end. Diagonal brace or secondary guide piece. |
| Frame assembly screws (S-1) | 16 | Screws 3.0 mm × 4.5 cm (1/8 × 1-3/4 in) | $5-12 | Secure W-1 and W-2 wood frame layers at corners. Typically sold in packs of 50–100. |
| Frame extension screws (S-2) | 4 | Screws 3.0 mm × 8.0 cm (1/8 × 3 in) | $5-12 | Attach vertical supports W-4 to frame. Recommended to use with washers. Sold in multi-packs. |
| Corner post fasteners (S-3) | 3 | Screws 4.0 mm × 8.0 cm (5/32 × 3 in) | $5-12 | Create vertical posts/axles through frame corners. Sold in packs of 10+. |
| Mechanism mounting screws (FS-1) | 8 | Flat head screws 3.0 mm × 8.0 cm (1/8 × 3 in) | $5-12 | Install spring compression guide mechanism with W-5 plates. Pan head may be substituted if flat head unavailable in this size. |
| Small fastener nuts | 36 | Nuts 3.0 mm (1/8 in) | $3-8 | Secure S-1, S-2, and FS-1 screws. Sold in packs of 50–100. |
| Large fastener nuts | 6 | Nuts 4.0 mm (5/32 in) | $3-8 | Secure S-3 corner post screws. Sold in packs of 50+. |
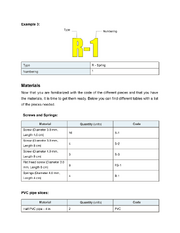
| Compression springs (R-1) | 4 | Spring 4.0 mm × 4.0 cm (5/32 × 1.6 in) (cut from one 30 cm (12 in) spring) | $4-10 | Cut one 30 cm (12 in) spring into 4 equal pieces (≈7.5 cm (3 in) each, compressed to 4 cm (1.6 in) working length). Provide resistance when tourniquet is applied. |
| Connection sealant | 1 | Teflon tape | $1-5 | Wrap all hose connections to prevent leaks. |
| Fluid pressure pump | 1 | Water pump (fumigator / hand-operated pump sprayer) | $8-15 | Creates fluid pressure simulating blood flow. Hand-operated. |
| Water reservoir | 1 | Plastic water bottle | $0 (free) | Collects water returning from the simulator circuit. Any standard plastic bottle. |
| Wood joint adhesive | As needed | Super glue | $2-8 | For reinforcing wood joints during frame assembly. |
| Structural bonding agent | As needed | Epoxy resin | $5-12 | For permanent structural bonds in the frame. |
| Hose securing ties | As needed | Plastic cable ties (bag) | $3-8 | Secure hose at 3 points along the mechanical frame. Do not overtighten — ties should hold hose without restricting flow when no tourniquet is applied. Sold in bags of 100+. |
Tools and Fixtures
[edit | edit source]
| Tool/Fixture | Quantity | Description and Notes | Approximate Cost |
|---|---|---|---|
| Hand saw | 1 | For cutting wood pieces W-1 through W-7 and PVC pipe to length. | $8–15 |
| Drill | 1 | For drilling mounting holes in all wood pieces. Corded or cordless; 12 V–20 V sufficient. | $25–60 |
| Drill bit — 3.2 mm (1/8 in) | 1 | Pilot holes for screws. | $3–6 |
| Drill bit — 15.9 mm (5/8 in) | 1 | Larger holes for mechanism hardware. | $5–10 |
| Drill bit — 7.9 mm (5/16 in) | 1 | Medium holes for frame assembly. | $4–8 |
| Philips screwdrivers | 1 set | For driving all S-1, S-2, S-3, and FS-1 screws. | $8–20 |
| Pliers | 1 | For holding nuts during screw fastening and cutting springs. | $5–12 |
| 400-grit sandpaper | As needed | Smooth all cut edges on wood and PVC pieces. | $3–8 |
| Measuring tape | 1 | Mark cutting lines and hole positions on wood pieces. | $4–10 |
| C-clamp | 1 | Secure wood pieces during drilling and cutting. | $5–12 |
| Wrenches | 1 set | For tightening nuts on frame assembly screws. | $10–25 |
| Scissors | 1 | Cut latex hose and cable ties to length. | $2–8 |
| Rotary tool (Dremel) | 1 | Optional. Can speed PVC cutting and edge smoothing. Not required. | $30–60 |
Build Instructions
[edit | edit source]Resources
[edit | edit source]- Source PDF: Simple Tourniquet Simulator — Step by Step Building Manual
- Wood cutting diagrams: Wood Diagrams (external link) or see Section 4.1.1 of the PDF above.
Preparation
[edit | edit source]- Cut all wood pieces to the dimensions specified in the Structural Parts table above. Use the wood cutting diagrams for precise measurements and hole positions. Sand all cut edges with 400-grit sandpaper.

- Drill all holes in each wood piece per the diagrams. W-1: 2 × Ø5.0 mm (3/16 in). W-2: 5 × Ø5.0 mm (3/16 in). W-3: 3 × Ø6.0 mm (1/4 in) + 2 × Ø5.0 mm (3/16 in). W-4: 2 × Ø5.0 mm (3/16 in). W-5: 2 × Ø5.0 mm (3/16 in). W-7: 2 × Ø5.0 mm (3/16 in).
- Prepare PVC half-pipes: Cut a 10 cm (4 in) PVC pipe lengthwise into two equal halves. Sand cut edges smooth.
- Cut springs: Cut the 30 cm (12 in) spring into 4 equal pieces (approximately 7.5 cm (3 in) each). These become the R-1 compression springs.
Fabrication: Mechanical System
[edit | edit source]Safety note: Wear appropriate safety gear (eye protection, gloves) during all cutting and drilling operations.

Step 1. Assemble the base frame rectangle using 2× W-1 (long sides, 300 mm (12 in)) and 2× W-2 (short sides, 150 mm (6 in)). Secure corners with S-1 screws (3.0 mm × 4.5 cm (1/8 × 1-3/4 in)) and 3.0 mm (1/8 in) nuts.
-
 W-1: 300 × 20 × 10 mm — 2 holes Ø5.0 mm
 -
 W-2: 150 × 20 × 10 mm — 5 holes Ø5.0 mm


Step 2. Attach a second layer of W-1 and W-2 pieces on top of the first layer, creating a double-height rectangular frame. Secure with additional S-1 screws. This doubled frame provides rigidity.

Step 3. Insert S-3 screws (4.0 mm × 8.0 cm (5/32 × 3 in)) through the frame corners to create vertical posts/axles. Secure with 4.0 mm (5/32 in) nuts.

Step 4. Verify the completed double-layer frame: the rectangle should be rigid with vertical posts at corners.

Step 5. Attach the two W-4 vertical supports (500 mm (20 in) long, 40 mm (1.6 in) wide) to the frame using S-2 screws (3.0 mm × 8.0 cm (1/8 × 3 in)). These extend upward from the frame and provide the main structural height for supporting the PVC half-pipes.
-
 W-4: 500 × 40 × 10 mm — 2 holes Ø5.0 mm
 -
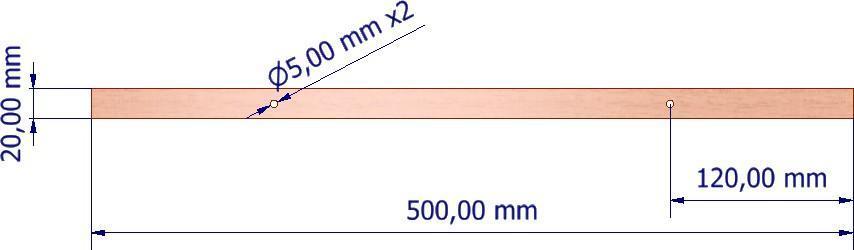 W-4 side view: 40 mm width profile


Step 6. Build the frame walls — attach additional wood pieces to create the enclosure sides.


Step 7. Install W-7 as a diagonal brace for structural rigidity.


Step 8. Create the sliding mechanism channel: embed 3.0 mm (1/8 in) nuts into the W-3 sliding mechanism guide (note the Ø6.0 mm (1/4 in) holes accommodate this hardware). This channel allows the tourniquet compression to travel along the mechanism.

Step 9. Place the two PVC half-pipe sections onto the frame. These form the simulated limb surface onto which the learner applies the tourniquet.


Step 10. Install the spring compression guide mechanism using FS-1 flat head screws (3.0 mm × 8.0 cm (1/8 × 3 in)) and the four W-5 guide plates. Load the four R-1 springs (4.0 mm × 4.0 cm (5/32 × 1.6 in)) between the guide plates. This mechanism provides tactile resistance when the tourniquet compresses the PVC half-pipe down onto the springs.

Step 11. Final mechanical assembly — secure the PVC half-pipes to the frame. Verify that springs are properly tensioned and that pressing down on the PVC surface compresses the springs smoothly. The mechanical system is complete.
Fabrication: Fluid System
[edit | edit source]- Fluid System Components and Tools
-
 Fluid system components: latex hose, hand pump, and water bottle
 -
 Fluid system tools: scissors, Teflon tape, and cable ties


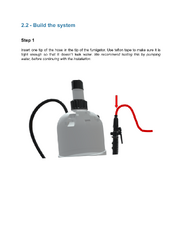
Step 1. Insert one end of the latex hose (5 mm (3/16 in) diameter) into the fumigator (pump sprayer) nozzle. Wrap the connection with Teflon tape to create a watertight seal.
TEST: Pump water through the system before continuing to verify the seal holds. Fix any leaks before proceeding.

Step 2. Thread the latex hose through the middle of the mechanical system, running it lengthwise through the compression zone beneath/between the PVC half-pipes. The hose must sit in the path where spring compression will squeeze it when a tourniquet is applied.

Step 3. Use plastic cable ties to secure the hose at 3 points along the mechanical frame.
Caution: Do not overtighten — the ties should hold the hose in position without restricting fluid flow when no tourniquet is applied.

Step 4. Place the remaining hose end into the water reservoir (plastic water bottle). Wrap this connection with Teflon tape as well. Fill the bottle with water.
Operating Principle
[edit | edit source]When the fumigator pump is operated, water flows through the latex hose — simulating arterial blood flow. The hose runs through the compression zone beneath the PVC half-pipe surface.
When a learner applies a tourniquet to the PVC surface and tightens it, the half-pipes press down onto the spring-loaded mechanism, which in turn compresses the latex hose. Sufficient tourniquet pressure occludes the hose and stops fluid flow — simulating successful arterial occlusion.
If the tourniquet is applied too loosely or in the wrong position, fluid continues to flow, providing immediate visual feedback that the technique needs correction.
Setup & Maintenance
[edit | edit source]Pre-Session Preparation
[edit | edit source]Before each training session:
- Fill the water reservoir with clean water.
- Attach the filled reservoir to the hand-operated pump.
- Test pump flow by actuating the pump several times. Water should flow freely through the latex hose beneath the PVC half-pipe surface.
- Visually inspect all hose connections and secure any loose fittings with Teflon tape if leaking is observed.
- Verify spring tension by pressing the PVC half-pipe surface by hand. Springs should compress smoothly and return to resting position without resistance or binding.
- Ensure the tourniquet and training supplies are assembled and within reach.
Reset Between Learners
[edit | edit source]After each learner completes their training:
- Actuate the pump to drain all water from the system into the collection reservoir.
- Disconnect the latex hose from the pump and inspect for leaks, cracks, or kinks.
- Wipe down the PVC half-pipe surface with a clean, dry cloth to remove any debris or residue.
- Verify that all compression springs return fully to their resting position without remaining compressed or deformed.
- Empty and dry the water collection reservoir.
- Refill the system with fresh water for the next learner.
Storage
[edit | edit source]When storing the simulator:
- Completely drain all water from the hose, pump, and reservoir to prevent stagnation and mold growth.
- Disconnect the latex hose from the pump assembly and coil it loosely for storage.
- Store the simulator in a dry, temperature-controlled location away from direct sunlight.
- Periodically inspect the latex hose, springs, and PVC surface for cracks, discoloration, brittleness, or wear before each use.
- Replace the latex hose immediately if cracks, brittleness, or leaking develops. Springs should be replaced if they no longer return smoothly to resting position.
Quality Verification
[edit | edit source]| # | Check | Status |
|---|---|---|
| 1 | All 17 wood pieces cut to specified dimensions and holes drilled per wood diagrams. | ☐ |
| 2 | PVC pipe halved lengthwise with edges sanded smooth. | ☐ |
| 3 | 30 cm (12 in) spring cut into 4 equal R-1 pieces. | ☐ |
| 4 | Double-layer wood frame is rigid and square. | ☐ |
| 5 | Vertical supports (W-4) are firmly attached and plumb. | ☐ |
| 6 | Spring compression mechanism moves freely under PVC surface. | ☐ |
| 7 | PVC half-pipes mounted securely; pressing down compresses springs smoothly. | ☐ |
| 8 | Latex hose threaded through compression zone without kinks. | ☐ |
| 9 | All hose connections sealed with Teflon tape; no leaks when pumping. | ☐ |
| 10 | Cable ties secure hose at 3 points without restricting baseline flow. | ☐ |
| 11 | Applying tourniquet to PVC surface stops fluid flow; releasing tourniquet restores flow. | ☐ |
All 11 checks must pass before the simulator is used for training. If any check fails, correct the issue and re-verify before proceeding.
| Alternative names | CrashSavers Tourniquet Simulator Tourniquet Application Trainer Hemorrhage Control Tourniquet Simulator |
|---|
| Authors | |
|---|---|
| License | CC-BY-SA-4.0 |
| Cite as | Arturopelayo (2026). "Tourniquet Simulator". Appropedia. Retrieved July 14, 2026. |