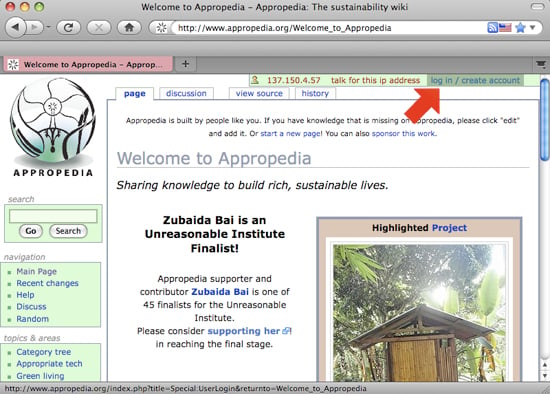
Steps to create images[edit source]

Steps to create images:
- Switch display to 800x600
- Make browser window full screen
- Take screen shots
- Open screen shot images in Photoshop
- Crop excess from top and bottom
- Add arrows and numbers as needed (here is the arrow for future use)
- Resize image to 72dpi, 550 pixels wide with proportions constrained.
- Save images as jpeg at highest quality
--Maccabee 15:46, 14 February 2011 (PST)
- Comments on images:
- Screen shots work better as PNGW than JPEG.W PNG efficiently compresses large areas of solid color which are typical in screenshots, and losslessly encodes sharp boundaries without artifacts. JPEG works better for photographs which have continuous color gradations. See wikipedia:Portable Network Graphics#Comparison to JPEG.
- Because PNG screenshots typically have small file sizes, upload them at full resolution, and thumbnail them on the tutorial page (see the above example where I thumbnailed your arrow image). See wikipedia:Help:Files and wikipedia:Wikipedia:Extended image syntax. This has several benefits:
- Images can float to the right, so they don't break up the flow of text on the left.
- The page displays a smaller image, which the user can click on to view at full resolution.
- You can caption each image.
- An image page needs proper licensing, attribution, and categorization. File:image_arrow.png lacks all of these at the moment. Category:Icons looks suitable. Add the {{Information}} template to the image page. Examine the Special:WhatLinksHere/Template:Information (i.e., the backlinks) for usage examples (File:Signature button.png, etc.). I believe I am the only Appropedia user who has used the {{Information}} template so far, since I only recently ported it to Appropedia. Images need these details to show that we comply with copyright law, and to clearly indicates conditions for their re-use by others (how we give back to the open source community for all the free content by other people we have used). For (much) more detail see Commons:Commons:First steps and Commons:Commons:Licensing. There are over 12,000 images on Appropedia, and most of them do not have complete information. Fixing all of them will be a fun job. --Teratornis 20:12, 14 February 2011 (PST)
Notes[edit source]
As per the Valentine's meeting, please:
- link to Help:Images
- change breaks to {{Break clear}}
- get new image (end recursion)
- fix double vision
- tell them to use caption when embedding an image
- select Creative Commons Attribution-ShareAlike for image
- add comment about how this could be used for non-user page images as well
- add caveat at bottom of page (maybe using footnotes) that mentions that the images in the tutorial are added without thumb or frame... blah blah something.
--Lonny 20:03, 14 February 2011 (PST)
Done except:
- Are steps still distinguished enough without double vision causing numbers? Is there another numbering system that won't look so weird in the index?
- Caveat at bottom not a footnote yet
Looking forward to any input from your students. --Maccabee 02:41, 15 February 2011 (PST)
More comments[edit source]

My comments:
- Glad to see this page moved out of article (main) space and into the Help: namespace where it belongs, and now obeys the naming convention.
- Section titles should not start with numbers. The table of contents automatically numbers entries, so additional numbers look kind of awkward. Clearly the MediaWiki software does not expect headings to start with numbers.
- Thumbnail and caption the images so they float to the right, instead of breaking up the text on the left. See example.
- Put each image just below the corresponding section heading, to avoid the bunched-up edit links problemW which can occur if there are more images in a section than can fit.
- Add a {{Shortcut}} to the page. See Appropedia:Shortcuts. A suitable shortcut name would be H:AIT. After you make the shortcut, add it to the list in Appropedia:Shortcuts#List of shortcuts. To make the shortcut, click on the red link: H:AIT and add this text to it:
#REDIRECT [[Help:Add image tutorial]]
--Teratornis 20:28, 14 February 2011 (PST)
- Another comment:
- I'm not a huge fan of {{Tocright}} when the table of contents is not long. The first screenshot can float to the upper right, below the {{Shortcut}} box that every help page needs, if you put its image link into the lead section. Another common use for the space to the right of the default TOC location is to put an infobox-style navigation template there. For example, we could make a navigation template for all the tutorial pages that will eventually be on Appropedia. If you look at articles on Wikipedia, very few use Tocright templates. Instead there are handy page design elements that can almost always use that space.
- --Teratornis 20:37, 14 February 2011 (PST)
Lots of thoughtful input here. I will do another round of updates once I get feedback from Lonny's class which I believe is using the tutorial today. --Maccabee 09:15, 15 February 2011 (PST)
- Created the shortcut per your link and added it to the list. (The process was very informative.) I then used the shortcut to list the page on ENGR 305 Interns Spring 2011. Maccabee 00:09, 9 March 2011 (PST)
Categories[edit source]
Help:Add image tutorial is currently in Category:Engr305 Appropriate Technology. It should also be in Category:Appropedia help. The ENGR 305 Interns Spring 2011 page should list all the pages that project members work on as part of the project. --Teratornis 12:50, 15 February 2011 (PST)
- Added a section to ENGR 305 Interns Spring 2011 to list pages we are working on. Maccabee 00:06, 9 March 2011 (PST)