
Redwood Discovery Museum magnetism

| Type | |
|---|---|
| Authors | XSkev Ryan Bergum Keiran Miller Brian |
| Location | Eureka, California |
| Status | Deployed |
| Years | |
| Made | Yes |
| Replicated | No |
| Uses | education |
Multiple Magnetic Stations is an exhibit designed by Team Saucers, for the Redwood Discovery Museum in Eureka, California during the Fall 2022 semester of Engr205 Introduction to Design course at Cal Poly Humboldt. The exhibit consists of three separate sections that each provide an exciting and educational way to experience Magnetism.
Background
[edit | edit source]This project was aimed at providing an array of magnetic objects in a confined frame at the Redwood Discovery Museum, a children's museum in Eureka, Ca, aimed at providing science education and exploration through recreational activities. The exhibit can be used for recreation and educational purposes for ages 4 and up.
Problem statement
[edit | edit source]The objective of this project is to create an interactive exhibit which teaches children the principals of magnetism in a fun, exciting, and educational way. Team Saucers also designed and built this project to enhance the Redwood Discovery Museum in their mission to create a love of lifelong learning for children.
Criteria
[edit | edit source]During the design process, the below criteria were used and weighted to provide focus aspects of the project which were deemed most important in the final exhibit. These criteria were tested throughout the design process (and can continue to be tested), to make sure the exhibit meets or exceeds the minimum requirements for each criterion.
| Criteria | Description | Weight (1-10) |
|---|---|---|
| Safety | Meets safety standards of the museum board | 10 |
| Cost | Less than or equal to $500.00 | 10 |
| Excitingness | More exciting than existing exhibits | 9 |
| Educational
Value |
Introduces the principles of magnetism | 8 |
| Attractiveness | As or more appealing than existing exhibits | 7 |
| Reliability | Made to last at least 3 years | 6 |
| Uniqueness | More unique than magnet toys available for purchase | 4 |
Prototyping
[edit | edit source]To prototype the framework and layout of the final frame design, cardboard and duct tape was used to create three boxes connected by a cardboard backboard, resulting in three exhibits for the magnetic solids, magnetic sand, and ferrofluid exhibits. The order of the contents of the boxes was determined to be (from left to right) magnetic solids, magnetic sands, and ferrofluid. This layout provides users with a pathway, progressing from most interacted with, to least commonly interacted with around a typical household.
The Magnetic Solids section was prototyped using 3D printed Tetris-like blocks that are made of ferrous 3D printing material. The objective of the prototype was to complete a puzzle of fitting blocks into a 4x4x2 grid, without any blocks sticking out of the set space. This prototype ended up being too restrictive in function, as there was one set goal, and only one solution to that set goal. This design prompted more thought into how to create a solution that is creative in use, and rely on intuition rather than the trial and error of fitting puzzle pieces into the grid.
To prototype the magnetic sands section of the final design, an acrylic box was filled with magnetic sand, or iron filings, and a magnetic grid set on a dowel connected to a wood sliding track was placed behind the acrylic box. The dowel connected to the wood sliding track is meant to slide the magnetic grid back and forth behind the acrylic box, allowing for magnetic sand to attract to the magnetic grid when the grid was close towards the acrylic box. The user can move magnetic sand and create a picture from the magnetic grid’s magnetic attraction. The user can then move the wooden slide back away from the magnetic sand and drop the magnetic sand by removing its magnetic attraction. This prototype was a proof of concept that showed that the design functions properly, and the magnetic sand is able to attract to the magnetic grid and drop when the magnetic grid is moved away.
To prototype the ferrofluid exhibit, an initial trial was conducted by pouring ferrofluid into an empty water bottle. This resulted in the realization that suspension fluid is required as well as a thoroughly cleaned container, as the container stained completely with the ferrofluid. Some manipulation of the ferrofluid using magnets was noticed but was difficult to see as the ferrofluid coated the container with a dark hue. The second ferrofluid trial involved an acrylic cylindrical container that was cleaned with dish soap with a saline solution acting as the suspension fluid. This prototype was also insightful as it still showed staining and salt crystals forming from the saline solution. From here we discovered that acrylic was not suitable for ferrofluid displays, as its surface is not smooth enough to prevent ferrofluid from sticking and staining the surface. The saline solution suspension fluid was successful in being able to suspend the ferrofluid and prevent more staining then without any suspension fluid, but it left salt crystals around the edges of the container and was foggy in color. This second prototype resulted in further research where we contacted the company FerroTech (a commercial distributer of ferrofluid), who redirected us to the company Concept Zero, who specialize in creating ferrofluid displays for museums and personal use. As a result of these two prototypes, a solution to utilize displays built by Concept Zero was concluded.
-
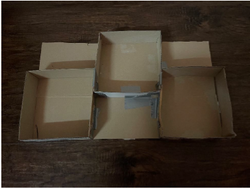 Initial prototyped design for the frame of the magnetism exhibit.
 -
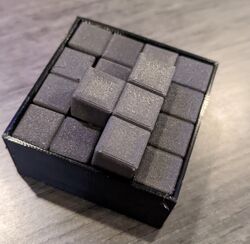 3D printed prototype for the magnetic solids section of the exhibit
 -
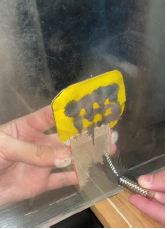 A prototype for the magnetic sands section of the exhibit, showcasing function of the magnetic sand (iron filings) attracting to a movable magnetic grid.
 -
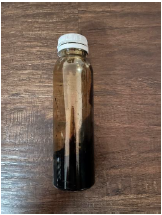 First prototype of ferrofluid, testing how it functions inside a plastic container.
 -
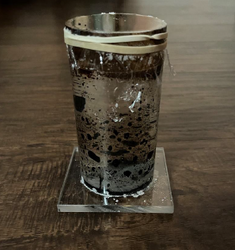 Second prototype of ferrofluid, testing how it behaves in an acrylic container with a saline suspension fluid.


Final product
[edit | edit source]
The solution “Multiple Magnetic Stations” or “Multi-Magnetic Stations” for short, includes three separate sections that exhibit some form of magnetism. The current design is a heavily adapted solution from the earlier prototypes, however it still maintains the core idea of implementing multiple magnetism concepts in a fun, approachable, and exciting way.
The frame for the exhibit consists of two horizontal 2”x6”x39” boards, two vertical 2”x6”x14” boards, and two 2”x6”x12” vertical boards separating the three sections of the exhibit. Each section is inside a 12”x23” opening, allowing for plenty of room to manipulate and play with the separate exhibitions. There is a 41”x14” plywood backing to cover the entire back of the exhibit and complete the boxes. There are smaller pieces of wood that provides a structure and dividers for the ferrofluid bottles in the ferrofluid section. Attached to the bottom of the frame, in the center, is a wooden slide used for the magnetic sand section.

The First portion of our exhibit is the Magnetic Solids section. This section consists of 14 blocks, that have small magnets embedded into them on several of their sides. Each side containing a magnet has either blue or red painted on to that side. The color corresponds to the magnetic pole the magnet has. The opposite poles or colors attract each other, so the blocks only connect when different colors are connecting.
The magnetic sands section of the exhibit consists of an acrylic box containing magnetic sand. Attached to the back of the acrylic box is a paper backing that depicts a sasquatch. Behind the paper backing is an array of magnets attached to another piece of thick paper. This piece of thick paper is attached to a wooden dowel that extends through the bottom 2x6 board. This dowel travels on a wooden slide that is screwed into the bottom of the 2x6 board, allowing the magnetic array it move back and forth, allowing the user to reset the magnetic sand.
The Ferrofluid section of the exhibit consists of 3 pre-sealed glass bottles. Each bottle contains ferrofluid that is suspended in a suspension liquid, provided by Concept Zero, to prevent staining and allow the ferrofluid to move freely within the bottle when manipulated with magnets.
Construction
[edit | edit source]The construction process begins with measuring out the desired dimensions of the frame utilizing Douglas fir 2 in x 6 in boards. The top and bottom boards were cut to 41 inches, whereas 4 vertical boards were cut to 12 inches. The vertical pieces are to be screwed into the top board, in 12 inch increments creating the frame for 3 compartments. The bottom 41 inch board had a 3 inch channel routed out perpendicular to the length of the board a half inch from one end. This channel is cut in the direct center of the board with regards to the length, roughly 20.5 inches from one end.
From this point the acrylic enclosure construction would take place. Two acrylic sheets 12 inches in height and 11.5 inches in width were cut with a table saw along with 4 additional strips to seal the box. Two strips were cut to 1 inch width and 12 inch height, along with 2 other strips that are 1 inch wide and 11.5 inches long. Acrylic adhesive was used with a syringe to seal off and glue the sheets together. Leaving the top 1 in x 11.5 in off is paramount so the magnetic sand can be put into the box after the adhesive dries.
The magnetic sand feature requires a sliding dowel to be mounted on the bottom 2 x 6 board. A wooden slide was cut to the width of the 2 in x 6 in. Mounting the slide on the 2 in x 6 in requires 2 half inch thick pieces of plywood to be cut to the width of the 2 x 6 to elevate the slide for optimal function. The slide had a predrilled 1/4 inch by 1/4 inch cavity for the dowel. Two screws are required to mount the plywood pieces on opposite sides of the routed channel, from this point the slide can be screwed on to the pieces of plywood. After this process, the pieces of wood were stained. Next, a sheet of cardboard shaped to the silhouette of a sasquatch is to be cut out with an exacto knife. Once cut out, small neodymium magnets were super glued to the cut out. After this, a poster board cut to 8 inches by 8 inches had a sasquatch painted on it with acrylic paint. From here, the dowel was superglued into the predrilled 1/4 inch cavity. After the glue had dried, the cardboard sasquatch silhouette was superglued to the dowel.
Next is the mounting process of the acrylic box to the bottom 2 in x 6 in board was preformed. This involved lining up the box with the dowel's line of action in an orientation that would allow the top board and its vertical pieces to fit around the box. Once the position was determined through measuring and referencing, the box was super glued to the bottom board. A 12 inch by 1/2 inch plywood strip was cut out and placed in the top cubby to support the top of the acrylic box. The next step was mounting the top board with its vertical pieces to the bottom board to connect the frame. After the top portion was placed in the proper position, super glue was applied behind the acrylic box near the top to glue the box to the top piece. Two screws were drilled from the bottom into each vertical member.
From here, a large board of plywood was stained with the same stain used for the 2 in x 6 in pieces. Once dried the plywood back board was cut out for the frame spanning 41 inches by 14 inches. Multiple other plywood strips were cut to brace the ferrofluid bottles. These Plywood strips ranged from 12 in x .5 in, to 12 in x 3 in. For the ferrofluid mounting, 4 block were cut ranging from 4 in x 4 in, to 2 in by 4 in. Once the cut pieces were stained, they were drilled into place in one of the frame's cubbies. Following this step, 3 pieces of the precut ply strips were mounted on the back of the blocks to brace the ferrofluid bottles. The bottles were then placed into their position and the final three ply brace strips were screwed into the block.
Following this, the precut plywood back board was drilled on to the back of the frame. For the adequate function of the sasquatch sand box, two 3 in x 6 in 40 degree angled legs were cut and were mounted to the bottom of the frame. Two additional 3 in x 14 in plywood support beams were cut and drilled onto the frames side The final step before adding the final magnets was the installation of the stringed magnet. A screw was drilled in to the rear of the frame which had a string tied to it. The string had a neodymium magnet tied on the opposite end to use with the magnetic sand and ferrofluid. Lastly the magnetic cubes which were created from wooden cubes routed out to house small neodymium magnets were placed in the third cubby completing the exhibit.
- Visual Imagery of Some Points During our Design Process:
-
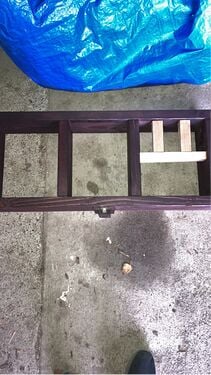 Frame pictured with unfinished ferrofluid brace blocks.
 -
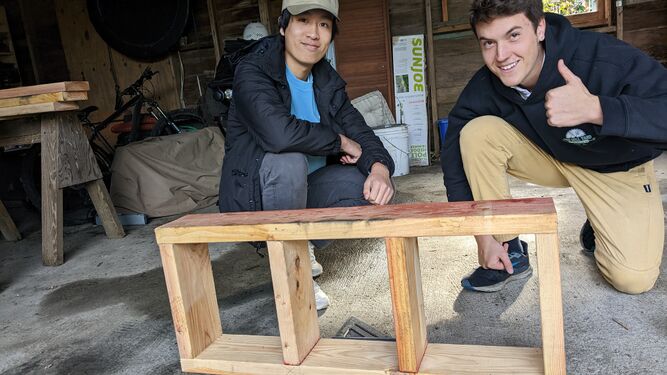 Frame made from Doug Fir 2x6 boards.
 -
Video demonstration of sasquatch magnet dowel slide, mounted on bottom of 2x6 board.


Video
[edit | edit source]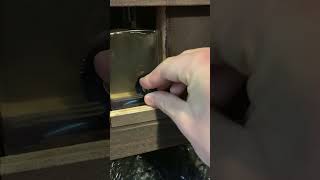
Bill of materials
[edit | edit source]Below is the list of materials purchased for this project and their respective costs. Note that these our proposed costs, and could vastly differ from someone trying to recreate the same project. Some of these materials were donated, so a huge thanks to those who donated and brought the costs down.
The Grand Total includes materials included in the project as well as well unused material, which was either excess or used for research and prototyping purposes.
| Item | Amount | Cost per unit | Total |
|---|---|---|---|
| Magnetic Fluid Bottles — Purchasable at Concept Zero | 3 | USD 58.79 | USD 176.37 |
| Lumber — 2"x6"x8" Doug Fir | 3 | USD 9.19 | USD 27.57 |
| Neodynium Magnets — Find on Amazon | 2 | USD 18.31 | USD 36.62 |
| Wood Slide — Find on Amazon | 1 | USD 15.07 | USD 15.07 |
| Drill Bit (1/4") | 1 | USD 8.61 | USD 8.61 |
| Wood Stain + Brush — Purchased at Ace Hardware in Arcata | 1 | USD 21.20 | USD 21.20 |
| Plywood — DONATED (By: Fenix's Dad) | 1 | USD 0.00 | USD 0.00 |
| Wooden Blocks — DONATED (By: Brian Nguyen) | 1 | USD 0.00 | USD 0.00 |
| Tools and Hardware (Screws, Drill, Sander, etc.) — DONATED (By: Fenix's Dad) | 1 | USD 0.00 | USD 0.00 |
| Magnetic Sand — DONATED (By: Redwood Discovery Museum) | 1 | USD 0.00 | USD 0.00 |
| Unused Material | 1 | USD 57.48 | USD 57.48 |
| Grand total | USD 342.92EUR 294.91 <br />GBP 250.33 <br />CAD 425.22 <br />MXN 7,149.88 <br />INR 25,667.56 <br /> | ||
Operation
[edit | edit source]Multi-Magnetic Stations consists of 3 separate sections, which each operate differently. Below is step-by-step instructions on how to operate each section of the Exhibit.
(IMPORTANT NOTE: This exhibit is very open-ended. The instructions below are only to give the user a starting point. The user is highly encouraged to explore the "Magic" of Magnetism, and manipulate the exhibit how they see fit.)
Magnetic Solids Station
[edit | edit source]Either pick up or push around the blocks.

Attempt to touch the sides of the blocks together in different orientations. Observe the forces of magnetism.
Magnetic Sand Station
[edit | edit source]Pick up the nearby magnet (attached to a string), and "wave" or drag it across the acrylic box. Notice that if you move it near the magnetic sand at the bottom, that the sand will attract to the magnet.
Drag the magnet (with sand attached to it) over the sasquatch. Pull the magnet away from the acrylic box and observe "fur coat" you leave behind on the sasquatch. Feel free to continue adding magnetic sand to the sasquatch.

To remove the sand from the sasquatch, push in the wooden handle (directly below the acrylic box). Observe the magnetic sand fall. Pull the handle towards you until it stops. Now the Sasquatch is prepared to be redecorated.
Magnetic Liquid Station
[edit | edit source]
Similar to the Magnetic Sand Station, pick up nearby magnet (attached with string), and drag it across any of the 3 bottles. Observe how the colored magnetic fluid reacts to the magnet.
Maintenance
[edit | edit source]Multi-Magnetic Stations is a well-rounded, robust exhibit, so needed maintenance is going to be low for the most part. However, there are more substantial long-term maintenance requirements and costs. Maintenance should be performed by a museum employee or the owner of the exhibit. Refer to the schedule below for maintenance tasks.
Maintenance schedule
[edit | edit source]- Daily
- Check if any magnetic blocks are missing.
- See if the strings attached to any magnets are breaking or coming undone.
- Weekly
- Check if magnetic sand enclosure has any leaks or noticeable damage.
- Examine magnetic sand slider to see if it is functioning properly.
- Monthly
- Observe structural integrity of the support beams.
- See if ferrofluid bottles have been damaged.
- Yearly
- Check if the ferrofluid bottles are getting cloudy or stained.
- Overlook entire frame to see if any damage has occurred to the frame or its supports.
- Every 2 years
- Inspect ferrofluid bottles to see if the internal contents still react to the magnets without obstructions to the visibility.
- Observe and determine if the magnetic sand has underwent any oxidation.
Conclusion
[edit | edit source]Testing results
[edit | edit source]The embedded magnets in the wooden blocks of the magnetic solids section attracted to each other based on the face of the magnet that is exposed. The faces of the wooden blocks were painted red and blue, based off whether the magnets attracted to each other or repelled. The red faces attracted to the blue faces (and vice versa), while the faces repelled those of the same color. The blocks were built with a default intention to create a half pyramidal shape, but attain the option to branch out into other shapes based off the magnetic attracting/repelling of the embedded magnets.
The magnetic sand (iron filing) was manipulatable by the neodymium magnets, creating interesting patterns based off the magnetic attraction to the magnets. The magnetic grid behind the sasquatch image was unable to attract enough of the magnetic sand in order to create a strong enough visual of fur covering the sasquatch when the magnetic grid was pulled towards the sasquatch image.
The ferrofluid displays by Concept Zero were able to be manipulated by the provided magnets, and required secure mounting as the displays were made of glass to ensure clarity and little to no staining of the bottles. The ferrofluid creates patterns and tracks the magnets easily without any complications.
Discussion
[edit | edit source]The magnetic solids worked as intended, allowing for learning through intuition of how magnetic poles work and figuring out why similar colored faces repelled each other and opposite colored faces attracted each other, drawing parallels to positive and negative magnetic poles.
The magnetic sand and the magnetic grid backboard behind the sasquatch image required more of an angle which we adjusted accordingly to, allowing for the sand to fall onto the image, rather than straight down, resulting in more sand covering the image and attracting to the magnetic backboard.
The ferrofluid displays were mounted with 2x6 wood pieces in order to fasten them onto the exhibit with little to no movement. The front of the displays are still revealed to the users, but the wood pieces entrap the sides of the display to ensure users could not grab/pull the display off the exhibit.
Lessons learned
[edit | edit source]This project emphasized the importance of research, as a lot of delays in production came from sections not working as intended. Spending more time on research would have resulted in less money used on prototyping and our final design, as well as less time wasted working on aspects of the project that were omitted. Further time should have been spent on cleaning up the aesthetics and usability of the project, cleaning up the aesthetics of the magnetic sand exhibit, as well as finding a less restrictive form of mounting for the ferrofluid displays that allow for access to the back and sides of the displays.
Next steps
[edit | edit source]As this project goes on in the future, different shaped magnetic wands and tools may be added onto the exhibit, allowing for users to experiment with different sized magnets on the magnetic sand and ferrofluid sections.
Troubleshooting
[edit | edit source]Utilize the table below to troubleshoot problems:
| Problem | Suggestion |
|---|---|
| Stolen magnetic solids | Replace with extra magnetic solids provided by Team Saucers |
| Ferrofluid displays become dirty or break | Contact the company Concept Zero, and order replacement 120 mL Squared ferrofluid displays |
| Magnetic sand magnetic grid backboard breaks | Unscrew backboard of exhibit and reattach dowel/magnetic grid using wood glue or another form of strong adhesive |
Team
[edit | edit source]Cal Poly Humboldt, ENGR 215 (Fall 2022), Team Saucers members:
References
[edit | edit source]
| Authors | |
|---|---|
| License | CC-BY-SA-4.0 |
| Organizations | Cal Poly Humboldt |
| Cite as | RoscoesWetsuit, Lonny, XSkev, Keiran M. (2022–2026). "Redwood Discovery Museum magnetism". Appropedia. Retrieved July 26, 2026. |