
As COVID-19 spread across the world, schools and businesses were forced to adapt or shut down all together. As schools are slowly starting to take steps to safely re-open, Blue Team has built a way for students to safely perform a stage play while keeping the face of the performer visible; we call it the Plexi-Stand.
Abstract[edit | edit source]
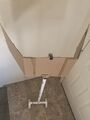
Blue Team was initially tasked with providing a barrier that drama students might be able to use to continuing performing after returning from school closures due to COVID-19. Blue Team wanted to make a cost efficient, adjustable barrier that would meet this criteria for Six Rivers Charter Highschool. The Plexi-Stand uses an IV stand, PVC pipe, and three sheets of Plexiglass to meet these criteria. Replicability was important to us, and therefore all of the components used in this process can be easily sourced online and at local hardware stores. Ideally, welded mounts for the PVC would provide more stability but would also take us further away from it being easily replicable. Although the barrier is finished in this picture, the final step is to spray paint the white PVC black to clean up the final appearance and not stick out as much to would be viewers in an audience.
Problem Statement & Criteria[edit | edit source]
Problem Statement[edit | edit source]
The Drama Teacher at Six Rivers Charter, Melanie Zapper, would like to perform a stage play when her students return to in person classes while also making sure they take all the proper precautions to help mitigate the spread of COVID-19.
Criteria[edit | edit source]
| Criteria | Importance | Constraints |
|---|---|---|
| Storage | 1 | Must be small enough to be stored in drama department storage |
| Adjustability | 5 | Height has to be adjustable |
| Reproducability | 7 | Must have less than 15 parts for easy reproducabilty |
| Audio Quality | 8 | Must be able to hear the performer clearly |
| Cost | 8 | Must cost under $100 |
| Mobility | 9 | Has to weigh under 50 lbs so children can use it |
| Face Visibility | 9 | Face of user must be clearly visible |
| Safety | 10 | Must act as a barrier to slow spread of droplets in the air |
Cost[edit | edit source]
| Quantity | Material | Source | Cost | Total |
|---|---|---|---|---|
| 3 | 1/4 Clear Acryllic PlexiGlass sheet | Home Depot | $14.98 | $48.75 |
| 1 | IV Stand | Amazon | $29.19 | $29.19 |
| 1 | 3 inch cutter/cutting wheels | Harbor Freight | $26.67 | $26.67 |
Description & Pictures of Final Project[edit | edit source]

The final design consists of an IV stand with three pieces of connected Plexiglass at the top. The middle plexiglass is 18"x18" and the sides are 18"x6". The plexiglass is recessed inside a slot made in the 1/2" PVC pieces that line the bottom of the plexiglass panels.
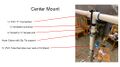
Center Mount[edit | edit source]
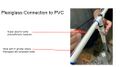
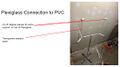
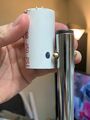
The center mounts hold the (3) sheets of plexiglass to the IV stand. The main neck of the IV-Stand which is around 1/2" goes inside a 3/4" piece of PVC. The fit was almost spot on, but given there was a little bit of play, the neck of the IV stand was wrapped in duct tape to form a tighter fit. Not seen in the picture is a retaining screw that was drilled into the 3/4" PVC and into the neck of the IV-stand. This retaining screw means that the center mount will not fall off of the IV-stand in the event of a tip over. We originally used 1/2" PVC to slot and put the plexiglass in, and so needed to find a reducer from 3/4" to 1/2". In the components gallery, you can see the reducer was matched with a 3/4" PVC piece to and 1/2" thread. We bridged the gap with a 1/2" threaded connector and secured that to a 1/2" PVC "T" connector. Two holes where drilled in the plexiglass at 1/4" and a zip tie configuration seen in the photo was implemented as an extra support. A hose clamp was positioned under the baffle of he reducer piece, and tightened so it would not travel upwards and secure the plexiglass to the PVC.
Super Glue for Stability[edit | edit source]
The Plexiglass has a tight fit as it is inside the PVC, since we used a 3-inch grinder to size each slot to the thickness of the plexiglass pieces. Once the PVC pieces where measured out and PVC cemented together, we felt like adding another measure of super glue inside the slots would provide extra stability and secure the plexiglass further inside the PVC.
Plexi-Stand Clips[edit | edit source]
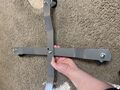
Since the plexiglass is 18" tall, we needed to find a way to stabilize the plexiglass at the top. In order to accomplish this, 1/2" 45 degree clips were slotted and placed at the tops of the plexiglass. This provided stability and kept the plexiglass rigid at the top. We secured these clips with some transparent sealant, as well as super glue put inside the PVC to secure it to the top.
Transparent Sealant[edit | edit source]
Transparency was a large factor in choosing plexiglass for our barriers. Aside from the rigidness from the plexiglass, it was also the most optically clear material that we found for the cost. Plexiglass barriers were often recommended from the CDC website as a potential barrier to help reduce the spread of viruses. We did not want any breaks in the transparency of the design, and to fill in the gaps between the pieces of plexiglass, a transparent sealant was added. This sealant also works partially as an adhesive.
Adjustable Neck and Maneuverability[edit | edit source]
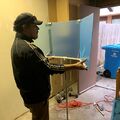
The IV-stand was purchased with the intent that it be a skinny enough neck to be able to be easily maneuvered, as well as be adjustable and mobile. In the Component Gallery, you can see the neck is completely adjustable to each individuals height. Toward the end of the gif, you can see that the base moves easily over flat terrain due to the base having wheels on the bottom.
- Components Gallery
-
Center mount for PVC
-
Super glue for extra protection in slots.
-
Plexi-Stand Clips
-

Transparent sealant
-

Adjustable neck
-
Wheel Base


Prototyping[edit | edit source]
During the prototyping process we learned many things about what not to do and how somethings that work in theory, don't always work in real life. After multiple different types of iterations, we were able to take these experiences and learn from them to create a final project that met all of the criteria and functioned properly.
First Prototype[edit | edit source]
Our first prototype would ultimately resemble our final project the most. We learned a lot from this first prototype. This first thing we learned was that creating a "usable" prototype that can be interacted with by your client or potential consumers, gives the most feedback. We had a few prototypes that just wouldn't have given us the same information had we not had something that can be interacted with. This first prototype had three panels in a tri-fold design offset at 45 degree angles much like our final design. We learned however from our client, that the 12" x 12" panels that the carboard was cut-out to, was too small in her opinion. Another valuable lesson was the idea that we could attach wheels to the bottom of it and add another level of maneuverability to the design. When our client was interacting with the neck of the design, she had mentioned that it was far too thick and needed to be reduced. All of these opinions ended up being in our final design, because we had the ability to give our client an interactive prototype.
Long Panels[edit | edit source]
After taking into consideration of the 12" x 12" panels being too short, we attempted to increase our sizes to 18" x 18". We learned that the size of the two outer panels offset the center of gravity too far outside of the base and it was prone to falling over. We ended up attempting to shorten the outside panels to 18" x 6", leaving the center piece at 18" x 18".
Short Center Mount[edit | edit source]
Another problem we ran into, was too much play from the center mount over the top of the neck. The long 18" panels had a tendency to topple over from their weight. To mitigate this, we needed to extend the length of PVC that was being inserted over the neck of the stand. We found that 3/4" was the correct size for this, and introduced a 6" piece that went around the neck, taking all of the play out of the center mount.
- Prototyping Gallery
-
First Prototype
-
Long Panels
-
Neck is too short


Testing Results[edit | edit source]
We ran some tests on the Plexi-stand and it is durable. We picked up and spun it around and the plexiglass didn't move or loosen. Even when falling over, the Plexi-stand did not break as the 45 degree PVC clips attached to the top acted as a a buffer between the plexiglass and the floor due to its bulbous nature. We did have an incident where one of our prototyping pieces of plexiglass fell to the ground and was scratched in the process. One of the downfalls of using plexiglass, is its tendency to be scratched easily. The clips at the top help mitigate this.
Maintenance[edit | edit source]
The Plexi-Stand was designed to require as little maintenance as possible. Apart from wiping down the handle and plexiglass with some anti-bacterial wipes after each use, the Plexi-Stand will not require any maintenance.
How to Build[edit | edit source]
Step 1: Create a center mount. 3/4" PVC extension must contain a drilled in retaining screw. The neck must also be drilled in with the same screw. A 1/2" thread is secured to the T connector. A ring surrounds the mount which will be looped in by two zip ties. The T connector must be slotted and one piece of PVC that must hold the length og the 18x18 must be slotted too. PVC cement and primer must also be added to better join the pieces of PVC. This forms the center mount.
Step 2: Cut the sheets of plexi to form a "18x18" and two "6x18" pieces. Slot four elbow pieces and two PVC pipes; This will join the two "6x18" pieces. Add PVC cement and primer to join the PVC pieces to the center mount.
Step 3: Add the sheets of plexi to the pieces of PVC and the center mount. Add two elbow pieces to join the joints of the top sheets
Step 4 Apply super glue to crevices in the PVC. Add clear sealant to the edges of the sheets
Troubleshooting[edit | edit source]
If the pvc pipes are cut and the sheets don't slide in place well, it helps to cut them straighter. If the zip ties are too loose, tighten them as well. Following these guides will successfully trouble shoot the most basic of operations.
Suggestions for Future Changes[edit | edit source]
We recommend a couple of ideas to further improve the Plexi-stand. For starters it would help to provide some structural support at the top of the stand. The zip ties holding the stand work well but adding a brace would give the stand a counterweight. If possible sourcing Plexiglas with different dimensions would cut down on costs and personalize the barrier further. Using an alternative to Plexiglas that is resistant to scratches and cuts would be much better in case of the Plexi-stand falling. Furthermore, a sturdier bottom base would make the stand resistant to falling.