Timing of module placement operation[edit | edit source]
As mentioned before, there is a short window of opportunity after you deploy your modules before they become too overgrown by marine life to safely plant coral fragments. If you are working with adult colonies, these guidelines can be relaxed slightly, but is it always easiest and best to plant on freshly deployed modules. If you have the luxury of choosing when the rehabilitation program will occur, try to schedule your rehabilitation project so that modules will be deployed in the season best suited to coral planting.
Transporting the modules[edit | edit source]
Careful manouvring[edit | edit source]
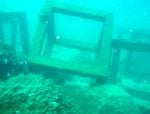
When manouvring through the healthy parts of the natural reef, you will have to conduct deployments with the utmost care. Barge anchors or spuds can easily destroy the coral you are trying to save. Modules that are dumped indiscriminately can do the same. Never work around natural reefs without a dive team in the water to ensure the protection of the existing reef. If you are building within the footprint of a reef, the best option is to float modules into position guided by divers. For Reef Balls, this can be accomplished using an internal bladder, a unique feature which allows precision deployment in close proximity to natural coral. With other materials, lift bags will provide you with a similar degree of control. Regardless of your material choice, deploying in close proximity to natural reefs is an extremely difficult and potentially hazardous task. If not deployed and stabilized with the utmost precision, unintended adverse consequences can occur (Figure 4), and therefore this type of deployment should be avoided unless absolutely necessary to accomplish the goals of the project. If deemed necessary, deployment in close proximity to natural corals should be implemented or at least supervised by trained experts.
Remaining stationary at a location[edit | edit source]
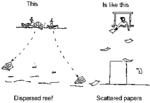


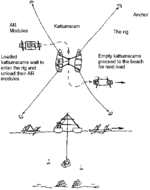
In order to keep absolutely stationary at exactly the location where the modules need to be lowered, it is best to work with a placement rig. This placement rig is supplied by other vessels of modules and is anchored with 4 anchors, directly into the current. This is required, as experience has shown that although the modules seem heavy on land, if they are simply tipped off the deck they can drift quite far as they fall down towards the bottom. This will result in widely dispersed modules and a very ineffective reef. As mentioned earlier, only a concentrated collection of modules will result in a rich and extensive marine environment. A method used by Practical Action in South India uses the plywood canoes that are the most popular artisanal craft there. The method can be adapted to suit local craft. A rig comprising two plywood canoes is rafted together, and a quadrapod arrangement is assembled across them (see sketches). A rope-and-pulley system is then mounted on the quadrapod; it must be strong enough (and the rope long enough) to lift the modules off the boats (in this case kattumarams) which have ferried the modules out to the rig, and lower them onto the seabed. The site for the reef is chosen by the community, and is marked out to ensure that it is oriented across the current. The rig is anchored over the proposed site using four anchors. The use of four anchors permits fairly precise positioning of the rig, and also allows controlled movements to be made away from the centre of the site. The modules are lifted off the kattumarams one at a time and lowered, positioning clusters of modules on and around the centre of the site.
Module placement location[edit | edit source]
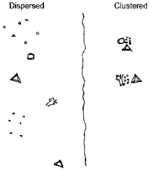
As mentioned before in the Damage assessment and organising step, the modules can be placed either clustered or in a line formation, depending on the nature of the damage.
Clusters[edit | edit source]
It is important to cluster plenty of material together densely; the more the better. Very dispersed materials will not be colonised successfully, and will only be wasted. (See later for a suggested technique for placement.)
Line formation[edit | edit source]

In a line formation, the modules again need to be placed close together, so as to create a dense formation that provides aduquate protection. Line structures or clusters should be placed so that they are across the current. This provides a sheltered environment for smaller fishes, and a "standing wave" above the reef, which throws up food for a variety of species. Before you begin placing the reef material set two marker buoys in the water and a land transit to give you an approximate line to follow.
Module height[edit | edit source]
At Damage assessment and organising, you may have already decided on what module height to take. However, when placing the modules, one should remember that reefs should be about one-third of the water depth. So, if you have smaller modules, it will be required that you stack them and/or (if this is not possible), then you should at least introduce a number of taller modules into the reef.
Anchoring of modules[edit | edit source]
Because you will be planting coral that over time will grow substantially, any movement of a base module can be detrimental to its coral colonies; projects that include coral planting require more stability than standard artificial reef projects. Increasing stability can be accomplished by utilizing heavy modules, modules with a high percentage of the weight in the bottom third of the unit, proper site selection (a site with 10-20 cm of sand over hard bottom provides more stability than a hard bottom alone for example), or anchoring techniques.
Anchoring types[edit | edit source]
There are several methods of anchoring, and complex factors which enter into the decision of whether to anchor your modules. If you are deploying modules in less than 30 feet of water, or in a high energy environment, contact your module manufacturer for a recommendation to anchor or not to anchor and they will help you to make an intelligent choice. If you choose to anchor your materials, there are a variety of methods. Double helix screw anchors are good choice for sand bottoms if subsidence is not an issue. They can be embedded in concrete modules before casting by covering the anchor head with a paper bag full of sand and coating the shaft with sugar water letting the anchor eye stick out of your mold. They work best at 45 degree or higher angles. Fiberglass rebar anchors are relatively inexpensive and are often used on hard bottoms (short lengths) or firm bottoms (longer lengths).
Fiberglass rebar anchors are particularly good at resisting shear forces but are not so resistant to uplifting forces. To use fiberglass rebar as an anchor, PVC pipes are embedded into your mold design and then the rebar is placed in the hole left by the PVC and hammered in (soft bottoms), or a pneumatic drill is used to drill into the bottom, then the fiberglass rebar is then dropped into the hole (hard bottom). In many projects you may need to use a variety or combinations of anchoring methods due to varying bottom types. Before any new method is used it should be tested in the field for practicality. In most cases, the manufacturer of your artificial reef modules will know what types of anchoring systems are most effective for your particular situation. Be sure to carefully heed their recommendations.
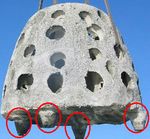

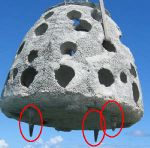

Here are some examples of different anchoring methods used with Reef Ball Modules:
- Anchoring Cones: these are used to prevent horizontal movement in soft to semi-firm bottoms. Cones are cast monolithically when the Reef Ball is made, and designed to settle slowly into the ocean bottom. Once settled, the cones will prevent lateral movement during storms
- Anchoring Spikes: In areas with hard packed bottom, pre-cast concrete spiked with #5 fiberglass rebar reinforcement can be used in place of anchoring cones. They serve the same purpose as anchoring cones, but can penetrate firmer bottom. Note: Engineering pressure tests should be conducted to indicate the size of the spike necessary self penetrating under the weight of the module.
- Specialized Cone Anchors: An advanced anchoring technique adapted for use in a sea grass bed. This technique produces cone anchors, but is adapted to allow the sea grass under the Reef Ball to stay alive.
- Battered Pile Anchors: Battered pile anchors are used in groups of three or four, to resist both horizontal and vertical movement in areas with soft sediment.
- Base Anchoring: Units can be anchored with additional concrete bases, and this can also be helpful to prevent settlement into soft bottoms.
Installing the module anchors[edit | edit source]
Battered pile anchors[edit | edit source]
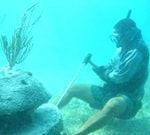
Three or four battered piles in a ‘tripod’ or square pattern are usually hydraulically jetted into the ground through precast holes in the module until they reach the hard bottom below the soft sand. When installing, the crew first determines the exact depth to hard bottom. Next, they would insert a concrete piling of the appropriate length with 1cm (0.5 inch) PVC pipe precast into the pile. The PVC-pipe allows the pile to be to ‘jetted’ to the bottom with compressed air. Three pieces of #3 fiberglass rebar can be added to each precast piling for additional strength. Pilings can be made in lengths ranging from 3 feet to 8 feet. When hard bottom is too deep to be reached using this technique, it can be modified by adjusting the diameter of the pilings to match the friction characteristics of the sediment. In this case the piles are typically called friction piles. This anchoring technique requires professional engineering tests of the sea floor. Battered rebar is often driven into pre-drilled holes in the seafloor when the bottom is too hard for other techniques but vertical stability is important.
Battered pile anchoring with reef balls[edit | edit source]
With Reef Balls, holes for both the fiberglass rebar and the concrete pile anchoring system are cast into every Reef Ball made in order to provide flexibility for crew to adapt to varying conditions at the deployment site. If you are unsure of your anchoring needs, be sure to discuss this with your manufacturer early in the process. Remember than an unstable artificial reef can do more damage than good.
Disclaimer[edit | edit source]
This information was Reef Ball's Draftguide document, and Practical Action's "How to build an artificial reef" document.