
Operation of large scale waste Hangprinter

| Type | |
|---|---|
| Authors | |
| Status | |
| Years |
| Hardware license | CERN-OHL-S |
|---|---|
| Certifications | Start OSHWA certification |
This page offers a comprehensive introduction to the operational aspects of an impressive project led by Christopher De Bruyn.
HangPrinter Operation
[edit | edit source]When Hangprinter hybrid machine and assembly is completed, the next step is to set up hardware and software of machine:
1. Setting up DUET3 controller and web interface.
[edit | edit source]There are multiple ways to establish DUET3 ethernet communication with a designated computer. The user is directed to setup connection between your DUET3 and computer. The user can opt to setup an ethernet connection directly to their computer or via a router.
The “Duet Web Control” is the web interface that is used to control functionality of the DUET3 board and to upload print jobs.
2. Updating firmware on DUET3.
[edit | edit source]Depending on the current firmware on the DUET3 board, the method of updating the DUET3 boards firmware may change. Ensure that you only upgrade to the newest, most stable version, which at the time of publication of this document, is release 3.3 or onwards.
3. Configuration file set up.
[edit | edit source]The DUET3 controller that is used in this project runs on a C based firmware called RepRap Firmware (RRF). This firmware accepts G-code commands from CAM programs (i.e., Slicers) or through terminal programs which then produces the proper response based on the G-code. Native support of the Hangprinter is supported in > RRF 1.2 thus for this project, no modifications in its firmware source code must be made. The “config.g” file, which contains G-code commands for the initialization of various setting and parameters, must be created.
4. Extruder and feeding system setup.
[edit | edit source]Networking comes disabled by default and must be enabled first through a serial communication program like YAT or PuTTY (see section above). Once the IP address has been set, enter it into your browser to access the DWC web interface. Click on the “System” button on the left tool bar. Then click on the “config.g” file in the file directory. The user can choose to edit the file directly in the DWC built in editor or choose to upload a new file to the SD card of the DUET3 by clicking the “upload” button at the top right of the file directory in the DWC. The YAT terminal program is only required once to initially set a temporary IP address to access the DWC web interface in your browser. Open the config.g file and erase all previous code as it is not needed. Enter the following lines of code at the top of the file (Operation Instructions;NETWORKING)
https://www.hardware-x.com/article/S2468-0672(23)00008-1/fulltext#secst190
Notes/tips on extruder and feeder operation
• Always preheat extruder to at least 190 °C before running the extruder motor. The firmware will prevent you from extruding at 160 °C.
• Feeder motor synchronously release pellets relative to the extruder motor by way of setting E-steps and assigning feeder motor as a mixing extruder.
• Instructions below assumes a RepRap firmware (RRF) greater than version 3.2.
• Prusa slicer is used for this project.
5. Hangprinter calibration.
[edit | edit source]This section covers the process of positioning and grounding the anchors, measuring, and entering all physical parameters into firmware to calibrate the Hangprinter. With the lines routed, the anchors can now be fixed to the ground. As mentioned before, it is up to the user how far they want to position the anchor if the following conditions are met:
- The anchor beam is parallel to the corresponding edge of the triangle end effector chassis.
- The lines between the anchor and triangular chassis are perpendicular to the edge of the triangle.
- There is sufficient line length.
- Coordinates and sign conventions are according to image below;
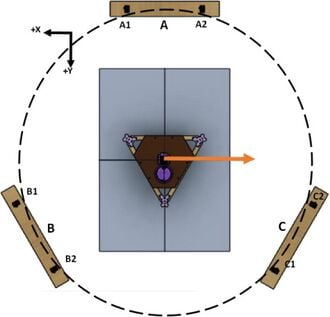
Hangprinter reference calibration image
6. Using the machine.
[edit | edit source]To start a print:
- Load the feeding system hopper with pellets.
- Using G1 H2 motor commands, position the print head approximately 2 mm above the center mark of the print bed. Tighten/loosen lines as needed.
- Enter G92 X0 Y0 Z0 when nozzle is positioned directly over the center point marked on the print bed to home machine.
- With the system plugged into an outlet, turn the system on and access the DWC web control UI by entering the IP address (129.100.228.115)
- Upload the sliced.gcode file to the DUET3 by accessing the jobs menu and clicking upload.
- Right click on the file and select Start.
- The DWC will change to display print status and bring up print tuning controls.
- Adjust and monitor printing as needed.
7. Cleaning and maintenance.
[edit | edit source]• To clean the nozzle, use a bristle brush while the system is heated to a sufficient temperature.
• To clean the inside of the barrel assembly, heat the extruder to approximately 220 °C and carefully unscrew the nozzle adapter with a wrench.
•Use the bristle brush to clean the inside of the barrel.
• Use compressed air to clean the hopper and internal components of the extruder such as the intake tube and auger channels.
8. Safety.
[edit | edit source]• Ensure that the appropriate ladder is present for the height at which the ceiling mount will be suspended.
• The entire construction of the Hangprinter system can be a trip hazard if one is not cautious in minding the wires and lines.
• Do not stand within the Hangprinters print area while in operation.
• Do not touch any live AC wires, terminals, or the heater while it is on as it can cause electrocution and burns.
• It is recommended to plug the Hangprinter power supply into a power bar with a breaker and manual on/off switch.
CITATIONS
[edit | edit source]Hangprinter developed by Dr. Joshua Pearce and team at FAST LABRATORIES
https://www.hardware-x.com/article/S2468-0672(23)00008-1/fulltext#secst190
Hangprinter for large scale additive manufacturing using fused particle ... (n.d.). Retrieved March 28, 2023, from https://www.hardware-x.com/article/S2468-0672(23)00008-1/fulltext
| Authors | |
|---|---|
| License | CC-BY-SA-4.0 |
| Cite as | Christopher De Bruyn (2023–2025). "Operation of large scale waste Hangprinter, Christopher De Bruyn". Appropedia. Retrieved July 10, 2026. |