Strength is an essential factor in the design of a stepladder, but lightness and dimensions which permit easy movement from one part of the house to another are important considerations. The ladder to be described meets those requirements, but the dimensions may be varied according to the particular use to which it is intended. The lumber used throughout is of 1-inch stock (7/8 inch when finished) and of good, sound quality. The quantities required are as follows:
| MEMBERS | # PIECES | MEASUREMENTS |
|---|---|---|
| Legs | 2 | 51 x 2 1/2 |
| Top brace | 1 | 13 x 2 1/2 |
| Bottom brace | 1 | 18 x 2 1/2 |
| Treads | 1 | 84 x 5 |
| Top piece | 1 | 15 x 8 |
| Back piece | 1 | 13 x 6 |
| Stringers | 2 | 63 x 4 |


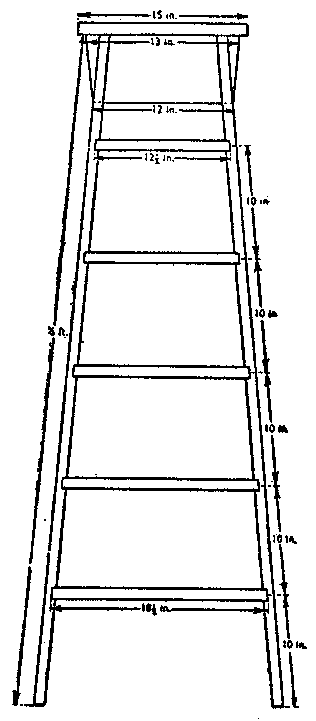
First mark off the bottom of one stringer at an angle of 30 degrees on the width and some 6 degrees on the thickness and cut off the waste. At intervals of 10 inches draw guide lines parallel with, and measured from, the bottom. These guide lines indicate the center line of treads; the marking off for the saw cuts should therefore be 7/16 inch on either . side of these lines. Now mark off a total length of 5 feet and saw off the waste, making the cut parallel with the bottom. Note that no saw cuts for the tread grooves have yet been made. Cut and mark off the second stringer similarly, remembering that the guide lines will face each other when the stringers have been cut as shown in Fig. 1. Measurements must again be made from the bottom so that the stringers will correspond.
Check the marking by placing both lengths of wood together with the pencil marks outwards. Having confirmed that the tread positions agree, lay the stringers on edge, guide lines inwards, and position them 12 inches apart at the fifth tread from the bottom and 18 inches apart (inside measurement) at the bottom tread. Secure the stringers in this position by tacking a piece of scrap board at each end to hold them. By this arrangement the angle of the groove cuts can be marked. Mark the depth of the grooves using a marking gauge set to 1/4 inch.
The tread grooves can now be cut to the required depth with a tenon saw. Chisel out the waste. It is better to chisel out slightly less than the required depth, the final chiseling being done when the treads are fitted. With all grooves cut, position and. temporarily secure the stringers as before. Now mark off the length of the bottom tread, using as a guide the distance between the deepest parts of the tread grooves already cut into the stringers for this tread. If the grooves have been cut accurately, and the stringers properly placed, the length of the tread. should measure 18 ½ inches, including the 1/4 inch allowed at each end for fitting into the grooves in the stringers. Trim each end of the tread. to match the tapering angle of the stringers, i. e. about 5 degrees. If the tread fails to fit the grooves snugly, adjust the grooves to fit the length of the tread. The front edge of the tread should project about 1 inch and the back edge must be flush. If the back of the tread projects even slightly it will interfere with the closing of the legs.
Mark off, cut, and fit the fifth tread from the bottom in a similar way. While countersunk screws are more stable, three 2-inch nails may be used. to secure the ends of each tread in the grooves of the stringers. If nails are used, use a nail punch to drive the heads below the surface. The other three treads may now be marked off, cut and fitted. (See Fig. 2).
Take particular care to mark the exact length of each tread. Chamfer the forward corners of treads. With these fitted, the most difficult part of the work is completed. Before the front section of the steps is complete, a back piece and top piece must be fitted. (See Fig. 3). Cut the top piece first. It is to be 15 inches by 8 inches. Lay it centrally over the head of the stringers with a projection of 1 inch to the front. Nail the top piece firmly into place at the top of the stringers with 8d nails.
The cutting of the back piece is a little more difficult. First cut a piece 18 inches by 6 inches and plane one edge to an angle of 80 degrees. Try this under the top piece. It should fit snugly into the angle formed by the back projection of the top piece and the stringers. Center it and mark off the point of intersection of the bottom edge and the outside face of the stringers. Mark of from this point to the top corner and cut. Nail into position. This completes the front section.
Next, cut the legs in the following manner. Take the front section and lay it face downward. Place one of the legs so that one end butts on the bottom edge of the back piece and the outside edge lies flush with the outside face of one of the stringers. Mark the top end of the leg and cut it at an angle so that it will butt flush against the bottom edge of the back piece. Mark off 4 feet 8 inches and make another cut parallel to the cut at the top end of the leg. The other leg is dealt with similarly. It will be noted that the bottom ends of the legs are not at right angles to the edges of the legs. Place the legs in position again on the front section. Mark off the bottom brace by placing a length 12 inches from the foot of the legs. The top brace is marked off 8 inches from the top of the legs. The braces can now be screwed on to the legs.
Hinges are fitted to the legs as shown in Fig. 3 and then to the back piece. Care should be taken in fitting these hinges otherwise the steps will not stand evenly when open.
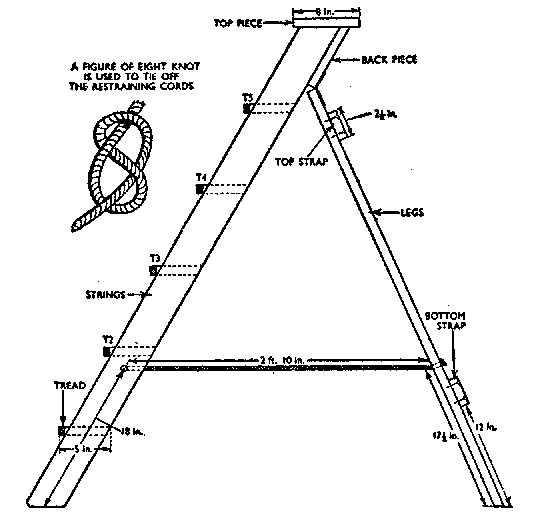
All that remains to be done is the fitting of the restraining cords. Drill a 3/8 inch hole in each stringer 18 inches from the foot and one in each leg 17 ½ from the bottom.
Cut two lengths of sash cord each 4 feet long. Make a "figure eight" knob at one end. of each length and thread through the holes in the stringers. (See Fig. 4). Place the steps upright and open the legs until the treads are horizontal. Make sure that this operation is effected on a level floor. Thread the cord through the legs and tie off again with a knot. Make the cord. a little less than the actual measurement to allow for stretching. But be certain that each cord takes equal strain when the ladder is subjected to loading.

The steps are now complete and should stand firmly on a level floor although a little trimming of the bottom ends of the legs may be necessary to achieve this. Sandpaper all corners and edges to prevent splinters entering the hands when using the steps. Finally, cut the bottom, forward corners of the stringers as shown in Fig. 4.
While it is not absolutely necessary, a coat of good spar varnish will help keep your stepladder in shipshape condition.