
Customizable Hinges
.jpg)
| Type | |
|---|---|
| Authors | TobinTheBlair |
| Status | Prototyped |
| Years | 2022 |
| Made | Yes |
| Manufacturing files | CustomizableHinge.stl |
|---|---|
| Hardware license | CERN-OHL-S |
| Certifications | Start OSHWA certification |
Project developed by Tobin Blair User:TobinTheBlair
Abstract
[edit | edit source]"To size up the work done by hinges, you simply have to imagine that every time you want to get in or out of a building you have to do the work as a prisoner trying to escape or a gangster trying to rob a bank, plus the work of those who rebuild either the prison's or the bank's walls." - Bruno Latour.[1] While it is whimsical to think of having to destroy and rebuild a wall every time you want to go inside or outside, it does highlight how necessary hinges are. Not only are they necessary for doors, but windows, toilet seats, and more. In short, hinges are necessary for buildings to function.
United Nations Sustainable Development Goal 9 is "Industry, Innovation, and Infrastructure".[2] This is related directly to the building, and especially maintaining, of infrastructure. In certain communities, particularly in developing countries, getting access to hinges or replacement hinges can be hard. Especially if a hinge breaks, there may not be a replacement available. There may also be a limited variety of hinges available, none of which will fit. A 3-D printable customizable hinge is OSAT because it provides easy access to whatever size hinge someone needs. The hinge can be adapted for any size screw or nail, and any size rod.
-
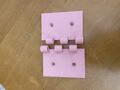
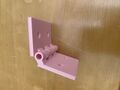 Customizable Hinge put together (no rod)
 -
.jpg)
Bill of materials
[edit | edit source]- Need: 4 screws. One example of a place to buy them is. Here, they cost an average of $.03 per screw.
- A straight rod, preferably metal, is also needed, it can be printed on its own or gotten elsewhere.
Design files
[edit | edit source]This is the base STL file for the customizable hinge. To customize it, see below.
Code
[edit | edit source]This is the code block for the Customizable Hinge. Copy and paste it into an openSCAD program and you will be able to customize it.
/* There are seven variables listed below. The first four detemine the general shape of the hinge. The second three determine the shape for the screw holes in the hinge.

For variable "d", which refers to the diameter of the rod that goes through the hole, make it slightly larger than the length of the rod you have. Also make the screw parameters slightly larger.

Two of these half-hinges fit together to make one hinge. */

/* [Hinge Parameters] */

//length of the hinge
length=60;

//width of the hinge
width=40;

//diameter of the rod that the hinge will swing on
d=5;

//height of the base of the hinge
height=2.5;

/* [Screw Parameters] */

//Height of the top of the screw
screwTopHeight=1.5;

//diameter of the top of the screw
screwTopTop=2.5;

//diameter of the screw
screwDiameter=1.5;

module screw(){ //this module determines the shape of the screw head.
 	 $fn=40;
 	 union(){
 	 cylinder(screwTopHeight,screwDiameter,screwTopTop);
 	 translate([0,0,-height])cylinder(height,screwDiameter,screwDiameter);
 	 }

}
module base() { //this module lays out the base of the hinge
 	 $fn=4;
 	 translate([0,0,d/4-height/2])cube([length,width,height],center=true);
}
module parts(){ //this module creates the circles that hold the hinge together
 	 $fn=50;
 	 translate([0,0,5*d/4]) rotate([0,90,0])cylinder(length/6.2,4*d/5,4*d/5);
 	 otherParts();
}
module otherParts() { //this module creates the rectangls that hold the circles to the base
 	 $fn=4;
 	 //translate([0,0,4*d/15])rotate([-40,0,0])translate([length/15.8,4*d,0])resize([0,9*d,0]) rotate([0,0,45]) cylinder(4*d/5,length/12,length/12);
 	 translate([length/12.4,d/2,d/3])rotate([40,0,0])cube([length/6.2,d,1.5*d],center=true);

}
module pole(){ //this module creates the rod that the hinge will swing on
 	 $fn=50;
 	 translate([-length,0,5*d/4])rotate([0,90,0])cylinder(length*2,d/2,d/2);
}

module underBad(){ //this module removes all the excess material created under the hinge from other parts of the code
 	 translate([0,0,-height+d/4])translate([-200*d,-200*d,-400*d])cube(400*d);
}
module hinge(){ //this module puts all the parts together that will form the hinge and takes out the screw holes

 	 difference() {
 			 difference() {
 	 union() {
 			 translate([0,width/2+d/6,0]) base();
 			 translate([(length/6-length/6.2)/2,0,0]) parts();
 			 translate([(length/3)+(length/6-length/6.2),0,0]) parts();
 			 translate([-length/3,0,0])parts();
 	 }
 	 translate([length/4,width/2+d/2,d/4-screwTopHeight])screw();
}
translate([-length/4,width/2+d/2,d/4-screwTopHeight])screw();
}
}

module hinges(){//this module shows what it will look like a a completed hinge. To see this, go into module run() and change "hinge()" to "hinges()"
 	 hinge();
 	 rotate([0,0,180]) hinge();
}

module run(){//This module completes the hinge by removing all the excess parts
 	 difference(){
 			 difference(){
 				 hinge();
 				 underBad();
 			 }
 			 pole();
 	 }
}

run();
This is the STl file for the rod that can go with the hinges. To customize it, see below.
This is the code block for the rod that goes with the customizable hinge. Any rod can work, it doesn't have to be 3D printed. This is available as an option, though is less strong than many other materials.
/* This is intended for use with the hinge provided. Please enter the same "d" and "length" values as with the hinge. They will be adjusted to fit. */

//diameter of the rod
d=5;

//length of the hinge
length=60;

module long(){ //This module creates the length of the rod
 	 $fn=50;
 	 cylinder(21*length/20,d/2.1,d/2.1);
}
module top(){ //This module created the top of the rod
 	 $fn=50;
 	 cylinder(d/2,4*d/5,4*d/5);
}
module bad(){ //This module flattens the side of the top so that it may be printed easily
 	 translate([-d/2.1,-3*d/2,0])rotate([0,-90,0])cube([length*2,d*3,d*3]);
}
module run(){ //This module puts it all together
 	 difference(){
 			 union(){
 				 long();
 				 translate([0,0,21*length/20])top();
 			 }
 			 bad();
 	 }
}
run();
Tools needed
[edit | edit source]- Jellybox or similar RepRap 3-D printer
Skills and knowledge needed
[edit | edit source]- 3-D printing knowledge, CURA knowledge
Technical Specifications and Assembly Instructions
[edit | edit source]- Instructions: Print two copies of the hinge. Turn them in opposite directions and slot them together. slide the rod through the hole created by the six rings.
- Print time: between 45 minutes and 5 hours depending on how it's sliced.
- Assembly time: 1 minute.
Common Problems and Solutions
[edit | edit source]- When using your own screws and rod:
- Make the dimensions of the hinge slightly larger than the actual dimensions of the screw or rod.
- When using the rod from this page:
- The rod is designed already to be slightly smaller than the hole in the hinge. Make sure that the "length" and "d" variables are the same.
Please Note! The sizes for the STL and openSCAD files that aren't modified are different from what is listed below in the Cost savings section.
Cost savings
[edit | edit source]- This is a cheap hinge from Lowes
- It costs $2.78 for a pair of hinges and screws
- A single customizable hinge of approximately the same size takes 2-3 grams of filament, so two hinges would be 5 grams of filament.
- around $.25 for two hinges
- 4 screws, also from Lowes, costs a total of $.12, at around $.03 each
- Using the rod provided on this page is approximately 1 gram of filament, or $.05
- In total, two hinges of the same size as that from Lowes would be .25+.12+.05=$.42
- The savings for this are 2.78-.42=2.36. The savings are $2.36.
- Percentage saving is (2.78-.42)*(100/2.78) = 2.36*35.971=84.89. The percentage saving is 84.89%.
However, PLA filament is weaker than metal. PLA hinges must be printed thicker, using more filament. While a hinge of the same size has around an 85% percentage savings, 2 hinges of adequate strength may cost more, say, around $1 per two hinges, which would have around 64% saving rate. Savings depends on how large hinges are.
References
[edit | edit source]Based on the developmental needs addressed (e.g. food, heat, electricity, clean water, health care, etc.) be sure to label your device in the proper categories e.g. use . Be sure to categorize your device so that it will be easy to find – for example "Low voltage connection basics" is categorized in
| Authors | |
|---|---|
| License | CC-BY-SA-4.0 |
| Cite as | ForgotOtherUser (2023–2024). "Customizable Hinges". Appropedia. Retrieved July 10, 2026. |