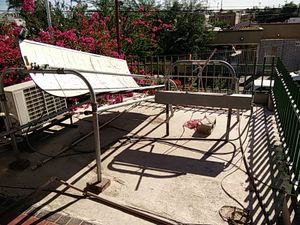
To finish building an Open Source parabolic hot water heater.
Here we have the different parts of the project design, including some photos[edit | edit source]
- Collector
- Metallic Structure
- Reflector area
- Motor area
- Motor mounting - Metallic structure
- Electrical
- Electronics
Collector[edit | edit source]
Collector Photos[edit | edit source]
- Collector Gallery
-
Jalero connection to rib. Pretty much the "front" view.
-
Collector aluminum channel edge. Also shows welded strip running along bottom of ribs.
-
Another photo of the jalero
Collector Drawings[edit | edit source]
-
Collector support, footer, from the front
-
Collector support, header (above and lateral)
-
Collector support, header, from the front
-
Collector layers incl. metal rib support - front view
-
Collector - front (the Jalero has been modified - it needs to be updated).
-
Collector - lateral view
-
Collector - top (without layers of reflective material)
Collector Comments[edit | edit source]
8 Nov. 2016 Just thought i'd add that the Jalero was pretty complicated. We decided to experiment with just the bent steel rod resting and rotating against a clamp.
i like the jalero: it's homemade and pretty inexpensive, and uses those round things with a set screw so the distance can be adjusted; it's all stainless steel and aluminum.
Motor Area[edit | edit source]
Motor Area Photos[edit | edit source]
- Motor Gallery
-
Motor threaded rod assembly. Looking down. Left is the back side of the metal box. This shows the bearing which upon which the aluminum C channel rides. The black item on the right is the limit switch.
-
Motor and threaded rod assembly - 2. Looking down. Left is the back side of the metal box. This shows the bearing which upon which the aluminum C channel rides.
-
Motor and threaded rod assembly. In forefront is the aluminum C channel, then the stainless steel block which rotates upon the threaded rod. Hidden are the extensions on either side of the stainless steel block and their respective washers and bearings. In the background can faintly be seen the horizontal aluminum C channel.
-
Threaded rod and pillow bearing - left. Note the small block of wood that raises the pillow bearing in order for the threaded rod to pass through.
-
Motor and some wiring and pillow bearing - right. Also note the small block of wood which helps to align the threaded rod with the motor.
-
Motor and more wiring with cotter pin mod.
-
Motor mount galvanized steel box - side view. The front is on the left.
-
New aluminum rotating tube placed lower. This apparently solves our "rod connection" challenge.
-
How the aluminum rod and support are connected to the motor area.
- No longer used designs
-
This assembly is no longer used.
-
Aluminum guide. This assembly is no longer used.
-
Aluminum guide - side view (sort of)
-
Previous iteration of the Rod Connection
-
Electronic sensor mounting and our "problem bolt".
-
Current iteration of the Challenge Rod Connection.
-
Aluminum guide. Replaced by a better design - we think so far - lol. See "Motor and threaded rod assembly" above.
Motor Area Drawings[edit | edit source]
-
Motor support base - front
-
Motor support base - side
-
Motor support - aluminum arm connections
-
Motor support box - bottom
-
Motor support box - right side
-
Motor support box - top
-
Motor support box - front inside
-
Motor support box - front inside
Motor Area Comments[edit | edit source]
In the photo of the side view of the motor mount, the far right cable has been eliminated because the wire now goes up the inside of the rotator rod which has the electronic sensor at the top.
The other three holes are, top to bottom: switch, power and power cable for small pump at foot of collector.
Motor support box - right side now only has three holes. See above.
Motor support box - front - inside: This needs additional items: the inverter, etc.
Electronics[edit | edit source]
Electronic Photos[edit | edit source]
- Electronics Gallery
-
New sensor and jar.
-
Wire entering aluminum rod and assembly that rod passes through which connects it (the rod) to the threaded rod.
Electronics Drawings[edit | edit source]
-
Electric connections (to motor, electronic sensor, left and right limit switches and small electric water pump)
Electronics Comments?[edit | edit source]
Here's where to comment on the electronics area - lol!
March 2015 - Well, it looks like the problem was one of angles. The relation between the long connecting rod and the two shorter, vertical ones which connect to the collector and motor needs to form a parallelogram. So we lowered the connection point on the motor area to make sure it was the same distance from the ground as the one that connects to the collector. Since we lowereed the connection point, we added an aluminum rod to the motor area frame and used our 7" bolt. We now see that a 4" bolt will probably do.
First comment... We have switched out the 6" bolt to a 7" one. When we were using the previous design, the assembly wouldn't bind, but now it does, so much so that it manages to bend the 1/2" threaded rod. We are at a loss to explain what is happening here. Anyone have an idea?
Misc.[edit | edit source]
For additional information, please feel free to contact Fred Frazelle at info@fundacionanisa.org
Return to Home Page: Anisa Foundation parabolic solar hot water heater


