This is a screenshot from the PurpleAir real time map of Orleans, CA in April 2023. The image displays that there are multiple indoor and outdoor sensors currently deployed.
This page documents the final course project for the Spring 2023 ENGR 535 (Development Technology) course at Cal Poly Humboldt. Our team was tasked with developing a "low-touch" way to deploy 100-200 outdoor PurpleAir sensors across the remote California portion of the Klamath Bay Region. This deployment strategy included developing materials to support the setup of the PurpleAir sensors by community end-users; these materials include an Installation Guide, Installation Video, and an Air Sensor Deployment Roadmap. Our project was designed to be deployed within the Klamath Bay Region, specifically surrounding Orleans in Humboldt County, CA. It is outside the scope of this project to determine who should receive the PurpleAir sensors, where the end-user package components should be purchased from, and which PurpleAir sensor model should be utilized for this deployment.
This page includes deployment documents and materials developed for our final product.
The air quality we breathe is essential for our health and well-being, and the increasing awareness of the impact of air pollution on our environment has led to a growing interest in monitoring air quality in our communities. This document provides guidelines for installing and maintaining PurpleAir PA-II air sensors to monitor air quality. The procedures outlined in this document cover everything from selecting the best location for the sensor to interpreting the data collected. These guidelines are aimed at individuals and organizations concerned about the air quality in their communities and looking to take action to improve it. By following these guidelines, anyone can set up and maintain a reliable air quality monitoring system to track pollution levels in their area.
Checklist
(1) Installation Guide
(1) PurpleAir Sensor
(1) Power cord
(1) 3 outlet wall adapters
(1) 15’ green outdoor extension cord
Mounting Options:
(2) 8” black outdoor cable ties
(1) 4” black outdoor cable tie
(1) Pair of hanging strips
(1) Large screw eye
Overview of PurpleAir PA-II sensor
The PurpleAir PA-II is a low-cost air quality sensor designed for the outdoors, in homes, schools, and other small-scale applications. It uses two laser particle sensors to measure particulate matter (PM) levels in the air, which can indicate air pollution and have adverse health effects. Figures 1 & 2 show the dimensions of a PurpleAir PA-II sensor.
Figure 1: Bottom view of PurpleAir PA-II sensor
The PurpleAir PA-II is small and portable and can be easily mounted on a wall or placed on a flat surface. It can be connected to the internet using Wi-Fi, allowing users to monitor air quality data in real-time through the PurpleAir website or mobile app. The device can also be integrated with other intelligent home systems, such as Google Home or Amazon Alexa. One of the unique features of the PurpleAir PA-II is its dual-laser sensor design, which allows it to measure both large and small particles in the air. This makes it a more comprehensive tool for measuring air quality than other low-cost sensors.
The PurpleAir PA-II is also designed to be user-friendly and easy to use, with simple installation instructions and a streamlined interface for monitoring and analyzing data. Overall, the PurpleAir PA-II is a popular choice for individuals and organizations looking for a low-cost, easy-to-use air quality sensor that can provide real-time data on particulate matter levels in the air. While it may not be as accurate as more expensive professional-grade air quality monitoring equipment, it can still be a valuable tool for identifying air quality issues and taking action to improve indoor and outdoor air quality.
PurpleAir Installation and Setup (Model PA-II)
Receiving and setting up a PurpleAir PA-II sensor begins with registering the PA-II air sensor. The instructions for registration are included in the package that the client receives. After the device is set up, the client should find a suitable location to mount the sensor. This location should be free from any obstructions and provide sufficient airflow. The accompanying documentation provided with the sensor, gives more detailed information on this process.
Process 1: Registration
Registering your PurpleAir PA-II sensor is the first step in setting up this valuable tool for measuring air quality. This process is essential to ensure the network recognizes the device and can communicate its measurements to the PurpleAir servers for analysis. Registering your sensor is a simple process that can be done quickly with the instructions provided by the device. Once registered, the sensor can be set up and mounted in an appropriate location to begin monitoring the air quality in your outdoor environment. The following equipment is required for registering the PurpleAir PA-II sensor:
Device to access the internet: Laptop or a smartphone.
Access to a Wi-Fi connection.
Access to a power outlet.
Step 1: Connect your PurpleAir PA-II sensor to a power outlet using the sensor power cable (labeled 2 & 3 in Figure 3) shipped with the package. When the device is plugged in, a blue light will appear for a few moments while the device boots up.
Figure 2: PurpleAir PA-II sensor and power cable setup
Step 2: Connecting to sensor hotspot: Open the network settings on your Wi-Fi-enabled device (phone, computer, etc.) and connect to the sensor’s hotspot. Figure 4 shows that the hotspot’s name will be PurpleAir-****.
Figure 3: PurpleAir Sensor Hotspot
Tips:
It may take up to 10 minutes for the PurpleAir-**** network to appear after the device is connected to power.
Depending on the Wi-Fi-enabled device used, a popup may appear. If it does not appear, open a web browser and enter http://192.168.4.1/config “[1]” into the address bar. If it still does not appear, try temporarily pausing or disabling mobile data on your Wi-Fi-enabled device and re-entering the URL above.
If you do not see the sensor’s PurpleAir-**** network, it may already be configured to Wi-Fi.
Step 3: Configure your Sensor to the Local Wi-Fi
Select the network you are connecting your sensor to in the available list. Next, enter the password for the local Wi-Fi network and press “Save,” as shown in Figure 5.
Figure 4: Connecting to PurpleAir PA-II sensor
Your PurpleAir sensor will begin trying to connect to Wi-Fi. This process may take a couple of minutes. Once the Wi-Fi is connected, the message at the top of the page will say, “Looking Good.”
Tips:
If your sensor is not connected, view these ideas for troubleshooting:
Step 4: Disconnect laptop/ smartphone from the PurpleAir-**** Network.
Your sensor is now connected to Wi-Fi. You can reconnect your Wi-Fi-enabled device (such as a smartphone or a computer) to your local Wi-Fi to regain internet access. The PurpleAir-**** network will become unavailable, providing the sensor has been configured to a network with an internet connection.
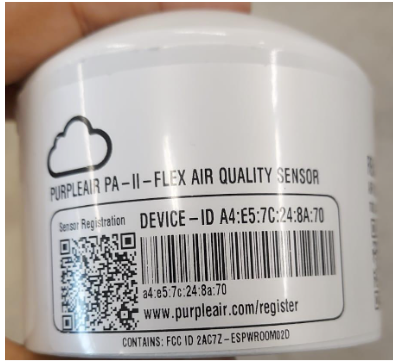
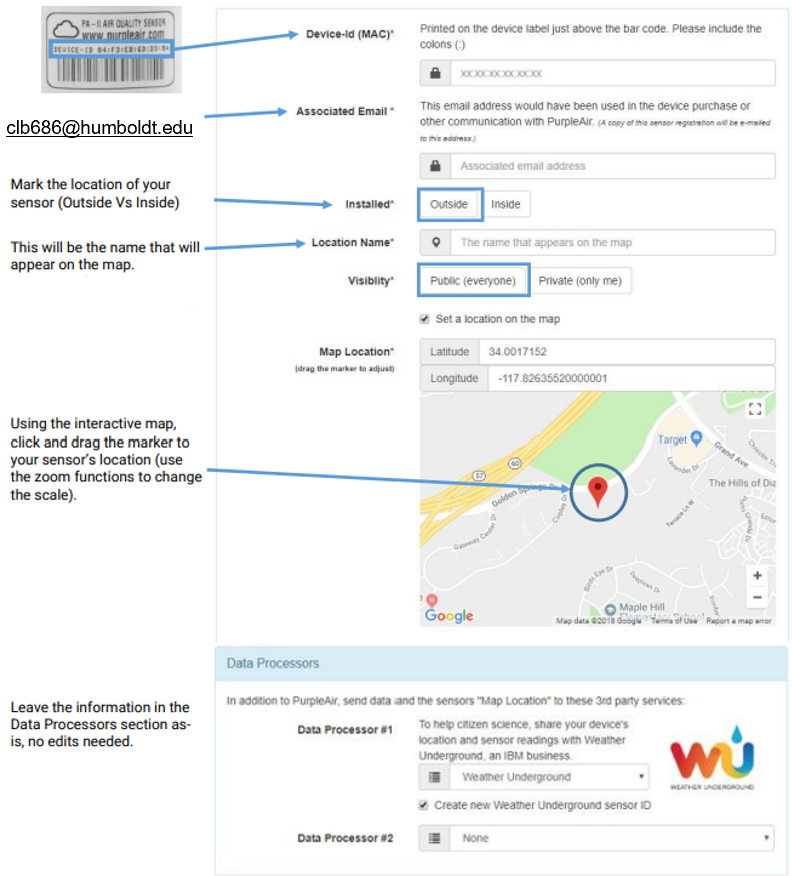
Once you open the registration link, a form will appear; you must fill out the form using the information from your sensor. The device ID for the sensor is printed on the sensor, as shown in Figure 7 below. The associated email address is clb686@humboldt.edu.
An associated email is needed to register your device. The email used to purchase your device is associated by default. For your device the associated email is clb686@humboldt.edu.
Step 6: View Sensor data
Once your sensor has been registered and configured to Wi-Fi, it will appear on the PurpleAir website.
Considerations for Installing Outdoor Air Sensors
Once you receive the air sensor and register it, the next step is to find the correct location to mount the PA-II sensor. The following picture describes five factors you should consider when selecting a place to install an air quality sensor.
Figure 9: Factor to consider while selecting the location to install the air sensor.
Once you find a suitable location to install your PurpleAir PA-II sensor, the next step is to mount your sensor in the desired location. The package you received your Air Sensor in contains zip ties, command strips, and screws, which can be used to secure your sensor in place. The following images show a few ways to mount your air sensor.
Method 1: Command strips:
Figure 10: Mounting the sensor using a command strip
Method 2: Using a Zip tie:
Figure 11: Mounting air sensor using a zip tie.
Methos 3: Using a large screw eye:
Figure 12: Using a large screw eye and zip tie.
Troubleshooting
The two most common issues in the field are loss of power and Wi-Fi signals to the sensor. So please check the power outlet to the device and the Wi-Fi connectivity. For more troubleshooting tips, scan the QR code:
This document will serve as a roadmap for both the Karuk Department of Natural Resources (KDNR) tribal staff and for the community member end-users. The KDNR staff will be responsible for the preparation and distribution of the PurpleAir sensors, and the end-users will be installing the sensors on their properties.
Expected Timeline
Figure 13. Expected timeline for air sensor deployment. The timeline includes acquisition, assembly, shipping, installation support, and ongoing support. Each phase of deployment has an estimated associated time value for planning purposes.
Each of the major expected timeline phases (acquisition, assembly, shipping, installation support, and ongoing support) are described in greater detail below:
Acquisition & Assembly
Staff responsible for assembly and shipping should acquire the items on the resource list (see below). The project will require both universal items used for all packages and then individual items needed per package. The universal items are the packing tape roll, packing tape dispenser, and brown packing paper. The individual items are the PurpleAir sensor (and power supply), 3 outlet wall adapter, outdoor extension cord, installation guide, and mounting. End user packages could be mass assembled for maximum efficiency and ready to ship out to end users as names come into KDNR.
Resource List
Items needed for the Karuk Department of Natural Resource (KDNR) to acquire (or have available) prior to assembly phase:
Universal Assembly Items Required
Quantity
Item Description
1
Packing tape roll
1
Packing tape dispenser
1
Packing Paper
Each end user will have a package sent to them containing the following items:
Individual Assembly Items Required
Quantity
Item Description
1
Cardboard box (12 x 9 x 6")
1
Shipping label
1
Installation guide
1
PurpleAir sensor
1
PurpleAir sensor power cord
1
3 outlet wall adapter
1
15' green outdoor extension cord
1
Small baggie to hold mounting items (below)
2
8" black outdoor cable ties
1
4" black outdoor cable tie
1
Pair of hanging strips
1
Large screw eye
Figure 14. End user package components.Figure 15. End user package assembled.
Shipping
Once all of the items for the packages have been acquired and printed (installation booklets) the shipping and deployment process is quite quick. The only reliable shipping service that covers the deployment region is the United States Postal Service (USPS). The box size recommended for packaging is 12 x 9 x 6”. There are multiple shipping methods via the USPS that can be utilized for a 12 x 9 x 6” box that have varying costs and acquisition impacts (see Table 1). A USPS medium flat rate box is free, includes tracking and $100 insurance, but costs $17.10 to ship. An unmarked corrugated box, such as Model# S-4406 from ULINE, has a per box cost of $0.87/box, would have to be ordered in advance, but costs less to ship. A 12 x 9 x 6” box assembled weighs roughly 3 lbs 12oz and can be shipped via USPS Priority Mail (which includes free tracking and $100 insurance) for $11.15. The assembled box can also be shipped via USPS Retail Ground (which includes free tracking but no insurance) for $11.00.
All of these shipping options offer durable packaging and have different impacts on the overall budget per package. However, it is worth considering that if a corrugated box is used and sent via the USPS Priority Mail there would be a $5.08 per box savings compared to using a USPS Medium Flat Rate box and does not sacrifice the insurance coverage.
USPS Shipping Option for End User Packages to Receive the PurpleAir Sensors
USPS Medium Flat Rate Box
Corrugated Box via USPS Priority Mail
Corrugated Box via USPS Retail Ground
Box Cost
$0.00
$0.87
$0.87
Shipping Cost
$17.10
$11.15
$11.00
Tracking Included
yes
yes
yes
Insurance Coverage
$100.00
$100.00
$0.00
Total Cost
$17.10
$12.02
$11.87
Because of the strong possibility based on feedback that end users may require installation support from tribal staff, it is recommended to stagger shipments to end users to not overwhelm tribal staff. Sending twenty packages a day would stagger some of the initial support needed. If there were 200 sensors being deployed it would take two weeks (10 business days) to ship out all of the sensors. The bulk of the support provided by tribal staff will be during installation.
Installation Support
Installation support will be the most taxing portion of this deployment for KDNR. Initial setup for the PurpleAir sensor is a bit clunky as a baseline and has a lot of potential roadblocks for end users. We have identified the following potential roadblocks:
Based on feedback, it is generally not an intuitive process to create a local hotspot for the PurpleAir sensor.
IP addresses have to be entered properly both creating the hotspot and to get to the registration page.
Several registration fields must be entered properly at the time of registration and cannot be changed if entered incorrectly.
Because of these roadblocks, it is recommended that KDNR pre-register all of the sensors with the proper Device ID, associated email, and the device owner’s information. Another potential solution to overcome registration errors is for KDNR to set up 30 minute appointments at the end-users home (or videochat could work) so that they can come and complete the entire sensor’s setup and registration process for the end user. A more in-depth cost vs benefit analysis should be conducted to determine if this is financially beneficial. However, despite the financial cost benefit results, the more important outcome for this deployment is the successful implementation of an air quality monitoring network throughout the Klamath Bay Region. Concerns about user frustration or setup errors can be overcome by proactive KDNR staff involvement.
Ongoing Support
Periodic operational check-ins, reminding people that there are troubleshooting resources, re-sending troubleshooting, and/or helping users with a few known ongoing support needs. These ongoing support needs can occur when the sensor isn’t functioning properly, power is lost, or when the Wi-Fi connection is lost.
Sensor Not Functioning Properly: The sensor not functioning properly can manifest in multiple ways such as the LED lights not working, the sensor not active on the PurpleAir map, etc. The first and foremost troubleshooting action to try is to unplug and re-plug the sensor's power cord back in. Wait a few minutes to see if the sensor re-establishes connections properly and resumes normal function. If not, there may be additional support required to resolve common issues such power outages or Wi-Fi disruption.
Power Outage: When there is a power connection disruption the PurpleAir will go offline. When power comes back on, and the Wi-Fi is restored, the PurpleAir sensor should automatically reconnect. However, if the sensor doesn’t come back on there are a few things you can check. Firstly, check to see if the sensor is plugged into a GFCI outlet – if it is, the power outage may have tripped the outlet and needs to be reset. Similarly, if no power is coming from the outlet check the main breaker to see if it needs to be reset. Once power is restored, the sensor will turn on, display LEDS, and automatically reappear on the PurpleAir online map.
Wi-Fi Disruption: If the router/modem is changed, Wi-Fi network is changed, and/or the password for the Wi-Fi network is changed it will be necessary to reset the Wi-Fi connection. To reset a Wi-Fi network, you will either need to take the sensor out of range or disconnect the sensor from its current network – after 10 minutes the sensor will broadcast its own network again under available networks. Repeat the Wi-Fi connection steps (found below).
User Manual (End User)
This section is the same as the above subsection "PurpleAir Installation and Setup (Model PA-II)" located under the the Installation Guide section.
Supplemental User Manual & Support (KDNR Staff)
PurpleAir Sensor Connecting to Wi-Fi & Registration
Plug the power cord into the sensor. The power cord plugs into the underside of the sensor.
Plug the power cord into an outlet. Once the device is successfully plugged in a blue light will appear. For devices with a full-color LED, it will change to the color associated with the current air quality.
On a Wi-Fi enabled device, open up your available networks.
Select the local PurpleAir network.
It may take up to 10 minutes for the PurpleAir-**** network to appear. If the Wi-Fi pop-up does not appear have the end user open a web browser and enter:http://192.168.4.1/config
After you select the PurpleAir network, you will be prompted to choose your Wi-Fi network and enter your Wi-Fi password.
Once the Wi-Fi is connected properly, a message at the top of the page will say “Looking Good”. The PurpleAir sensor is now connected to Wi-Fi.
The “Looking good” message may or may not display - at the time of publishing, the PurpleAir is not displaying the message but a note on the PurpleAir page says that this will be fixed with a future update. Update timeframe unknown.
Next, reconnect your Wi-Fi enabled device to your local Wi-Fi network. The PurpleAir network will become unavailable, this is normal once the PurpleAir sensor is connected directly to Wi-Fi.
Fill out the form with the registration information. Device ID is on the cardboard sleeve the sensor was shipped in, the associated email address is clb686@humboldt.edu, the sensor will be installed outside, the location name should be appropriate as it will appear on the public map, set the visibility to Public (everyone), and set a map location.
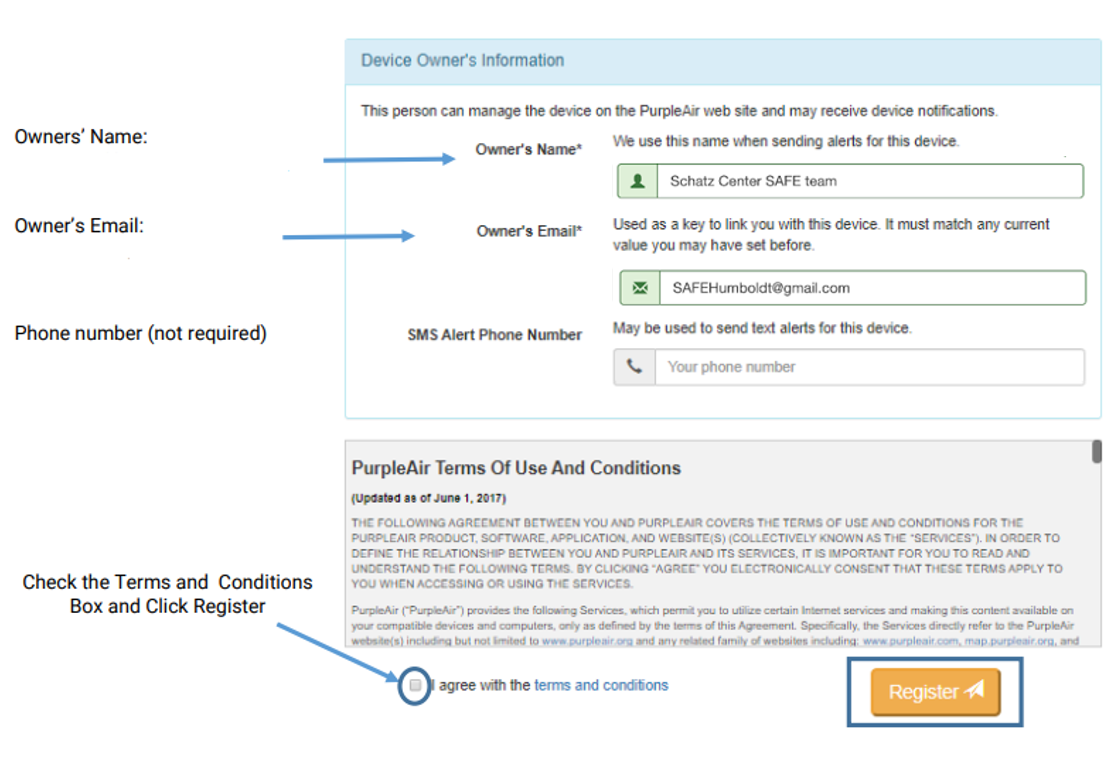
Once the registration form is complete, press the Register button. A green box will appear to confirm that the PurpleAir sensor has been successfully registered.
Next steps will be to install the PurpleAir sensor, you can safely unplug and relocate your device to an outdoor location.
PurpleAir Sensor Installation
Determine an outdoor location that is within the power cord’s distance and is still able to receive your Wi-Fi signal. The sensor will need to have proper airflow, and not be near building exhaust vents or kitchen windows.
Use the most appropriate mounting method for your location. You have been provided with three different mounting options:
A pair of command strips: attach one side to your metal bracket on the PurpleAir sensor and the other side to the physical mount
Black 8” zip ties: these can securely hold the sensor in place against a mount, and can be coupled together as needed for a larger hold
Screw Eye: twist the screw end of the screw eye into your mount then use the 4” zip tie to thread through the hole on the sensor’s metal bracket and connect the zip tie in a loop through the screw eye
After mounting the PurpleAir sensor, reconnect it to the power supply. Your PurpleAir sensor is now continuously monitoring the local air quality. To view your sensor and/or current air quality go to https://map.purpleair.com/
Supplemental Troubleshooting Support
Provided below are a list of curated helpful links that can aid KDNR staff in troubleshooting:


.png)


.png)


