
215 Accordion photovoltaic portable power
.jpg)
| Type | Photovoltaic system |
|---|---|
| Authors | Tatiana Anthony Eggink Lowell Lindner |
| Location | Arcata, United States |
| Status | Deployed |
| Years | |
| Made | Yes |
| Replicated | No |
| Uses | photovoltaics, energy generation |
Team ATLAS, a group of Spring 2022 Environmental Resources Engineering students at Cal Poly Humboldt, designed and built a photovoltaic system that recharges a power bank that charges laptop and smartphone devices. This project was intended to provide information to build a mid-quality mid-cost product that not only competes with the power bank market today but also has the ability to replace components, utilize renewable energy, and customize the product to the user's desire.
Background
[edit | edit source]We are team ATLAS, a group of Environmental Resources Engineering Students located at Cal Poly Humboldt for a Spring 2022 Introduction to Design course instructed by Lonny Grafman. The project conducted was to inspire the users of Appropedia to recreate and utilize free information as well as the free renewable energy provided by the sun. A photovoltaic system that charges a Do-it-Yourself (DIY) power bank was created to power laptops and smartphones at mid-quality and mid-cost in which provides an alternative to the available power banks in the current market.
Problem statement
[edit | edit source]The objective of the project was to create an alternative choice for individuals purchasing a power bank. The current options for a photovoltaic system in today's market is a low-cost low quality power bank that charges with a small solar panel or an alternative electrical source, additionally, the market consists of high-quality high-cost power banks that charge significantly more than the essential laptops and smartphones. The team developed a solution for individuals that experience lack of electricity resources and cannot low-cost solar panels with electricity. The solution being a mid-cost mid-quality solar power bank that can be recreated by any individual with access to sources that can purchase solar panels and components to build a simple power bank.
Analyzing this issue, team ATLAS conducted interviews and developed an understanding of what individuals desire in a solar power bank. The main factors in using personal power banks were traveling to remote areas where electricity was not accessible, effectiveness in charging the power bank, and how easily portable it was. Individuals would pay a larger sum relative to the cheapest product on the market for better quality, but not significantly large. Below is a list of criteria team ATLAS formed considering the consideration of others.
Criteria:
| Criteria | Description | Weight (1-10) |
|---|---|---|
| Portability | This product should be mobile by being under 15 pounds. | 9 |
| Ease of Operation | The product should be simple enough for everyone to operate despite varying skillset. | 9 |
| Durability | The product must withstand outdoor conditions such as heat intensity and dirt. | 8 |
| Cost | The cost of the materials and tools necessary to build is under $500 | 8 |
| Charging | The solar panels charge the power bank within 12-24 hours. | 7 |
| Safety (construction) | The construction process of building the product does not cause harm to the user | 6 |
| Reproducibility | The product and its instructions are simple enough for anyone with basic tool and circuit skills to recreate | 6 |
| Aesthetics | The product is aesthetically pleasing and visually desirable to inspire others to recreate. | 5 |
Prototyping
[edit | edit source]The first stage of prototyping for team ATLAS was to first understand the properties of solar panels as each individual had no prior knowledge in electronics or solar arrays. Therefore, this learning process helped the team visually understand parallel circuits and the properties of series and parallel when considering voltage and amperage. To simplify the learnings further; in a parallel circuit voltage stays the same and amperage adds, in a series circuit voltage adds and amperage stays the same. Amperage output is desired in a solar array as this determines how effective the solar array will charge the power bank.
- Sample gallery
-
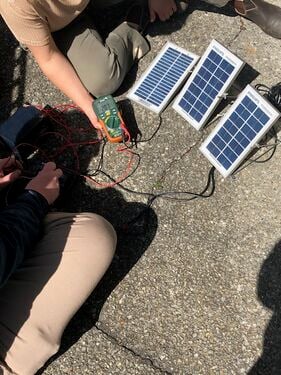 Figure 1: A three-panel system wired in parallel (Lindner, 2022).

The second stage of prototyping was to create a physical object of what the design should look like so that team ATLAS could accommodate for future construction challenges as well as universally understand what needs to be done to have a final product that looks similar.
-
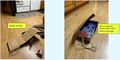 Figure 2: A cardboard prototype of the original accordion design with respective labels

Finally, the last prototype created was an update to the original 5-panel Accordion Box. The CAD drawing is a 3-panel solar array that folds the same as an accordion but will not weigh as significantly as a 5-panel design would.
-
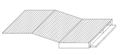 A CAD design drawn by Lowell Lindner.

Final product
[edit | edit source]Finally, the photovoltaic power bank, The Accordion Box. The final product includes a DIY power bank and a foldable solar array both labeled separately. The solar array plugs into the power bank to recharge, the power bank can be disconnected once charged to take on the go. The power bank consists of one AC outlet and two USB-A outlets that are capable of charging 12V laptops and 5V smartphones.
Shown below in Figure 3 are the components that consist of the power bank first seen with component map, then actual components in Figure 4.
-
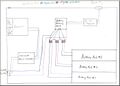 Figure 3: A component map of all the components used in power bank system.
 -
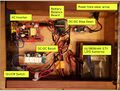 Figure 4: Actual components consisting of the power bank that charges laptops and smartphones


The solar array, shown below in Figure 5, is connected together through parallel circuitry. The parallel circuit as stated above means that the voltage will remain the same, but the amperage will add. Additionally, this means that if one panel is shaded while the others are in sunlight, the circuit will not be distributed compared to the opposite properties of series circuits.
-
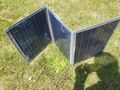 Figure 5: Epoxy Polycrystalline Panels bonded with glue and waterproof canvas

After wiring the panels in parallel, the panels are wrapped in waterproof canvas to protect the circuit box attached at the back of each panel from getting wet with the outdoor environments.
Construction
[edit | edit source]The Accordion box is easily reproducible and requires minimal knowledge of working with electrical components. The only skills the reproducer will need to implement is substantial tool knowledge with screwdrivers, wire cutters, and soldering. The user should have supplemental instruction for recreating the Accordion Box, as long as they stay true to the instructions. These directions can be found within the team's instructional video. An additionally helpful source of information for the recreation of the Accordion box is the YouTube video "Ultimate DIY 60,000 mAh Power Bank (222Wh)", (Kralyn, 2018).
To use the solar powered power bank after construction, initially connect the male adapter from the solar panels to the female adapter located on the side of the power box. The present batteries in the battery bank will charge throughout this time. In order to Position the solar panels at direct sunlight. At full charge, indicated by multimeter, the male adapter connecting the solar panels can then be detached. The battery bank is now portable and can charge laptop and smartphone devices by turning on the switch. The switch will indicate that it is on by red light.
- Sample gallery
-
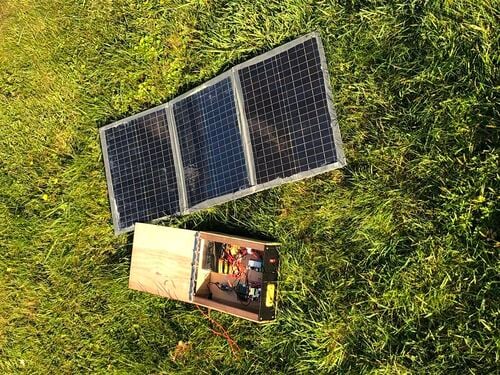 Team ATLAS's Accordion Box: Assembled and Operational
 -
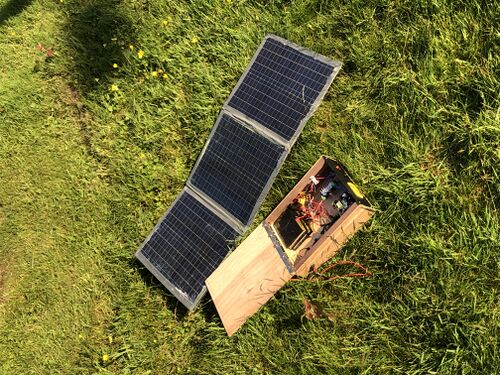 Team ATLAS's Accordion Box: Assembled and Operational


Video instructions
[edit | edit source]A good way to display a process is by making a video explaining your process. See Template:Video for information on how to add and annotate videos.
Overview of Cost
[edit | edit source]It is apparent that the total cost to replicate the Accordion Box is approximately listed at $326. This happens to be significantly lower than the research and development cost implemented prior. This accumulated cost meets the desired criteria; moreover, prompting individuals to replicate a design similar that charges laptops and smartphone using the sun to recharge their device at a reasonable cost.
| Item | Amount | Cost per unit | Total |
|---|---|---|---|
| Thermal Paste | 1 | USD 3.99 | USD 3.99 |
| LiPO 10000 mAh Batteries | 6 | USD 23.99 | USD 143.94 |
| 45 Celsius Temperature Switch | 2 | USD 3.11 | USD 6.22 |
| 10A 45V Schottky Diode | 2 | USD 0.80 | USD 1.60 |
| 0.28 Inch 12V Voltmeter | 2 | USD 2.95 | USD 5.90 |
| 14.8V 4s 30A Circuit Protection Board | 1 | USD 6.99 | USD 6.99 |
| XT60 Male/Female Connectors | 3 | USD 0.80 | USD 2.40 |
| 12V to 110V AC Converter Car Adaptor | 1 | USD 14.99 | USD 14.99 |
| Waterproof Canvas | 1 | USD 11.95 | USD 11.95 |
| AC 3 Prong Switches | 2 | USD 1.40 | USD 2.80 |
| Heat Sinks | 2 | USD 1.78 | USD 3.56 |
| DC-DC Boost Converter | 1 | USD 13.44 | USD 13.44 |
| 12 Gauge Wire | 1 | USD 0.00 | USD 0.00 |
| USB Buck Converter 12V 24V to 5V | 2 | USD 2.99 | USD 5.98 |
| Polycrystalline 17V 1.2A Solar Panels | 3 | USD 33.99 | USD 101.97 |
| Grand total | USD 325.73EUR 280.13 <br />GBP 237.78 <br />CAD 403.91 <br />MXN 6,791.47 <br />INR 24,380.89 <br /> | ||
Operation
[edit | edit source]To use the solar powered power bank after construction, 1 connect the male adapter from the solar panels to the female adapter located on the side of the box. The batteries in the battery bank will charge during this time. 2 Position the solar panels at direct sunlight. At full charge, indicated by multimeter, the male adapter connecting the solar panels can then be detached. The battery bank is now portable and can charge laptop and smartphone devices by turning on the switch. The switch will indicate that it is on by red light.

Connect the male adapter from the apparent solar array to the female adapter located on the side of the wooden power box.
Position complete charging system in direct sunlight.

The solar array attached to the Accordion Box is flexible and foldable which enables the product to have a higher surface area when completely unfolded; furthermore, allowing faster charging while still being considerably portable when closed. The user can adjust these implemented panels easily to optimize the angle at which the arrays face the sun, as this increases the overall angles and flexibility of sunlight capture.
Maintenance
[edit | edit source]When considering the maintenance cost, the components in the box are easily replaceable. The box containing the components opens and closes allowing access to the user for maintenance. This reduces the cost of purchasing a new power bank entirely, prolonging the life of the power banks, and allows customization to the user if desired.
Maintenance schedule
[edit | edit source]Every 10 Weeks
Clean surface of solar panels with a towel and cleaner.
Solar panels generally are receptive to dust and lose efficiency when solar cells are covered by these particles. Therefore, it is recommended that every month, the user dusts or cleans off the surface of the solar panels to maintain the maximum efficiency of the solar panels.
Every 10 Months
Check if batteries are swelling or experiencing corrosion at the terminals.
Damaged LiPO batteries may experience swelling or corrosion at the terminals. Check every 10 months if battery replacement is needed.
Every 10 Years
Check if solar panel cells are cracked or broken.
Cracked solar cells are indicators that the solar panels need replacing. Cut the fabric of the accordion to access the wires of the damaged panel (be sure not to cut the wires). Replace the polycrystalline solar panel and wire in parallel with others, replacing the canvas is optional.
Check if components are outputting the correct amount of voltage and amperage.
Components such as DC-DC Step Down, DC-DC Boost Converter, and battery balancing board can have an extensive lifetime. It is recommended that individuals test the voltage output to determine the quality of the components. Using a multimeter can determine the performance.
Conclusion
[edit | edit source]The Photovoltaic Power Bank, The Accordion Box, was successful in charging laptop and smartphone devices after being recharged by the sun. The overall cost of research and development was $325.73 and the cost to recreate is significantly lower at approximately $113. The Power Bank is portable and easily accessible for upkeep in component maintenance. The Solar panels are lightweight and foldable for further portability.
Testing results
[edit | edit source]Time constraints for building and reinforcing this product resulted in a lack of testing results to provide results in supporting the met criteria. Therefore, next steps of the project would include further testing for results.
Discussion
[edit | edit source]Lack of testing results determine a lack in discussion.
Lessons learned
[edit | edit source]There were many setbacks in this project including delay in component orders, purchasing heavy monocrystalline panels, not utilizing simpler knowledge, and lack of time to build/test product.
The hardest lessons of this project were understanding the foundational physics to understand circuits and what components are needed to build a DIY power bank; however, the power bank could have been done a lot simpler. Using components such as DC-DC boost converter and a step down is considered a more complex design capable of adjusting voltage for laptops that require more voltage such as gaming laptops with further building.
The polycrystalline solar panels are almost as efficient as aluminum monocrystalline. For best portability, stick with epoxy polycrystalline panels.
Next steps
[edit | edit source]The next steps ATLAS anticipates for the Accordion Box is to build a simpler design, maximize portability with a power bank case made of lighter materials such as 3-D printing, and testing the product overall.
In the future, the power bank can be created a lot simpler with cheaper materials, such as the ones below. The power bank itself can be done with:
- a car inverter
- 12V battery
- car fuse
- on/off switch.
- 12 gauge wire
- wire cutters & voltmeter
The knowledge to build this simpler system requires further research.
To continue building the voltage regulator for charging 12V-19.5V laptops; first remove the voltage regulator bolt from the DC-DC Boost converter, connect wires from the negative terminal and wires to the positive terminal, the screw-like object on the regulator can be adjust by the user with a dial glued on the bolt as one would adjust the voltage with a Philips head screw.
Gluing canvas is not necessary for hinging the solar panels together. The corner of panels can be carefully drilled into and tied together with zip-ties. The backs of the panels where the wire box is will need to be considered with the outdoor environments. Keep away from water.
Lessons learned when putting together the canvas casing on the panels, know for sure the wiring of the panels are correct with a multimeter, then be careful with super glue getting on the solar cells. If this happens, quickly remove it with a towel or research resources that remove glue goo.
Troubleshooting
[edit | edit source]For troubleshooting basic operations, follow the table of problems and suggestions below. For further complex issues, research internet resources or videos on how to further understand a solution.
| Problem | Suggestion |
|---|---|
| Solar Panels are not charging power bank | Clean solar panel surfaces and check adapter connection. |
| Power bank does not turn on | Make sure the power bank is charged by testing voltage on outlets. Additionally, turn switch off and on, check if lights from USB components are flashing on. |
Team
[edit | edit source]Team ATLAS, a group of Engineering students at Cal Poly Humboldt for Spring 2022 Semester consists of 3 individuals:
| Authors | |
|---|---|
| License | CC-BY-SA-4.0 |
| Organizations | Cal Poly Humboldt |
| Cite as | Tatiana12, Lonny, Hetchyhetchy (2022–2026). "215 Accordion photovoltaic portable power". Appropedia. Retrieved July 24, 2026. |