
The CCAT solar stereo system was designed and constructed by four students from Cal Poly Humboldt during the Spring 2021 semester for class Engr305 Appropriate Technology. This project was built for the Campus Center for Appropriate Technology (CCAT) to play music for volunteer days and special events using only solar power. We used a prebuilt bluetooth speaker and powered it using three 15W solar panels. The system is contained in a single structure that can be rolled around for convenient use and storage.
Background[edit | edit source]
This project is a solar powered stereo system to be used at the Campus Center for Appropriate Technology (CCAT) at Cal Poly Humboldt. The system will be designed to be used outdoors as well as water resistant with good sound quality and volume. CCAT consists of a two-story building and surrounding outdoor property and it is located on the Cal Poly Humboldt campus. The area has varying steepness and terrain as well as high humidity and frequent rainfall. Participants often continue as usual on rainy days. CCAT is currently using a record player (which we will have a photo of soon) to play music out of the window of the main building. Their current setup is not portable and must stay inside which only allows people on site to hear music within a short distance from the main building. Most participants and volunteers listen to music through headphones because of the record players lack of range. A longer range stereo system would foster more camaraderie and a positive work environment. CCAT has requested a system that will work better on their terrain that can be moved around the site.
Another ENGR 305 team built a solar stereo system for CCAT, but it was permanently outside and essential components were stolen from the site. Our system should be easily portable to bring inside overnight or somehow locked up. CCAT has also requested the system be compatible with both Android and Apple products and suggested using Bluetooth technology for this purpose. During our interviews with other CCAT users, several people mentioned the appeal of using a Bluetooth setup. Due to the weather in Humboldt County, battery storage will likely be required to run the solar system on rainy and cloudy days.

Problem statement[edit | edit source]
The objective of this project is to produce a water resistant, portable, solar powered stereo system for CCAT. The following criteria will be used to assess our success. They were chosen based on the suggestions of the project coordinator and the HSU Engineering 305 students creating the system.
The scale below (1-10) represents the importance level of meeting the constraint of each listed criterion, with 10 being most important.
| Criteria | Constraints | Weight (1-10) |
|---|---|---|
| Aesthetics | Must be organized in a visually pleasing way within a small space for both storage and use. | 6 |
| Cost | Must not exceed budget. | 7 |
| Sustainability | Must run off of solar energy and use as many reused materials as possible. | 7 |
| Mobility | Must be easily moved and operated by one person. | 8 |
| Durability | Must be weatherpoof and withstand being moved around. | 9 |
| Functionality | Must be able to operate when the sun is not out and be compatible with Android/Apple. | 10 |
| Sound Quality | Must utilize at least 6 in subs and sound should reach property perimeter. | 10 |
Literature review[edit | edit source]
See our literature review at /Literature review.
Prototyping[edit | edit source]
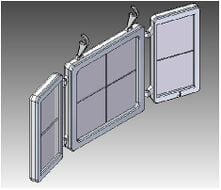
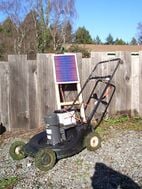
We initially designed three primary concepts represented in the drawings shown here. One option was built around finding a used wagon and containing the system within the wagon to make it easily portable. We ultimately ruled out this option because a wagon takes up more space than the system needs to. With portability still in mind, another design idea was based on the speaker being like an upright rolling suitcase with a handle and then laying it flat when in use. The flaw we realized in this plan is that it leaves the speaker facing straight up and inhibits the sound quality. The design we ultimately chose to prototype was inspired by an example we found during our literary reviews.[1]
-
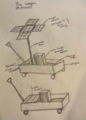
Drawing of the concept based on finding a used wagon.
-
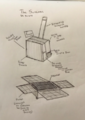
Drawing of the concept based on the structure of a suitcase with wheels.
-
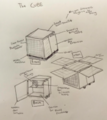
Drawing of the basic design we ended up using for our project.


Each teammate built their own prototype using cardboard and some kind of speaker they happened to have available. At the time of prototyping we had not done an energy analysis for the speaker yet and did not know how many solar panels we would need to use. We planned for four or five panels and had them either fold on top of each other or slide out. Some of us focused on making the prototype the actual size it would end up being, while others focused on making a more thorough model with all the features. There were aspects from each prototype that we ended up using in our final product.

Construction[edit | edit source]
After gathering all of the materials (listed in the bill of materials) we all met up in Arcata to work on the construction of the system. We started out by deciding on the correct measurements for the plywood that would make the main frame of our design.
Non-electronic construction[edit | edit source]
First, we cut the pieces of plywood with a Skillsaw into the correct measurements. We pre-drilled holes in the plywood and then screwed the walls of it together with wood screws and an electric screwdriver. The first thing we built was a general box shape that fit our initial measurements. We then added support beams made out of a 1 inch by 1 inch rectangular piece of wood.
-
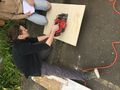
Jessie and Annabel cutting plywood to the correct measurements using a SkillSaw
-
The opening in the front for the speaker and controls.
-
Annabel and Fiona working on the solar panel flaps that will be connected to the rest of the box using hinges


Once the base of our design was complete, we started working on the flaps that would hold the solar panels. We drilled small holes in the back of the solar panels and the boards and we attached them together with metal rivets (using a hand riveter). We also attached the hinges using rivets. The backboard of the panels was made out of 1/4" thick plywood, and they were three different sizes. One was made to fit just sitting in the top of our design, one was made to fold over that, and the third was made longer and placed higher to fit over both of them, while also providing some cover from the rain. We drilled holes in the back of these wooden backboards to allow the wires from the solar panels to come through. Just to the side of these wires we attached wooden blocks that fold out to act as supports for the solar panels when they are open.
When the flaps were complete, we made siding that went around the outside of our design to make it more durable and to hold the panel backboards at varying lengths. We added some support beams to to inside of the design to hold up our lift-out panel, and marked where we wanted to drill holes to add the bar that would connect the wheels. We measured the size of the face of our speaker and controls, and cut a hole using a Jig Saw in the front of the box to allow the sound to escape and to access the buttons.
When the main outer shell of our design was complete, we used an electric sander to round the edges of everything and avoid splintering. We also had to sand the inside support beams so that the design was wide enough on the inside for its users to lift out the speaker.
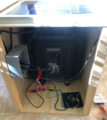
After we completed and tested the electrical aspects of the system (described below), we installed a shelf and an enclosure for the wiring. Next we installed a door on the back, attached the wheels and added a handle for easier maneuvering. We had just enough remaining plywood to also build a wooden cap over the entire system for additional weatherproofing.
-
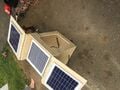
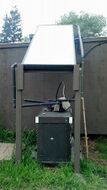
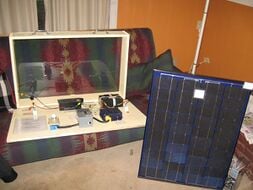
This is our box with the solar panels attached with hinges
-
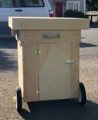
All of the parts built and installed, just waiting on paint prep!


Electrical construction[edit | edit source]
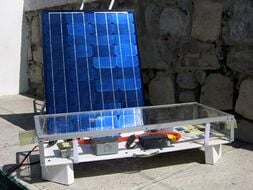
We purchased a bluetooth speaker with an adapter taking input AC 100-240V and creating output DC 15V and requiring 2.4Amps. Our solar panels produce DC power, so rather than use the original adapter, we powered our speaker directly from the panels using a variable step down voltage regulator that we could set to 15V. We purchased three 15W solar panels with a max power voltage of 17.7V and a max power current of.85Amps. By connecting our panels in parallel, our max power current increased to 2.55Amps and our max power voltage remained at 17.7V, which was reduced to 15V using the regulator. According to the manufacturing instructions, the step down regulator we used requires a heat sink if intended for continuous use. At first we tried to use the metal from an old computer fan as a heat sink, but it proved too large and difficult to work with. We ended up using a part from a broken alarm clock instead.
We brought the wires from all three solar panels into a junction box and connected all of the positives together and all of the negatives together. Then a single set of positive and negative wires left the junction box and were secured into place and connected to the "input" side of voltage regulator. We cut off the end of the original power cord from the speaker and connected it to a single positive and negative wire coming from the "output."
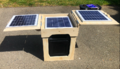
-
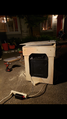
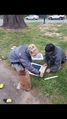
A first test of the solar panels connected in parallel to ensure it could produce 15V, 2.4Amps and actually power the speaker.
-
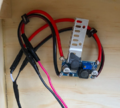
The new heat sink before we finished wrapping the regulator with electrical tape.
-
Testing the system once the new heatsink was installed.


Timeline[edit | edit source]
Below is a tentative timeline to ensure we successfully complete our project by the due date. The "Week" refers to the week within our school semester.
| Date | Week | Proposed Project Timeline |
|---|---|---|
| 3/21/2021 | 9 | Submit Budget Proposal Peer Evaluations |
| 3/28/2021 | 10 | Meet with CCAT: Get Budget Approved Prototype Completed Midterm Timesheet |
| 4/4/2021 | 11 | Meet with CCAT: Get Prototype Approved Project Design and 1st Photos Start Buying Supplies |
| 4/11/2021 | 12 | Meet with CCAT: Construction Started Project Design and 2nd Photos Finished Buying Supplies |
| 4/18/2021 | 13 | Meet with CCAT: Construction Finished Project Design and 3rd Photos |
| 4/25/2021 | 14 | Meet with CCAT: Test System and Troubleshoot Draft Appropedia Page Film Video |
| 5/2/2021 | 15 | Final Appropedia Page and Submit Video |
| 5/10/2021 | 16 | Final Timesheet and Peer Evaluations |
Below is our actual timeline. Fortunately we were given an extension for the final Appropedia page and video, but we were still left rushing toward the end of the project. The "Week" still refers to the week within our school semester.
| Date | Week | Actual Project Timeline |
|---|---|---|
| 3/21/2021 | 9 | Submit Budget Proposal Peer Evaluations |
| 3/28/2021 | 10 | Prototypes Completed Midterm Timesheet |
| 4/4/2021 | 11 | Meet with CCAT: Get Prototype Approved Project Design and 1st Photos Start Buying Supplies |
| 4/11/2021 | 12 | Project Design and 2nd Photos Still Sourcing and Confirming Supplies |
| 4/18/2021 | 13 | Project Design and 3rd Photos Started Construction Offsite |
| 4/25/2021 | 14 | Draft Appropedia Page Continued Construction Offsite Testing and Troubleshooting |
| 5/2/2021 | 15 | Continued Construction Offsite Testing and Troubleshooting |
| 5/6/2021 | 15 | Construction Completed Filmed Video |
| 5/7/2021 | 15 | Final Appropedia Page and Submit Video |
| 5/10/2021 | 16 | Final Timesheet and Peer Evaluations |
Bill of materials[edit | edit source]
Below are the materials we purchased for the project. We were fortunate to save money on tools because we already owned some and borrowed others. We also found a jigsaw in a free pile and just had to pay for the blades. We had hoped to use more recycled and repurposed materials, but unfortunately this didn't work out. In addition, the used speaker was broken so we had to purchase a new speaker (adding to the cost of the project). Not included is the voltage regulator we used to bring the panel voltage range to the correct voltage for our stereo (similar voltage regulators usually cost under USD 10).
| Material | Source | Quantity | Cost (USD) | Total (USD) |
|---|---|---|---|---|
| Speaker purchased new (once other speaker failed) |
Target | 1 | 141.04 | 141.04 |
| Speaker purchased used | eBay | 1 | 40.13 | 40.13 |
| Solar Panels15W, 12 V | Amazon | 3 | 43.29 | 129.87 |
| Aux Cord | Dollar Store | 1 | 1.00 | 1.00 |
| 2x4 sheets, 1/2in plywood 2x4 sheets, 1/4in plywood Rivets |
Ace Hardware | 1 | 53.54 | 53.54 |
| Primer Wood Glue Sanding discs Paintbrush |
Ace Hardware | 1 | 35.51 | 35.51 |
| Waterproof Exterior Paint | Home Depot | 1 | 29.64 | 29.64 |
| 2 hinges for door Water proof junction box and cover Cable connectors |
Pierson Building Supply | 1 | 20.67 | 20.67 |
| Tools and equipment Misc materials, wood scraps |
Donation pile, student owned, or lab supplies | 0.00 | 0.00 | |
| Blades for jigsaw | Ace Hardware | 3 | 3.99, 1.99, 2.99 | 9.73 |
| Total Cost | USD 461.13 | |||
Operation[edit | edit source]
Below are the recommended instructions for using and caring for the Solar Stereo System.
Maintenance[edit | edit source]
To ensure the best performance of this Solar Speaker System, it is important to upkeep and maintain it in the best possible condition. Although the speaker itself is waterproof, it is still important to expose this unit to as minimal weathering as possible so the speaker and the box can last as long as possible. This includes things like cleaning, storage, and gentle use. If the system is exposed to heavy rain, the excess water should be wiped away for optimal lifespan of the unit.
Schedule[edit | edit source]
Below are our recommendations on when to care for the Solar Stereo System. "Daily" refers to whenever it is being used, not necessarily every day.
- Daily
- Use the On/Off switch on the back of the speaker to prevent draining the battery.
- When in use, adjust location as needed get maximum sunlight, and always use support arms for fold out solar panels. If using battery power, no need to fold out the solar panels (less wear and tear).
- When not in use, this solar speaker system should be properly folded up and stowed in a dry place, sheltered from elements. Keep inside every night to prevent theft.
- Monthly
- Clean dust and dirt from solar panels and nooks inside box and on speaker to keep in best working condition
- Yearly
- As needed, maintain the paint on exterior of box, as well as weather proofing components.
Instructions[edit | edit source]
Below are instructions for using the system in sunlight, rain and for performing light maintenance. The instructions for use in the rain include an option to remove the speaker from the box or leave it inside.
Use in the sun[edit | edit source]

While still folded up, move the unit into position. From the door on the back, check that the speaker is plugged in. Flip the switch to ON when ready to use.

Remove the weather cap. Fold out the supports into position and open the top panel.
Open the second panel and adjust to obtain optimal sunlight.

Choose your method of input by selecting the "mode" button, then adjust the sound as desired. When finished, flip the switch on the back to "OFF" and fold up the lower panel, then top panel.
Use in the rain[edit | edit source]
If NOT removing speaker:

If removing speaker:

Cleaning[edit | edit source]

Conclusion[edit | edit source]
Testing results[edit | edit source]
We kind of tested each component of our system as we were building it. If something was a problem, we didn't proceed until it was figured out. We spent a long time during the initial days of construction just walking through how the flaps were going to fold up, then addressing the issues we stumbled upon while installing them. For example, we didn't originally plan for handles on the panels, but when we tested folding up the panels and opening them back up, we found this problem and addressed it.
When we first got our solar panels, we tested them individually using a multimeter to ensure they produced the output we expected. Around the same time, we tested our bluetooth speaker when it wasn't plugged into the wall and realized it had a defective battery and could not hold a charge. Once we addressed the issue with the speaker, we tested the three panels in parallel to ensure they could power the speaker. Then as each additional aspect of the project was added, we went back to test the speaker again and make sure nothing had interfered.
Discussion[edit | edit source]
We had two main complications with the electrical aspects of our project. First, the bluetooth speaker we purchased requires 15V of DC input, which we found out is much less common than having a 5V or 12V system. This meant it was harder to find parts, specifically a DC-DC step down regulator that already had a heatsink. We never found one, so we had to attach a heatsink ourselves and this proved rather challenging. In retrospect, if we had realized this issue sooner we would have had time to order a proper heatsink of the appropriate size. However, we were short on time and none of the local electrical supply shops we checked with had one to purchase in person. Our first attempt at improvising was to solder the heatsink to the metal fan from an old computer. This was very difficult and our professor had to assist with the soldering. Unfortunately, the heat sink was just too heavy for the size of the regulator and the soldering broke off once we installed it into the system. For our next attempt, we opened up a broken alarm clock and found a more appropriate sized piece of aluminum to use. We were unsuccessful at soldering it together though. Instead we purchased heat resistant epoxy putty which ultimately held the heatsink in place and remained sturdy after installation. At this point we conducted several tests to ensure the system would function as intended and seemed to have the appropriate sound quality to meet CCAT's expectations.
The other problem we ran into should have been caught earlier, but we admittedly did not check our purchases thoroughly enough. The first bluetooth speaker we purchased was second hand, but appeared brand new. We tested it's bluetooth capabilities and sound quality while it was plugged into the wall, but we did not think to check whether the battery was charging appropriately. When we went to play the speaker without it plugged into the wall, we discovered why it had been resold - the battery wouldn't hold enough charge to run the speaker for more than a few seconds. By this time, we had already built the main structure based on the dimensions of this particular speaker, but we hadn't yet solved the heatsink problem described above. We had to quickly decide whether to purchase a brand new version of the speaker we already had, or purchase a completely different speaker that avoids the 15V complication. After several hours of researching other speakers, we decided to purchase a new version of the speaker we had because the system was already built for it and we felt confident we could figure out the heat sink.
Lessons learned[edit | edit source]
The main lessons we learned are to always test used electronics very thoroughly and get started on everything earlier to allow time to address problems and incorporate new ideas. As described above, our used speaker worked perfectly when plugged into a wall outlet, but the battery wouldn't actually charge. This would have left us with a speaker that would only run when it's sunny and not when it's cloudy. We purchased the speaker before we ever started constructing, so if we had determined this earlier we could have found a new speaker and designed a box for those dimensions and bought solar panels for those energy requirements. Instead we were in a difficult scenario of looking for a new speaker after we had already committed to a particular sized box and a particular set of solar panels. This sort of forced us to just buy a new version of a speaker we had only really purchased in the first place because it was a good deal used.
Something else we should have done earlier is the energy audit for our speaker. During most of our designing, we didn't actually know how many solar panels were were going to need to attach to the unit. During our prototyping we thought it could be four or five panels and came up with an idea to have some solar panels fold up and some slide out on drawers. When we determined we would only be using three solar panels, we were still set on using the drawer and folding up combination. It wasn't until actually building it that we realized the drawer was unnecessary. If there are only three panels, one of them can just stay in the center. If we had known during the prototyping stage that we would only need three panels, we likely would have determined this far sooner.
We also should have started our physical construction sooner because it was during this phase that we came up with new ideas and addressed problems we hadn't originally considered. Once the project was hands on instead of just conceptual, we thought about convenient features like being able to remove the speaker once the battery is fully charged. We had time to implement some of these improvements, but there were also ideas that just weren't realistic under our time constraints. Had we started earlier, we likely could have incorporated more of these new ideas.
Next steps[edit | edit source]
One of the ideas we ran out of time for but would like to see added to the system at some point is to make the whole unit able to tip at different angles. Our solar panels fold out so they are all parallel to each other and face the sun at high noon. By allowing the entire unit to tilt, this would allow for adjusting the panels more directly towards the sun at different times of the day. For now, based on our testing at different times of the day, we feel confident the panels as they are will provide a sufficient power supply to the speaker. There will also be plenty of opportunities to position the panels towards the sun at CCAT by either propping it up or taking advantage of the uneven terrain onsite.
Troubleshooting[edit | edit source]
The following table presents a few potential problems and ways to resolve them. For issues not covered here, please see the manual stored inside of the unit.
| Problem | Suggestion |
|---|---|
| Speaker will not connect via bluetooth | The speaker has several input options. Cycle through the various options to ensure you're on "Bluetooth." Or, cycle through to "Aux" and use the provided auxiliary cord. |
| Does not turn on | Make sure it is plugged in, open the panels and place in sunlight to charge the battery. |
| Speaker setup can't fit into a small place to play music | Make sure speaker battery is charged in advance and remove speaker from solar cube for smaller spaces. Lasts up to 5 hrs at maximum volume. |
See also[edit | edit source]
Related projects[edit | edit source]


References[edit | edit source]
- ↑ Siemenwauters, and Instructables. "Solar Sound System." Instructables Circuits. Autodesk, Inc., October 3, 2017. https://www.instructables.com/Solar-Sound-Systerm