m (→D.I.Y) |
(→D.I.Y) |
||
| Line 59: | Line 59: | ||
|File: Newell glassbottles.jpg |Glass Bottle Insulation |3 |Fill in perimeter with glass bottles laid on their side. | |File: Newell glassbottles.jpg |Glass Bottle Insulation |3 |Fill in perimeter with glass bottles laid on their side. | ||
|File: newell leveledsand.jpg |Sand Covering |4| Cover and level the glass bottle layer with sand. | |File: newell leveledsand.jpg |Sand Covering |4| Cover and level the glass bottle layer with sand. | ||
|File: Newell firebrick.jpg | | |File: Newell firebrick.jpg |Firebricks |5| Arrange firebricks and tamp down onto the leveled sand. Duct tape was used; however a mallet would be preferable. The bricks were labeled with numbers since they were previously arrange on a table to find the best fit. Arrange and Mortar red bricks for the mouth of the oven. | ||
| | |File: Newell moundmouth.jpg |Sand Mound and Red Brick Mouth |6| Use a wooden form to help support red bricks as you mortar them into an arch. To avoid cracking, create a wedge cut keystone as the top brick in the arch. Add wet sand on top of the firebricks to create a mound that will act as the form which the oven layers will be built on top. Cover the sand with wet newspaper so that it holds its shape and doesn't attach to the inner thermal layer. | ||
| | |File: Newell thermallayer.jpg |Application of the Inner Thermal Layer|7| Apply the thermal layer clay mixture around the sand mound. Pound the clay downward instead of into the mound to keep the integrity of the mound intact. Work your way up the mound in about 6' layers. | ||
| | |File: Newell woolylayer.jpg |Application of Insulation Layer|8| Apply the 'wooly' insulation layer. | ||
| | |File: Newell outerlayer.jpg |Application of Outer Cobb Layer|9| Before applying the outer cobb layer, cut a whole in the previous two layers for the chimney. A thick cylindrical hollow cardboard tube was used. The tube was covered with the thermal layer mixture. | ||
|File:asdklfasl.jpg |Designs molded with cobb|10| Use cobb to put designs onto the exterior of your oven. | |||
|File: asldkfasldkf.jpg |Application of Lime Plaster|11| Apply a layer of lime plaster to protect the oven from the elements. | |||
|||3 |Do something really complicated that really isn't that takes up lots of space and goes all the way across the page... | |||3 |Do something really complicated that really isn't that takes up lots of space and goes all the way across the page... | ||
Revision as of 04:31, 3 December 2012
Abstract
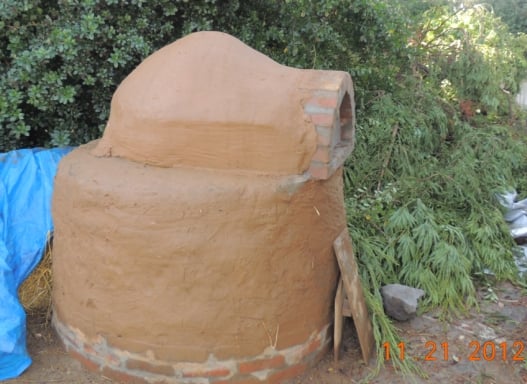
The objective of this project is to build a sustainable, beautiful, safe, long-lasting, and functional outdoor oven for baking and cooking. The project will be a collaborative effort including Laurel Tree Charter School, its students, Humboldt State University, our team, and the community to demonstrate the ability to apply sustainable practices by designing products for use in daily life.
Background
The Cobb Goblins were commissioned to design and construct an earthen pizza oven for Laurel Tree Charter School. Laurel Tree's mission is to create a sustainable model of education which provides all students with accessible curriculum, based on college preparatory standards, while developing life and socials skills in a mixed age setting.
Problem Statement and Criteria
The purpose of our design is to create a low embedded energy, natural, beautiful way to cook pizza. The oven will be used weekly for children's pizza lunches and for the occasional fundraiser.
| Criteria | Importance |
|---|---|
| Safety | 10 |
| Construction Time | 10 |
| Effectiveness | 9 |
| Durability | 8 |
| Usability | 7 |
| Sustainability | 7 |
| Aesthetics | 6 |
| Student Involvement | 6 |
| Cost | 5 |
Description of Final Project
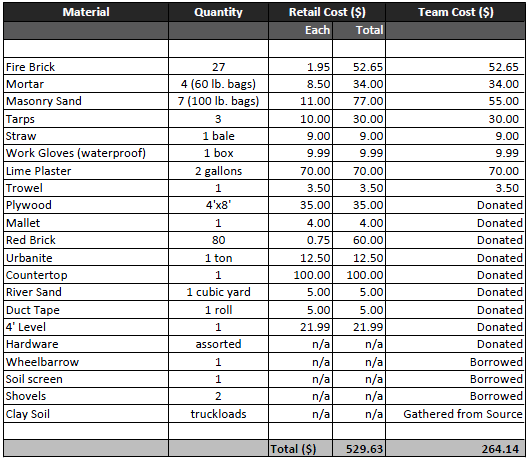
Materials/Costs
Results
Ovenly Inferno is successful in producing ebough pizza for the whole school during lunch time. It requires 1 ft^3 of wood to fire it in 2 hours. The oven's peak temperature is ___*F and after cooking __ pizza's the temperature is ____*F. The counter space provides adequate preparation space and the fuel is kept close in the wood storage.

