Please note this document is currently a work in progress.
Introduction
This 10 week project is a combination of social service and a comprehensive experience with natural building. The final goal of this project is to provide a refuge for homeless senior citizens to find shelter and companionship with the Parras Desarollo Integral de la Familia (DIF), as integration of the family and community is an important part of the Parras culture.DIF is a nation-wide government organization based in Mexico City. They are a social service organization providing communities with essentials such as childcare services, food drives, public education concerning etiquite, proper nutrition, child rearing, etc. while creating a community center and support network for those who need it.
The shelter is to be constructed out of adobe, a natural building material that is widely used in desert areas such as in Parras, Mexico. By doing this project we hope to raise public awareness of the benefits of using adobe. Adobe is a time-tested wonder, a building method that has low environmental impact, low overall cost, is ideal for warm climate area. This project also has provided hands on natural building education for the participants of the Parras 2006 summer program and DIF volunteers. Throughout construction, we have made efforts to recycle and reuse our materals.
General Description
The final construction will consist of one large room measuring 4.40 x 6 meters. The adobe walls are 30 cm thick, making the building itself 5 x 6.60 meters. The projected number of adobes needed to complete the shelter is approximately 1,300. Adobes are made offsite where there is more area to work and transported to DIF. The building will consist of one large community room. The DIF bathrooms and kitchen are very close so the building will not need plumbing.
THIS PLAN IS A WORK IN PROGRESS, figures not exact

Location
The shelter is to be constructed in a small ranch town called Parras of approximately 32,000 citizens which is located in northern state of Coahuila, Mexico. It will be constructed in the Parras DIF headquarters which is located on calle Ramos Arizpe. At the DIF headquarters the senior center will be located in a far back right corner, behind the kitchen. The adobe blocks used to build the center were fabricated offsite from the DIF. The site provided ample storage space to allow approximately 300 adobe bricks to dry per day. This number was approximated by looking at the space, knowing the size of the adobe bricks and then by making an educated guess. It was also done by counting all the adobe bricks in a given picture and doubeling it. The number was about 167 bricks and there was still some room for more.
Proposed Materials and Budget
| Quantity | Materials | Source | Cost (pesos) | Total |
|---|---|---|---|---|
| 8 | Strawbales | Forrajera Parras on calle Bravo | 50 | 400 |
| 4 | Truckloads (HOW MUCH) Dirt | Materiales Alcala on Carretera Parras Paila Km1 | 330 | 1420 |
| 4 | Adoberas | Carpiteria "El Nogal" on calle Manuel Madero | 120 | 120 |
| 100 liters of Water | Bernardo's House | Free from la Presidencia | Free | |
| 10 | Bags Cement | Materiales Ibarra on calle Calzada del Marques | 110 | 1100 |
| 1 | Truckload of Gravel | Materiales Ibarra on calle Calzada del Marques | 350 | 350 |
| Mortar | DIF site | Recycled | Free | |
| Rebar | DIF site | Recycled | Free | |
| Lime | DIF site | Already on site | Free | |
| 8 meters | Agrigate | ? | ? | ? |
| 10 | Bags of Cement | ? | ? | ? |
| ? | Rocks | ? | ? | ? |
| Total Cost | 3390 | |||
The only paid labor on this project is for the expertise and guidance of Martin, aka Ciro Liro. He has had over a decade of experience with making adobe and construction. Martin will recieve 900 pesos paid by the municipal government of Parras. All other labor is purely volunteer.
Address topics such as plumbing, wiring, windows, doors, framing, paint , sealant, plasters, required mortar, design, , equipment, actual cost of water, rooving, foundation and construction. Itemize costs for the floor and roof.
Do and show quantity calculations for materials, such as adobe needed (for blocks, mortar, maybe plaster), concrete (foundation etc), water (for adobe etc), paint, etc.
Process: Preparing the Adobe Site
-

Fig 1: Here the students of the Parras 2006 program are clearing the area where the adobe bricks are going to be constructed. A majority of organic matter is removed so that it does not get mixed into the adobe. The ground both where the adobe matereals are mixed and where the adobes dry is leveled. This allowes for even drying of the adobes and a much smoother process.
-
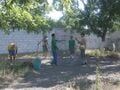
Fig 2: To clear and level the area tools such as hoes, shovels, rakes, and pick axes were used.
-
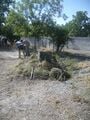
Fig 3: During the clearing process separate piles of the organic mater and trash were made. To dispose of the organic mater it was suggested to the homeowners to compost it.
-

Fig 4: This process took 18 people only two hours to finish. We have found it to be enough area to dry approximately 250 bricks, an important thing to consider in terms of scheduling and drying time. Adobes take aproximately two days to dry enough to be moved in Parras´ hot climate.


Process: Making the Adobe Mixture
-
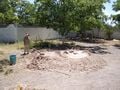
Fig 1: After the pile of dry dirt is made into a crater it needs to be filled with water and soaked over night so that the hard chunks of dirt will be easier to break up. This way most of the dirt will be wet for the following day. In this picture the crater was seperated into two parts by a dirt barrier. This was done so that half of the pile could be made one day and the other half the next.
-

-
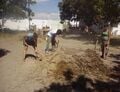
Fig 3: Once the pile is soaked overnight, the dry dirt from the edges of the crater is piled onto the top of the pool of water.
-
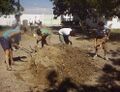
Fig 4: Now there are no extremely dry areas in the extremities, and mixing will be much easier.
-
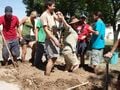
Fig 5: The dirt is mixed by the stomping of feet. It is done in this manner in order for each grain of sand to be coated in a layer of clay. It is important that the clay and dirt are well mixed because clay offers the cohesive strength between the sand. If it is not well mixed, the adobes will crack or crumble. More water can be added throught the mixing process; chances are the mixture will need it.
-

Fig 6: When the mixture feels stiff it is likely ready for straw. A good test for this is if your fingerprint remains. The straw is added in order to provide internal tensile strength to the bricks (making them more difficult to break in half). The pile should consist of more or less 10% straw. Straw function is the comparative to rebar in a concrete building.
-
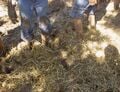
Fig 7: The straw is then piled on top and mixed into the mud by stomping it in with your feet.
-
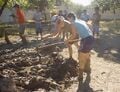
Fig 8: After the straw is mixed into the mud it must then be turned with shovels to mix it once again and then cut with a hoe into smaller piles which are ready to be brought to the brick making site.
-
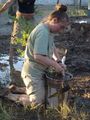
Fig: After all the work is done it is necessary to thouroghly clean the tools. This is because the mixed adobe mud is like cement when it drys thus being very difficult to remove.


Process: Making the Bricks
-
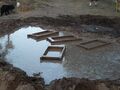
Fig 1: The adoberas must be soaked in water over night so that they are easier to use and so that they don't stick to the adobe when they are pulled off.
-
Fig 2: The adobera must always be washed before and after making an adobe brick. This is because it alows the adobera to free itself much easyer from the sticky adobe mud that gets placed inside of it.
-
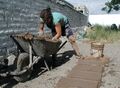
Fig 3: The mud that is ready to be made into adobes is piled into the adoberas.
-
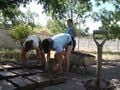
Fig 4: The mud must then be massaged into the adobera with extra empesis placed on getting it into the corners. If there is any extra mud that doesn't fit into the mold it can be scraped off and placed where the next adobe is to be made.
-
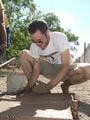
Fig 5: After the mud is level with the adobera a little bit if water is used to smooth out the top of the brick.
-
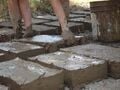
Fig 6: The adobera can now be carefully removed.
-
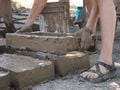
Fig 7
-
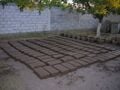
Fig 8: The feild of freshly made adobes now awaits the next day or two to be dry enough to handel.
-
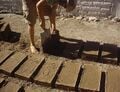
Fig: After the bricks have dried for two days they are ready to be cleaned and placed on their side to dry more thouroghly. The cleaning is done with a shovel, spade or any other flat tool one can use for scraping. The bricks need to be scraped because on the bottom they have a layer of dirt that stuck to them because they were cured on the ground.
-
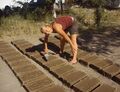
Fig: As drying time varies in different climates, an adobe is ready to be scraped and stacked when it can be scratched with a nail and does not scrape off easily.
-
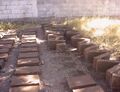
Fig: After the bricks have been cleaned and scraped they can be picked up and put on their side in order to dry more thouroughly. The bricks are placed in a zig-zag pattern because it provides them more security from falling.
-
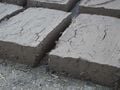
Fig: Cracked adobes are a result of insufficient mixing of the adobe mud.
-
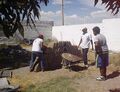
Fig: Once the bricks have dried they can be put in stacks like this so that they will be ready for when they are needed.


Process: Preparing the DIF Construction Site
-

Fig 1: Previous to this photo the area was cleared of both organic and inorganic materials. There was a lot of trash and also a large decomposing tree. There was also a large adobe and concrete oven. The entire top of it was taken off, broken up and spread over the ground to make it hightr and flat.
-
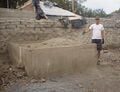
Fig 2: The concrete foundation of this once huge oven had to be removed from the site. However, it was filled with dirt and rocks that had to be removed in order to destroy it.
-
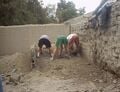
Fig 3: Since there were large rocks filling the foundation it was hard to shovel out the dirt. Resorting to digging the rocks out with our hands was the easiest way to go about it.
-
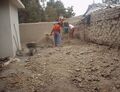
Fig 4: When there weren't large rocks in the way, shovels were used to take out the dirt from the foundation of the oven and it was piled along side of it.
-
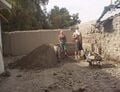
Fig 5: Finally after many hours of shoveling the oven was completely emptied.
-
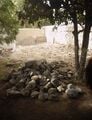
Fig 6: Here are all the rocks that were in the oven. They will be saved for filling the foundation.
-
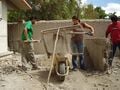
Fig 7: The dirt that was shoveled out of the oven was then sifted so that it could be used as the mortar for the adobe bricks. A screen, shovels and a wheel barrow were used in this process.
-
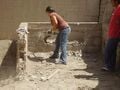
Fig 8:The concrete foundation was demolished little by little by using an iron rod and sledge hammers.
-
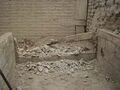
Fig 9: After a few hours one wall was completely destroyed.
-
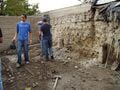
Fig 10: Finally after two days work the whole oven was destroyed. All that was left was rebar in the corners from the initial foundation.
-
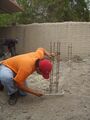
Fig 11: By using a hacksaw the rebar from the corners of the oven was removed. The rebar was saved to be used in window and door support.
-
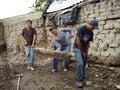
Fig 12: These were the top parts of the oven. Inside of them is rebar which will be reused.
-

Fig 13: By using an iron rod and a pick axe the concrete surounding the rebar was removed.
-
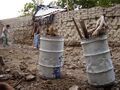
Fig 14: In one of the corners there was a lot of trash that was put into these trash cans and taken away.
-
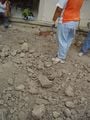
Fig: Using the standing office building and the old adobe wall as points of reference, the layout of the foundation was made using string and rebar posts.
-
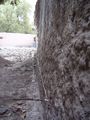
Fig: The adobe wall is old and has a pretty big lean to it, so the wall of the building is to be put atleast a foot away.
-
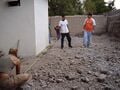
Fig: Part of the wall of the building next to the site will be used as a wall for the adobe building in order to save resources and time. The wall is
-

Fig: Lime is poured over the string to mark where to dig.
-
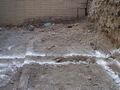
Fig: Another line of lime is put 30 cm over (width of adobe).
-
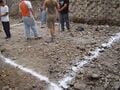
Fig:
-
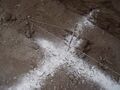
Fig:
-
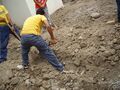
Fig: Begin digging! The width of the shovel is about 30 cm, a good source to go by.
-
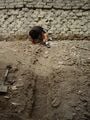
Fig: The foundation must be dug until virgin (soft, hard) soil is reached. We dug approximately two and a half feet deep.


Timeline
Week One: The first step of the process was learning and perfecting the art of making adobes. Each day about 200 adobes were made in a three to four hour period with a group of about 15 workers. Each day the progress moved more quickly.
day one: 27 bricks
day two: 185 bricks
day three: 166 bricks
day four: 188 bricks
Week Two: With a quota of 1,400 adobes the adobe construction continued.
day five: 180
day six: Rain
day seven: 54
day eight: 174
Total 974 Bricks
[the rest will be purchased at 3.50 pesos each]
Week Three: The building site, having been neglected for some time, needed to be cleaned and prepared for construction. A dead tree was removed, an out-of-commission adobe oven was taken down, and all of the inorganic trash was taken out. The materials taken from the adobe oven were used to level the ground in the area.
Week Four: The three foot foundation of the adobe oven was removed. Before taking it down, the large rocks and sand filling it were taken out. The rocks were piled for later use in the foundation, and the sand was saved to be used as mortar. Once removed, the walls were taken down with a sledge hammer.
Week Five: The sand from the foundation was sifted in order to be saved for mortar. The rocks sifted out were used for filling in holes in order to level the ground. The concrete was removed from the rebar in the foundation and saved for use on the building.
Week Six: Tying string to the old adobe wall and the DIF kitchen and office buildings as points of reference, the perimeter of the building was established. Lime was poured over the string to mark the ground where the foundation would be. The following day the perimeter was dug about 60 cm (2 feet) deep, or until firm virgin soil was reached, and about a foot wide.
Week Seven: Fill foundation, compact ground, begin laying bricks
Week Eight: Have all four walls built
Project Participants
Project Coordinators

Project Participants
Parras 2006 Humboldt students and coordinators, Parras DIF employees; Bernardo Reyes and Adrian, Parras DIF volunteers, Adobe educator; Martin (Ciro Liro).