No edit summary |
(Normalize) |
||
| (61 intermediate revisions by 7 users not shown) | |||
| Line 1: | Line 1: | ||
[[File:Test Wall Frame.jpg|thumb]] | |||
{{Project data | |||
| authors = User:Myles | |||
| status = Prototyped | |||
| completed = 2009 | |||
| made = Yes | |||
| replicated = No | |||
| cost = USD 44 | |||
| instance-of = Clay wall | |||
| location = Arcata, California | |||
}} | |||
This page describes the materials, processes, and work that goes into making a small covered wall made from natural construction materials and covered with natural plasters. This project was completed in May of 2009. Constructed, with the help of CCAT and student volunteers, from stick frame and infilled with papercrete and clay-slip straw with a recycled brick base, and covered by a cedar shingle roof. This wall will then have information signs attached for visitors of CCAT campus. | |||
== Introduction == | == Introduction == | ||
The [[Campus Center for Appropriate Technology]], located in Arcata, CA needs an information kiosk. Constructed, with the help of CCAT and student volunteers, from stick frame and infilled with [[papercrete]] and [[clay-slip]] straw with a recycled brick base, and covered by a cedar shingle roof. This wall will then have information signs attached for visitors of CCAT campus. | |||
<center> | |||
<gallery> | |||
File:CCAT Fall 08.jpeg|thumb|CCAT Fall 2008|alt= | |||
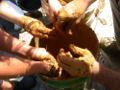
File:Mud Hands.jpg|thumb|Gettin Dirty with Natural Construction | |||
</gallery> </center> | |||
== Project Requirements == | == Project Requirements == | ||
The goal is to construct a test wall that both suits the wet climate of [[Humboldt County, California]] and is useful to CCAT. | The goal is to construct a test wall that both suits the wet climate of [[Humboldt County, California]] and is useful to CCAT. | ||
The Criteria for this project (and other projects of this scale) could look like this: | The Criteria for this project (and other projects of this scale) could look like this: | ||
*Durability (''How long are the materials specified to last?'') | * --- | ||
*Construction Time (''What climate and material conditions limit time?'') | * Durability (''How long are the materials specified to last?'') | ||
*Complexity (''Can construction be completed by the layperson?'') | * Construction Time (''What climate and material conditions limit time?'') | ||
*Cost (''How much will you spend?'') | * Complexity (''Can construction be completed by the layperson?'') | ||
*Locality of Materials (''How far will you go to find materials?'') | * Cost (''How much will you spend?'') | ||
--- | * Locality of Materials (''How far will you go to find materials?'') | ||
These are basic criteria used to judge the design of this project. When each criterion is examined you can rank them according to importance. | * --- | ||
These are basic criteria used to judge the design of this project. When each criterion is examined you can rank them according to importance. For this project, locality of materials, complexity, and construction time were very important factors because this project is one, part of an Appropriate Technology class, two, being constructed by students of [[HSU]], and three, has to be completed in 15 short weeks. | |||
Ranking your criteria can be a powerful tool to assist in the timely and orderly design and construction of projects large and small. | Ranking your criteria can be a powerful tool to assist in the timely and orderly design and construction of projects large and small. | ||
== Design == | == Design == | ||
===Overview=== | === Overview === | ||
The foundation of this wall will be compacted soil with added gravel which will serve as the base for a 1ft tall layer of recycled brick layed in an interlocking pattern will sand mortar. | |||
The foundation of this wall will be compacted soil with added gravel which will serve as the base for a 1ft tall layer of recycled brick layed in an interlocking pattern will sand mortar. This brick footing serves to keep natural plasters and infill material from coming in direct contact with the ground. The use of sand as mortar also allows the brick foundation to act as a wicking barrier helping to relive the wall of built up moisture through the seasons. The wall is framed by two driftwood logs and in-filled half by paper-crete bricks, half by clay-slip-straw, which is held in place by a recycled wood lath; and is covered by a combination of natural and lime plasters. The driftwood serves as a border for infill sections and to support a small a-frame pitched roof above covered with cedar shingles (seen to the right). | |||
===Specs=== | === Specs === | ||
*8 ft long, 4ft tall, 16in wide in a gentle S curve shape | |||
*Roof dimensions, 9ft long 5.5ft high at peak, with 18in pitches on each side from peak | * 8 ft long, 4ft tall, 16in wide in a gentle S curve shape | ||
*Timber frame made from reclaimed timber and driftwood logs, simple 4x4s could work fine | * Roof dimensions, 9ft long 5.5ft high at peak, with 18in pitches on each side from peak | ||
*Recycled brick footing 1ft tall, 1ft wide, mortared with riversand | * Timber frame made from reclaimed timber and driftwood logs, simple 4x4s could work fine | ||
*One 4 by 4ft section in-filled with papercrete bricks mortared together with papercrete slurry | * Recycled brick footing 1ft tall, 1ft wide, mortared with riversand | ||
*One 4 by 4ft section stick framed with wood lath to hold infill of clay-slip-straw | * One 4 by 4ft section in-filled with papercrete bricks mortared together with papercrete slurry | ||
*To be covered by earth/lime plasters by another student in ENGR 305 class | * One 4 by 4ft section stick framed with wood lath to hold infill of clay-slip-straw | ||
* To be covered by earth/lime plasters by another student in ENGR 305 class | |||
<center> | |||
<gallery> | |||
File:Test Wall Frame.jpg|thumb|frame with roof supports and gravel foundation | |||
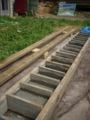
File:Interlocking Brick Foundation.jpg|thumb|This brick pattern allowed for this foundation to be made without mortar|alt= | |||
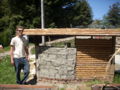
File:Complete Frame.jpg|thumb|The roof will protect the wall from the harsh rains </gallery></center> | |||
== Costs == | == Costs == | ||
{| class="wikitable" | |||
<center> | |||
{| class="wikitable" | |||
! Qty | ! Qty | ||
! Material Needed | ! Material Needed | ||
! Source | ! Source | ||
! Cost | ! Cost | ||
! Total Cost | ! Total Cost | ||
|- | |- | ||
| ~60 | | ~60 | ||
| Thin Wood Lath | | Thin Wood Lath | ||
| Salvage from local lumber mill | | Salvage from local lumber mill | ||
| align="right"|$0 | | align="right" |$0 | ||
| align="right"|$0 | | align="right" |$0 | ||
|- | |- | ||
| 3 94lb bags | | 3 94lb bags | ||
| Portland Cement | | Portland Cement | ||
| Do-it-yourself-Hardware | | Do-it-yourself-Hardware | ||
| align="right"|$12 | | align="right" |$12 | ||
| align="right"|$36 | | align="right" |$36 | ||
|- | |- | ||
| lots | | lots | ||
| Paper | | Paper | ||
| Shredded office pack from HSU Student Services Building | | Shredded office pack from HSU Student Services Building | ||
| align="right"|$0 | | align="right" |$0 | ||
| align="right"|$0 | | align="right" |$0 | ||
|- | |- | ||
| 1 | | 1 | ||
| Straw Bales | | Straw Bales | ||
| Local seller | | Local seller | ||
| align="right"|~$6 | | align="right" |~$6 | ||
| align="right"|~$8 | | align="right" |~$8 | ||
|- | |- | ||
| 3 Flats | | 3 Flats | ||
| Cedar Shingle | | Cedar Shingle | ||
| Salvaged and Donated by [http://www.thebighammer.com Pierson Building Center] | | Salvaged and Donated by [http://www.thebighammer.com Pierson Building Center] | ||
| align="right"|~$0 | | align="right" |~$0 | ||
| align="right"|~$0 | | align="right" |~$0 | ||
|- | |- | ||
| ~300 | | ~300 | ||
| Nails for Shingles | | Nails for Shingles | ||
| CCAT Shed | | CCAT Shed | ||
| align="right"|$0 | | align="right" |$0 | ||
| align="right"|$0 | | align="right" |$0 | ||
|- | |- | ||
| ~100 | | ~100 | ||
| Screws | | Screws | ||
| CCAT Shed | | CCAT Shed | ||
| align="right"|$0 | | align="right" |$0 | ||
| align="right"|$0 | | align="right" |$0 | ||
|- | |- | ||
| ~150 | | ~150 | ||
| Recycled Bricks | | Recycled Bricks | ||
| CCAT Recycled Brick Pile | | CCAT Recycled Brick Pile | ||
| align="right"|$0 | | align="right" |$0 | ||
| align="right"|$0 | | align="right" |$0 | ||
|- | |- | ||
| 2 | | 2 | ||
| Natural Log Posts | | Natural Log Posts | ||
| Beach Salvage | | Beach Salvage | ||
| align="right"|$0 | | align="right" |$0 | ||
| align="right"|$0 | | align="right" |$0 | ||
|- | |- | ||
| ~12 ft | | ~12 ft | ||
| 4x4 Lumber | | 4x4 Lumber | ||
| CCAT Lumber Rack | | CCAT Lumber Rack | ||
| align="right"|$0 | | align="right" |$0 | ||
| align="right"|$0 | | align="right" |$0 | ||
|- | |- | ||
| ~20 sqft | | ~20 sqft | ||
| Plywood | | Plywood | ||
| CCAT Lumber Rack | | CCAT Lumber Rack | ||
| align="right"|$0 | | align="right" |$0 | ||
| align="right"|$0 | | align="right" |$0 | ||
|-class="sortbottom" | |- class="sortbottom" | ||
| colspan="4" align="right"|'''Total''' | | colspan="4" align="right" |'''Total''' | ||
|align="right"| '''$44''' | | align="right" |'''$44''' | ||
|} | |} | ||
</center> | |||
== Testing == | |||
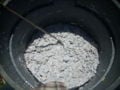
The first phase of the project after designing is to test CCAT's [[soil]] type and paper-crete mixtures. A [[soil shake test]] seen to the left proved that CCAT has the perfect clay for doing natural construction and will work well for our purposes of clay-slip-straw. | |||
Next to test is the paper-crete mixture. The first test brick was made with a 1:2:1 ratio of paper to cement to water. This made a very soupy mixture that took weeks to dry, but, when it did it was as hard as concrete. After about 6 test mixtures the final ratio that seemed suitable was 3:2:3:1 of paper:Cement:Water:Sand. The use of less [[water]] and additive of sand made the bricks shrink less during drying and dry faster. The sand also increases thermal mass and helps with fire resistance. The resulting bricks (shown drying in a window to the right) dried solid like a very hard paper-mache and were also a lot lighter in weight than there would be concrete counterparts. The proportions that I used were what seemed appropriate for the Arcata area. More standard and researched recipes for paper-crete can be found from the [[#Links to Relevent Sites|Links]] and [[#References (Annotated)|References]] at the bottom of this page or at [http://papercrete.wikidot.com/recipes:block-starter Paper-crete Block Starter]. | |||
<center> | |||
<gallery> | |||
File:The Shake Test.jpg|thumb|left|Shown are the proper proportions of sand, clay, and silt for natural building | |||
File:Drying bricks.jpg|thumb|Drying papercrete bricks in a sunny window | |||
File:Test brick.jpg|thumb|The first two test mixtures!</gallery></center> | |||
== Purposed Timeline == | == Purposed Timeline == | ||
{| | |||
!ITEM | <center> | ||
!PROPOSED DATE | |||
!DATE MET? | {| class="wikitable" | ||
! ITEM | |||
! PROPOSED DATE | |||
! DATE MET? | |||
|- | |- | ||
| align="center"| -Design and site measurements complete | | align="center" | -Design and site measurements complete | ||
| align="center"| 3/4/09 | | align="center" |3/4/09 | ||
| align="center"| Yes | | align="center" |Yes | ||
|- | |- | ||
| align="center"| -Dig foundation and set posts | | align="center" | -Dig foundation and set posts | ||
| align="center"| 3/23/09 | | align="center" |3/23/09 | ||
| align="center"| Yes | | align="center" |Yes | ||
|- | |- | ||
| align="center"| -Construct Roof frame and lay gravel foundation | | align="center" | -Construct Roof frame and lay gravel foundation | ||
| align="center"| 3/24/09 | | align="center" |3/24/09 | ||
| align="center"| Yes | | align="center" |Yes | ||
|- | |- | ||
| align="center"| -Make test paper-crete bricks and forms | | align="center" | -Make test paper-crete bricks and forms | ||
| align="center"| 3/24/09 | | align="center" |3/24/09 | ||
| align="center"| Yes | | align="center" |Yes | ||
|- | |- | ||
| align="center"| -Lay Brick with sand mortar | | align="center" | -Lay Brick with sand mortar | ||
| align="center"| 3/25/09 | | align="center" |3/25/09 | ||
| align="center"| Yes | | align="center" |Yes | ||
|- | |- | ||
| align="center"| -Finish roof with cedar shingles | | align="center" | -Finish roof with cedar shingles | ||
| align="center"| 3/28/09 | | align="center" |3/28/09 | ||
| align="center"| Yes | | align="center" |Yes | ||
|- | |- | ||
| align="center"| -Nail up wood lath | | align="center" | -Nail up wood lath | ||
| align="center"| 3/29/09 | | align="center" |3/29/09 | ||
| align="center"| Yes | | align="center" |Yes | ||
|- | |- | ||
| align="center"| -Finish making bricks | | align="center" | -Finish making bricks | ||
| align="center"| 4/2/09 | | align="center" |4/2/09 | ||
| align="center"| two weeks late due to rain! | | align="center" |two weeks late due to rain! | ||
|- | |- | ||
| align="center"| -Make large batch of paper-crete for work day | | align="center" | -Make large batch of paper-crete for work day | ||
| align="center"| 3/14/09 | | align="center" |3/14/09 | ||
| align="center"| yep | | align="center" |yep | ||
|- | |- | ||
| align="center"| -Class work day on wall | | align="center" | -Class work day on wall | ||
| align="center"| 4/15/09 | | align="center" |4/15/09 | ||
| align="center"| Yes | | align="center" |Yes | ||
! | |||
|- | |- | ||
| align="center"| -Touch-ups and finishing touches to prepare for plaster | | align="center" | -Touch-ups and finishing touches to prepare for plaster | ||
| align="center"| 5/1/09 | | align="center" |5/1/09 | ||
| align="center"| Yes | | align="center" |Yes | ||
|} | |} | ||
</center> | |||
== Project in Construction == | == Project in Construction == | ||
The gallery below contains pictures from the April 15 class work day. | |||
The gallery below contains pictures from the April 15 class work day. The pictures below describe the process involved with making paper-crete and clay-slip-straw. | |||
<gallery> | <gallery> | ||
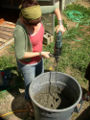
Image:Clay Slip Drilling.jpg|Mixing clay found on-site for the clay-slip-straw using a power drill with a paint mixing paddle | Image:Clay Slip Drilling.jpg|Mixing clay found on-site for the clay-slip-straw using a power drill with a paint mixing paddle | ||
| Line 181: | Line 224: | ||
Image:Clay-Slip-Straw.jpg| The clay is then stuffed into the wood lath frame and ends up drying and looking like this ready to plaster. | Image:Clay-Slip-Straw.jpg| The clay is then stuffed into the wood lath frame and ends up drying and looking like this ready to plaster. | ||
Image:Mixing_papercrete_CCAT.jpg| It takes about 5 minutes of mixing with a power drill with a paint mixing paddle for wet shredded paper to pulp like this before adding cement | Image:Mixing_papercrete_CCAT.jpg| It takes about 5 minutes of mixing with a power drill with a paint mixing paddle for wet shredded paper to pulp like this before adding cement | ||
Image:Paper Crete Mixing.jpg|Blending paper shreds with Portland cement | Image:Paper Crete Mixing.jpg|Blending paper shreds with Portland cement | ||
Image:Paper-crete_Brick_Form.jpg|This is the form we used to make the bricks used in the wall. When the bricks dry, they shrink, making the form easy to lift off | Image:Paper-crete_Brick_Form.jpg|This is the form we used to make the bricks used in the wall. When the bricks dry, they shrink, making the form easy to lift off | ||
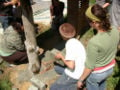
Image:Laying Papercrete Brick 1.jpg|Here I am showing the class how to lay paper-crete bricks on the wall... | Image:Laying Papercrete Brick 1.jpg|Here I am showing the class how to lay paper-crete bricks on the wall... | ||
Image:Laying Papercrete Brick 2.jpg|...And again. | Image:Laying Papercrete Brick 2.jpg|...And again. | ||
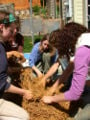
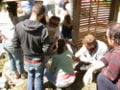
Image:Work Day on the Wall.jpg|Natural building projects require a lot of community and group effort to make progress! | Image:Work Day on the Wall.jpg|Natural building projects require a lot of community and group effort to make progress! | ||
Image:Finished_CCAT_Test_Wall.jpg| The finished paper-crete wall has divots that we made with our fingers in it to give the natural plasters something to stick into | Image:Finished_CCAT_Test_Wall.jpg| The finished paper-crete wall has divots that we made with our fingers in it to give the natural plasters something to stick into | ||
Image:Unfinished_CCAT_test_wall.jpg|The wall after a long hard days worth of work and almost ready to receive natural plasters | Image:Unfinished_CCAT_test_wall.jpg|The wall after a long hard days worth of work and almost ready to receive natural plasters | ||
| Line 194: | Line 237: | ||
== Conclusions and Reflection == | == Conclusions and Reflection == | ||
Because of relatively good planning and readiness of materials this project was quite feasible and enjoyable. | |||
Because of relatively good planning and readiness of materials this project was quite feasible and enjoyable. Were it not for the collective help of volunteers and the [[ENGR 305]] class this project may have never been finished. | |||
Having now finished there are some things i would do differently in the future. | Having now finished there are some things i would do differently in the future. | ||
#I would not have made bricks from the papercrete. | |||
#Just a note, paper-crete takes forever to dry in a coastal climate, especially if there is not enough cement in the mixture and too much water. | # I would not have made bricks from the papercrete. The bricks all of slightly different size and shape and with different levels of moisture in them were not ideally suited for building a wall. Using larger forms that contain larger wall sections with tensile reinforcement like [[bamboo]] or scrap [[metal]] would have been a lot easier and required a lot less paper. | ||
#I would have liked to have experimented more with different types of paper in the mixtures I made. The shredded paper was so readily available it was all that I used. | # Just a note, paper-crete takes forever to dry in a coastal climate, especially if there is not enough cement in the mixture and too much water. Some applications I have researched suggest straining the paper-crete through a wire mesh to relieve it of a portion of its water helps it to dry a lot faster. | ||
#Even if your project is small, get others involved! The process of natural building can be fun and educational and most of all it brings people together with one goal in mind, to build something maybe new and exciting that is a hands on alternative to conventional building practices. | # I would have liked to have experimented more with different types of paper in the mixtures I made. The shredded paper was so readily available it was all that I used. Word of mouth and research suggests that using different types of paper (e.g. newspaper, magazines) produces a significantly different consistency of paper-crete. So I would suggest experimenting to see which type is most appropriate to your project. | ||
# Even if your project is small, get others involved! The process of natural building can be fun and educational and most of all it brings people together with one goal in mind, to build something maybe new and exciting that is a hands on alternative to conventional building practices. | |||
== Links to Relevant Sites == | == Links to Relevant Sites == | ||
*[http://www.architectureweek.com/2002/1113/building_1-2.html ArchitectureWeek-Building with Paper-crete] | |||
*[http://papercrete.wikidot.com Paper-crete Resource Webpage] | * [http://www.architectureweek.com/2002/1113/building_1-2.html ArchitectureWeek-Building with Paper-crete] | ||
*[http://www.papercrete.com Papercrete.com] | * [http://papercrete.wikidot.com Paper-crete Resource Webpage] | ||
*[ | * [http://www.papercrete.com Papercrete.com] | ||
*[http://www.oikos.com/library/papercrete Oikos Building Green Source] | * [https://en.wikipedia.org/wiki/Papercrete Wikipedia on paper-crete] | ||
* [http://www.oikos.com/library/papercrete Oikos Building Green Source] | |||
== Brief Update 2016 == | == Brief Update 2016 == | ||
With the Original Construction ending in 2009 this site was later used to create the Solar Charging Station in 2015. | With the Original Construction ending in 2009 this site was later used to create the Solar Charging Station in 2015. | ||
CCAT solar Charging station: [[CCAT Solar Charging Station] | CCAT solar Charging station: [[CCAT Solar Charging Station] | ||
== References (Annotated) == | == References (Annotated) == | ||
==== | |||
==== Books ==== | |||
:• '''Callahan, Tim, and Clarke Snell. Building Green: A Complete How-To Guide to Alternative Building Methods Earth Plaster * Straw Bale * Cord wood * Cob * Living Roofs. New York: Lark Books, 2005.''' | :• '''Callahan, Tim, and Clarke Snell. Building Green: A Complete How-To Guide to Alternative Building Methods Earth Plaster * Straw Bale * Cord wood * Cob * Living Roofs. New York: Lark Books, 2005.''' | ||
In this very complete 600 plus pages guidebook, Callahan and Snell demonstrate alternative building methods of cob, straw bale, earth plaster, cord wood and living roofs. | In this very complete 600 plus pages guidebook, Callahan and Snell demonstrate alternative building methods of cob, straw bale, earth plaster, cord wood and living roofs. The book is filled with history, applications, methods, and afterthoughts from the authors' firsthand experience with building all of the above listed alternative building methods. The book also provides step by step building processes with notes on basic construction of foundations, walls, doorframes, drainage trenches, trussing, and site preparation. Contains over 150 pages on proper calculations for soil, r-value, shrinkage, stick frame construction, and environmental specs. Thoroughly covers natural wall construction and earthen plasters in a manner that an amateur could understand. | ||
:• '''Norton, John. Building with Earth: A Handbook. London: Practical Action, 1997.''' | :• '''Norton, John. Building with Earth: A Handbook. London: Practical Action, 1997.''' | ||
This handbook has practical applications for choosing whether or not earthen construction is appropriate or suitable for your site as well as an overview of how to build with earth. | This handbook has practical applications for choosing whether or not earthen construction is appropriate or suitable for your site as well as an overview of how to build with earth. Contains a synopsis of the logistics for site appropriateness, soil testing, earthquake considerations, costs, resource use. Continues on to explain wall construction using the methods of wattle and daub, direct moulding, adobe, mud brick, rammed earth, and compressed blocks. The handbook continues to describe the same tone roofs, foundations and floors, and weather protection. Most of the experience the author has comes from earthen construction in Africa and China. This handbook has good overview of earth building, but lacks the attention to detail that a novice earth builder would need to begin construction. | ||
:• '''How to build walks, walls & patio floors, (A Sunset book, 170). Menlo Park, CA: Lane Books, 1973.''' | :• '''How to build walks, walls & patio floors, (A Sunset book, 170). Menlo Park, CA: Lane Books, 1973.''' | ||
This book is a rather contemporary overview of building walls, walks, and patio floors. | This book is a rather contemporary overview of building walls, walks, and patio floors. It explains wall building foundations and materials for use that include brick, stone, adobe bricks, and concrete cast. This book does explain to good depth the different types of patio and walk construction. It includes loose aggregate, concrete with many alterations to it including pebble mosaics, brick, adobe brick, tile, flagstone, and asphalt. Goes over most contemporary or western brick styles for walls and floors; this book requires a previous understanding of general construction to utilize properly. | ||
==== | |||
:• | ==== Journals ==== | ||
This short online journal sheds light on straw bale building. | |||
:• ''' "Building with Straw Bales." Appropriate Technology Vol 32.No 4 (2005): 69. 13 Feb. 2009 <http://www.researchinformation.co.uk/aptearch/Oct-Dec 2005 p/html/Oct-Dec 2005 p 69.html>.''' | |||
This short online journal sheds light on straw bale building. Written as an overview this article describes the advantages and shortcomings of straw bales. It speaks of straw bales life span, resistance to pests, fire resistance, and insulation properties. Gives a brief history of the long lived tradition of using straw in building around the world. | |||
==== Web source ==== | |||
:• '''"Cob, Earth bags, Cast Earth, Paperboard, and Straw-Clay Mixes - Real Goods Solar." Residential Solar Panel Installation and Solar Power Systems for Homes - Real Goods Solar. 15 Feb. 2009 <http://www.realgoodssolar.com/solar/p/Architecture-and-Building-Materials-Part-4.html>.''' | :• '''"Cob, Earth bags, Cast Earth, Paperboard, and Straw-Clay Mixes - Real Goods Solar." Residential Solar Panel Installation and Solar Power Systems for Homes - Real Goods Solar. 15 Feb. 2009 <http://www.realgoodssolar.com/solar/p/Architecture-and-Building-Materials-Part-4.html>.''' | ||
This web source taken from the Real Goods website provides brief overview and opinion of different natural building materials. | This web source taken from the Real Goods website provides brief overview and opinion of different natural building materials. Materials include cob, earth bag, cast earth, straw clay, and papercrete. A short history is included with the different methods as well as description of code restrictions and/or patent information. This page is a brief that contains little to no process description but does include links throughout the page to more in depth explanations and other literature on the various topics. | ||
== Contact Details == | == Contact Details == | ||
Myles D. | Myles D. | ||
med44@humboldt.edu | med44@humboldt.edu | ||
Arcata, CA | Arcata, CA | ||
{{Page data|part-of = Engr305 Appropriate Technology]] | |||
Latest revision as of 01:28, 3 August 2022

This page describes the materials, processes, and work that goes into making a small covered wall made from natural construction materials and covered with natural plasters. This project was completed in May of 2009. Constructed, with the help of CCAT and student volunteers, from stick frame and infilled with papercrete and clay-slip straw with a recycled brick base, and covered by a cedar shingle roof. This wall will then have information signs attached for visitors of CCAT campus.
Introduction[edit | edit source]
The Campus Center for Appropriate Technology, located in Arcata, CA needs an information kiosk. Constructed, with the help of CCAT and student volunteers, from stick frame and infilled with papercrete and clay-slip straw with a recycled brick base, and covered by a cedar shingle roof. This wall will then have information signs attached for visitors of CCAT campus.
-
CCAT Fall 2008
-

Gettin Dirty with Natural Construction


Project Requirements[edit | edit source]
The goal is to construct a test wall that both suits the wet climate of Humboldt County, California and is useful to CCAT.
The Criteria for this project (and other projects of this scale) could look like this:
- ---
- Durability (How long are the materials specified to last?)
- Construction Time (What climate and material conditions limit time?)
- Complexity (Can construction be completed by the layperson?)
- Cost (How much will you spend?)
- Locality of Materials (How far will you go to find materials?)
- ---
These are basic criteria used to judge the design of this project. When each criterion is examined you can rank them according to importance. For this project, locality of materials, complexity, and construction time were very important factors because this project is one, part of an Appropriate Technology class, two, being constructed by students of HSU, and three, has to be completed in 15 short weeks. Ranking your criteria can be a powerful tool to assist in the timely and orderly design and construction of projects large and small.
Design[edit | edit source]
Overview[edit | edit source]
The foundation of this wall will be compacted soil with added gravel which will serve as the base for a 1ft tall layer of recycled brick layed in an interlocking pattern will sand mortar. This brick footing serves to keep natural plasters and infill material from coming in direct contact with the ground. The use of sand as mortar also allows the brick foundation to act as a wicking barrier helping to relive the wall of built up moisture through the seasons. The wall is framed by two driftwood logs and in-filled half by paper-crete bricks, half by clay-slip-straw, which is held in place by a recycled wood lath; and is covered by a combination of natural and lime plasters. The driftwood serves as a border for infill sections and to support a small a-frame pitched roof above covered with cedar shingles (seen to the right).
Specs[edit | edit source]
- 8 ft long, 4ft tall, 16in wide in a gentle S curve shape
- Roof dimensions, 9ft long 5.5ft high at peak, with 18in pitches on each side from peak
- Timber frame made from reclaimed timber and driftwood logs, simple 4x4s could work fine
- Recycled brick footing 1ft tall, 1ft wide, mortared with riversand
- One 4 by 4ft section in-filled with papercrete bricks mortared together with papercrete slurry
- One 4 by 4ft section stick framed with wood lath to hold infill of clay-slip-straw
- To be covered by earth/lime plasters by another student in ENGR 305 class
-
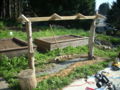
frame with roof supports and gravel foundation
-
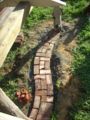
This brick pattern allowed for this foundation to be made without mortar
-
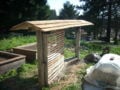
The roof will protect the wall from the harsh rains


Costs[edit | edit source]
| Qty | Material Needed | Source | Cost | Total Cost |
|---|---|---|---|---|
| ~60 | Thin Wood Lath | Salvage from local lumber mill | $0 | $0 |
| 3 94lb bags | Portland Cement | Do-it-yourself-Hardware | $12 | $36 |
| lots | Paper | Shredded office pack from HSU Student Services Building | $0 | $0 |
| 1 | Straw Bales | Local seller | ~$6 | ~$8 |
| 3 Flats | Cedar Shingle | Salvaged and Donated by Pierson Building Center | ~$0 | ~$0 |
| ~300 | Nails for Shingles | CCAT Shed | $0 | $0 |
| ~100 | Screws | CCAT Shed | $0 | $0 |
| ~150 | Recycled Bricks | CCAT Recycled Brick Pile | $0 | $0 |
| 2 | Natural Log Posts | Beach Salvage | $0 | $0 |
| ~12 ft | 4x4 Lumber | CCAT Lumber Rack | $0 | $0 |
| ~20 sqft | Plywood | CCAT Lumber Rack | $0 | $0 |
| Total | $44 | |||
Testing[edit | edit source]
The first phase of the project after designing is to test CCAT's soil type and paper-crete mixtures. A soil shake test seen to the left proved that CCAT has the perfect clay for doing natural construction and will work well for our purposes of clay-slip-straw.
Next to test is the paper-crete mixture. The first test brick was made with a 1:2:1 ratio of paper to cement to water. This made a very soupy mixture that took weeks to dry, but, when it did it was as hard as concrete. After about 6 test mixtures the final ratio that seemed suitable was 3:2:3:1 of paper:Cement:Water:Sand. The use of less water and additive of sand made the bricks shrink less during drying and dry faster. The sand also increases thermal mass and helps with fire resistance. The resulting bricks (shown drying in a window to the right) dried solid like a very hard paper-mache and were also a lot lighter in weight than there would be concrete counterparts. The proportions that I used were what seemed appropriate for the Arcata area. More standard and researched recipes for paper-crete can be found from the Links and References at the bottom of this page or at Paper-crete Block Starter.
-
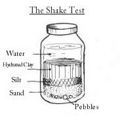
Shown are the proper proportions of sand, clay, and silt for natural building
-
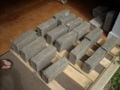
Drying papercrete bricks in a sunny window
-
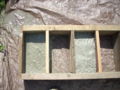
The first two test mixtures!


Purposed Timeline[edit | edit source]
| ITEM | PROPOSED DATE | DATE MET? | |
|---|---|---|---|
| -Design and site measurements complete | 3/4/09 | Yes | |
| -Dig foundation and set posts | 3/23/09 | Yes | |
| -Construct Roof frame and lay gravel foundation | 3/24/09 | Yes | |
| -Make test paper-crete bricks and forms | 3/24/09 | Yes | |
| -Lay Brick with sand mortar | 3/25/09 | Yes | |
| -Finish roof with cedar shingles | 3/28/09 | Yes | |
| -Nail up wood lath | 3/29/09 | Yes | |
| -Finish making bricks | 4/2/09 | two weeks late due to rain! | |
| -Make large batch of paper-crete for work day | 3/14/09 | yep | |
| -Class work day on wall | 4/15/09 | Yes | |
| -Touch-ups and finishing touches to prepare for plaster | 5/1/09 | Yes |
Project in Construction[edit | edit source]
The gallery below contains pictures from the April 15 class work day. The pictures below describe the process involved with making paper-crete and clay-slip-straw.
-
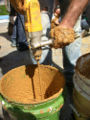
Mixing clay found on-site for the clay-slip-straw using a power drill with a paint mixing paddle
-
The drill couldn't breakup all the small chunks so we did it by hand
-
The straw was mixed and turned till all just covered by the clay slip
-
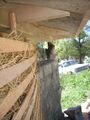
The clay is then stuffed into the wood lath frame and ends up drying and looking like this ready to plaster.
-
It takes about 5 minutes of mixing with a power drill with a paint mixing paddle for wet shredded paper to pulp like this before adding cement
-
Blending paper shreds with Portland cement
-
This is the form we used to make the bricks used in the wall. When the bricks dry, they shrink, making the form easy to lift off
-
Here I am showing the class how to lay paper-crete bricks on the wall...
-
...And again.
-
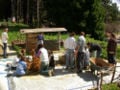
Natural building projects require a lot of community and group effort to make progress!
-
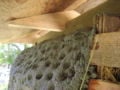
The finished paper-crete wall has divots that we made with our fingers in it to give the natural plasters something to stick into
-
The wall after a long hard days worth of work and almost ready to receive natural plasters
-
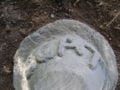
With the left over paper-crete from the day we made a large planter bowl. There are many uses for extra paper-crete. Use your imagination!


Conclusions and Reflection[edit | edit source]
Because of relatively good planning and readiness of materials this project was quite feasible and enjoyable. Were it not for the collective help of volunteers and the ENGR 305 class this project may have never been finished. Having now finished there are some things i would do differently in the future.
- I would not have made bricks from the papercrete. The bricks all of slightly different size and shape and with different levels of moisture in them were not ideally suited for building a wall. Using larger forms that contain larger wall sections with tensile reinforcement like bamboo or scrap metal would have been a lot easier and required a lot less paper.
- Just a note, paper-crete takes forever to dry in a coastal climate, especially if there is not enough cement in the mixture and too much water. Some applications I have researched suggest straining the paper-crete through a wire mesh to relieve it of a portion of its water helps it to dry a lot faster.
- I would have liked to have experimented more with different types of paper in the mixtures I made. The shredded paper was so readily available it was all that I used. Word of mouth and research suggests that using different types of paper (e.g. newspaper, magazines) produces a significantly different consistency of paper-crete. So I would suggest experimenting to see which type is most appropriate to your project.
- Even if your project is small, get others involved! The process of natural building can be fun and educational and most of all it brings people together with one goal in mind, to build something maybe new and exciting that is a hands on alternative to conventional building practices.
Links to Relevant Sites[edit | edit source]
- ArchitectureWeek-Building with Paper-crete
- Paper-crete Resource Webpage
- Papercrete.com
- Wikipedia on paper-crete
- Oikos Building Green Source
Brief Update 2016[edit | edit source]
With the Original Construction ending in 2009 this site was later used to create the Solar Charging Station in 2015. CCAT solar Charging station: [[CCAT Solar Charging Station]
References (Annotated)[edit | edit source]
Books[edit | edit source]
- • Callahan, Tim, and Clarke Snell. Building Green: A Complete How-To Guide to Alternative Building Methods Earth Plaster * Straw Bale * Cord wood * Cob * Living Roofs. New York: Lark Books, 2005.
In this very complete 600 plus pages guidebook, Callahan and Snell demonstrate alternative building methods of cob, straw bale, earth plaster, cord wood and living roofs. The book is filled with history, applications, methods, and afterthoughts from the authors' firsthand experience with building all of the above listed alternative building methods. The book also provides step by step building processes with notes on basic construction of foundations, walls, doorframes, drainage trenches, trussing, and site preparation. Contains over 150 pages on proper calculations for soil, r-value, shrinkage, stick frame construction, and environmental specs. Thoroughly covers natural wall construction and earthen plasters in a manner that an amateur could understand.
- • Norton, John. Building with Earth: A Handbook. London: Practical Action, 1997.
This handbook has practical applications for choosing whether or not earthen construction is appropriate or suitable for your site as well as an overview of how to build with earth. Contains a synopsis of the logistics for site appropriateness, soil testing, earthquake considerations, costs, resource use. Continues on to explain wall construction using the methods of wattle and daub, direct moulding, adobe, mud brick, rammed earth, and compressed blocks. The handbook continues to describe the same tone roofs, foundations and floors, and weather protection. Most of the experience the author has comes from earthen construction in Africa and China. This handbook has good overview of earth building, but lacks the attention to detail that a novice earth builder would need to begin construction.
- • How to build walks, walls & patio floors, (A Sunset book, 170). Menlo Park, CA: Lane Books, 1973.
This book is a rather contemporary overview of building walls, walks, and patio floors. It explains wall building foundations and materials for use that include brick, stone, adobe bricks, and concrete cast. This book does explain to good depth the different types of patio and walk construction. It includes loose aggregate, concrete with many alterations to it including pebble mosaics, brick, adobe brick, tile, flagstone, and asphalt. Goes over most contemporary or western brick styles for walls and floors; this book requires a previous understanding of general construction to utilize properly.
Journals[edit | edit source]
- • "Building with Straw Bales." Appropriate Technology Vol 32.No 4 (2005): 69. 13 Feb. 2009 <http://www.researchinformation.co.uk/aptearch/Oct-Dec 2005 p/html/Oct-Dec 2005 p 69.html>.
This short online journal sheds light on straw bale building. Written as an overview this article describes the advantages and shortcomings of straw bales. It speaks of straw bales life span, resistance to pests, fire resistance, and insulation properties. Gives a brief history of the long lived tradition of using straw in building around the world.
Web source[edit | edit source]
- • "Cob, Earth bags, Cast Earth, Paperboard, and Straw-Clay Mixes - Real Goods Solar." Residential Solar Panel Installation and Solar Power Systems for Homes - Real Goods Solar. 15 Feb. 2009 <http://www.realgoodssolar.com/solar/p/Architecture-and-Building-Materials-Part-4.html>.
This web source taken from the Real Goods website provides brief overview and opinion of different natural building materials. Materials include cob, earth bag, cast earth, straw clay, and papercrete. A short history is included with the different methods as well as description of code restrictions and/or patent information. This page is a brief that contains little to no process description but does include links throughout the page to more in depth explanations and other literature on the various topics.
Contact Details[edit | edit source]
Myles D. med44@humboldt.edu Arcata, CA
{{Page data|part-of = Engr305 Appropriate Technology]]