Sophivorus (talk | contribs) m (Text replacement - "{{OpenKnowHowManifest" to "{{Device") Tags: mobile edit mobile web edit |
mNo edit summary |
||
| Line 15: | Line 15: | ||
|manifest-language=eng | |manifest-language=eng | ||
|documentation-language=English | |documentation-language=English | ||
|countries-of-design=Category:Canada | |||
|estimated-cost-amount=9.00 | |estimated-cost-amount=9.00 | ||
|sustainable-development-goal=SDG06 Clean water and sanitation, Sustainable Development Goal 9 | |sustainable-development-goal=SDG06 Clean water and sanitation, Sustainable Development Goal 9 | ||
Revision as of 07:40, 17 September 2020
ABSTRACT
Introduction
The task is to adapt a widely available thermostatic valve for use in the solar water pasteurizer. The thermostatic valve that will be used comes from the coolant system in automobiles. The thermostat in automobiles utilizes a wax core which expands with increased heat, pushing a piston and ultimately opens the valve.[1]
Project Requirements
To alter an existing thermostatic valve for use in a water pasteurization system using simple labour and cheap materials. The device must be readily accessible and easily modifiable.
Design
Currently the most feasible solution is a modified radiator valve, however alteration may be difficult. We have come to the conclusion that altering the thermostatic valve will require too much money and precision. Due to the circumstances of alteration it would be unfeasible for local labor to produce such precise results. Therefore, we have decided that the valves posted below would suit the task without modification required. In order to achieve the desired results the valves must be attained, cleaned and tested before being implemented into the water pasteurization system. In our project we will outline how to remove, test, and clean a thermostatic valve from a car.
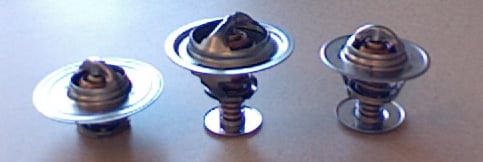
There are now three possible thermostatic valves.
- Murray Plus 13476
- Murray Plus 13108
- Murray Plus 13069
Testing
To test the thermostatic valves we will use a traveling heating element', 2" ABS piping, a digital thermometer, and a waterproof adhesive.
- 1. The ABS piping will be cut into three pieces and attached to the sensitive end of the thermostatic valves.
- 2. Fasten the thermostatic valve to the ABS pipe using putty for sealant and duct tape for support (this was done so that the valve could be easily removed and used in the Solar Pasteurization System). The cylinder side must be places inside the ABS pipe.
- 3. Using a hot plate and a beaker heat up 200mL of water to 67˚C.
- 4. Clamp the thermostatic valve device vertically above another beaker.
- 5. Pour the water into the ABS pipe, if water begins to drip start the stopwatch and record flow rate using the 600mL beaker below. Record time until there is enough water for an accurate reading.
- 6. Pour water from 600mL beaker into a 50mL graduated cylinder. Measure volume and divide by time to produce flow rate.
- 7. Repeat with water at the rated temperature specific to each valve.
'The heating element was decided upon to provide better control of the water temperature. It provides the ability to instantaneously remove or add the heat source.
How to Remove a Car Thermostat [2] [3]
- 1. Make sure the car system is completely cool.
- 2. Locate the radiator cap and use a rag to cover and open the cap. To open the cap push down and turn. (The rag is used to prevent any splash back from the radiator).
- 3. Place a tub underneath the radiator and locate the draincock which should be on the bottom left or right of the radiator. Unscrew the draincock and allow the coolant to drain for fifteen too twenty minutes.
- 4. On the top of the radiator locate the upper radiator hose. Follow this hose to the thermostat housing.
- 5. Loosen the hose around the thermostat housing and remove. Be aware of excess coolant spilling out.
- 6. Use a wrench to unscrew the thermostat housing. Remove the housing and the thermostat should be exposed.
- 7. Now that the thermostat is exposed remove it. If stuck, jiggle the thermostat out or use a pair of pliers to pull it (be careful not to damage it).
- -------------------------------------------------------
- 8. Now that the thermostat is remove the coolant residue must be removed. In order to do this, use warm water and a rag to clean thoroughly.
- 9. To determine quality of thermostatic valve a visual inspection should be conducted. Look for:
     *Rust
     *Bends or Cracks
     *Chemical Buildup
     *Valve stuck open
- 10. If the valve exhibits any of the above systems it should not be used because the seal may be compromised. If the valve passes visual inspection it should move on to more thorough testing as specified above.
[Image:Untitled1.jpg]
Costs
$9.00 each however that is retail price so if bought straight from the factory it would cost less.
Discussion
What has been accomplished
- Research of thermostatic valve operation
- Determine automobile coolant thermostat to be most viable option through comparison
- Pricing of the parts
Conclusions
Your conclusions.
References
- ↑ Nice, Karim. , How Car Cooling Systems Works, HowStuffWorks.com, 22 November 2000.
- ↑ TurboTV, Discovery Channel Affiliate, August 2008
- ↑ Draining Coolant to Change Car Thermostat, Expert Village, Nathan McCullough
Members
-- Mjmcdonald 20:16, 27 January 2009 (UTC) -- Tedm 20:16, 27 January 2009 (UTC) -- Alicia 20:17, 27 January 2009 (UTC) -- B burrows 20:17, 27 January 2009 (UTC)
