User:Xander Chin

| Name | Alexander (Xander) Chin |
|---|---|
| Affiliations | |
| Location | |
| Nationality | |
| achin84 |
|
| Links | youtube.com linkedin.com github.com [xanderchin.xyz xanderchin.xyz] |
| Registered | 2022 |
About Me
[edit | edit source]In Short: An engineering student passionate about building things and sharing them on the internet. Interested in creating and integrating hardware, software, design, mathematics and science into tangible and creative projects.
Currently, I am an undergraduate engineering student at Western University in my first year hoping to study Mechatronics Engineering. Upon entering Western University, I was awarded the national STEM Schulich Leader Scholarship valued at $100,000 based on my well-rounded, entrepreneurial and STEM related achievements.
Like most people, I have two sides: Engineer and non-engineer.
As an engineer, I love experimenting and integrating hardware (circuits, logic gates), software (microcontrollers, web development) and design (PCB design, 3D printing) with aspects of mathematics and science in the form of projects that I can showcase. I’m currently looking into exploring and utilizing neuroplasticity in robotics, AI, machine learning and biotechnology.
As a non-engineer, I love playing the guitar, doing parkour, gaming, and most recently, breakdancing! I also love deep meaningful conversations, admiring and taking inspiration from any kind of creative work, and learning about anything (currently it's geopolitics).
Notable Personal Projects
[edit | edit source]Checkout the full list of them on my website xanderchin.xyz and GitHub
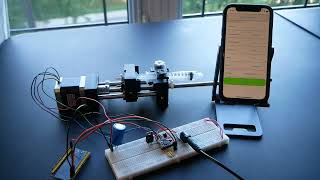
Voice Controlled Syringe Pump
[edit | edit source]I collaborated with a University of Toronto anesthesiologist to produce a low-cost 3D-printed infusion syringe pump for developing countries with wireless and voice control from a mobile app. I designed the pump hardware, programmed the pump’s microprocessor, and built an iOS/Android-compatible user interface app. The 3D print files were open source, allowing me to focus on mobile app development and voice control. Overall, this project exposed me to the entire engineering process of transforming a device from concept to reality.
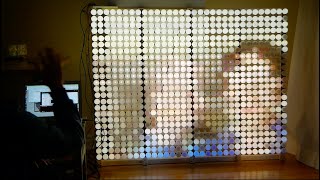
Modular RGBW Ping Pong LED Wall
[edit | edit source]This project was inspired by bitluni's own open-source ping pong LED wall as who doesn't enjoy RGB lights and colors? I inspected his build, setup and PCB files and modified it according to my needs for a cheap, modular, and lightweight LED wall. This project was so huge that I divided it into two parts with corresponding videos.
The first part consisted of the build and planning of a modular, light and cost-effective 24 by 32 RGBW LED wall using Neopixels as the LEDs. I optimized the PCBs to be light-weight, modular and cost-effective by creating strips of 1 by 8 LEDs instead of whole 8 by 8 panels, saving on cost and weight. These strips can be attached to connector PCBs via male and female headers, allowing for a custom modular build. The frame to support these PCB's was simply a wooden skeleton frame as it was the cheapest, lightest, and easiest option for structural support. On the software side, I increased efficiency through 8-bit parallel data streaming to the LEDs using low level port manipulation of the ATmega328P. This allowed images and GIFs to be displayed with over 60 fps using a simple Arduino. Overall the build required creative PCB design, detailed knowledge of various ATMEL MCU register structures, and thorough planning. Check out the journey and result below!

The second part consisted of gluing on the ping pong balls (as they make nice diffusers) and optimizing the LED wall to allow camera output, screen sharing and drawing modes. This was done using assembly for ATMEL MCUs to simultaneously receive serial communication data (pixel data from the camera, videos, pictures, etc. from a computer) and output it to the LEDs. I coded Processing programs in Java to send pixel data via serial communication from the computer camera, screen and painting grid to the MCU.
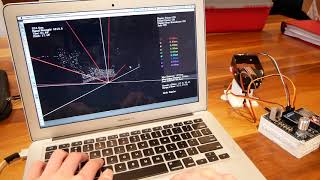
LiDAR Measurement Device
[edit | edit source]This device measures distance and models the surrounding room using LiDAR, servo motors, and an ESP32 programmed in C++. I Coded a Processing program in Java to display a 3D point cloud, perform measurements, and control the ESP32 with Bluetooth. I also taught myself about vectors to derive and apply an equation relating pitch and yaw angles to angles between any 2 points in 3D space. Along with that, I designed and manufactured a custom PCB in EAGLE and 3D printed enclosure in Fusion360.
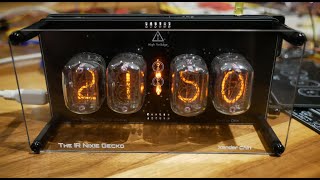
Infrared Nixie Tube Clock
[edit | edit source]This is a 4-digit nixie tube clock with alarm, timer, date, and temperature features controlled with an infrared remote and side buttons. It is programmed in C++ on an ATmega328 IC. The nixie tubes required 170VDC high voltage, which increased the risk of PCB leakage and shorting, therefore, proper PCB design was crucial. A laser-cut acrylic pane designed in Adobe Illustrator was added for a nice touch.
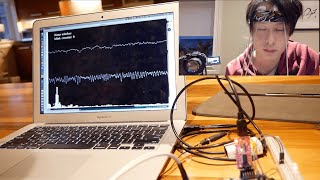
EEG + EMG Recording Device
[edit | edit source]This is a dual channel electroencephalogram (EEG) and electromyography (EMG) recording device that detects brain activity and various muscle movements. I took on this complex endeavor because I was heavily interested in Brain Computer Interfaces (BCI) and the potential uses of them. EEG comes in the form of bioelectrical waves picked up by electrodes and amplified through a circuit and different activities such as focusing or sleeping correspond to different frequencies and amplitudes. Therefore, I taught myself Fourier Transforms to program an FFT algorithm that processed these bioelectrical waves into spectral frequencies. I also prototyped and implemented various stages of op-amp filter circuits with successful attenuation of outside interference, such as the 60 Hz AC electricity, from the bioelectrical signals. To keep the PCB size small for potential use in wearables, I challenged myself to use and solder surface mount components. Placement of the electrodes was also important, requiring research of EEG and EMG signal waveforms from various areas of the brain and muscles.
In the end, I was able to accurately detect EEG and EMG activity with minimal noise, however, it was not reliable due to using wet electrodes and poor contact. I also planned to implement "mind control" using machine learning to detect certain EEG and EMG patterns but I have not gotten there yet (I am working on it for part 2!).