
User:Tom K

| Name | Tom Kliewer |
|---|---|
| Affiliations | |
| Location | |
| Nationality | |
| Interests | OSH, 3D printing |
| Registered | 2021 |
| Contributions | Planter with Water Catcher |

Tom Kliewer, a senior at Principia College, graduating May 2021 with a bachelors degree in Music.
Reflective Writing on the Open Source Movement
[edit | edit source]The open source movement entices me to continue with it, as I feel like through the combination of efforts across the world wide web, developments in projects posted online increases immensely.
Working on my Jellybox2 3D printer, I could clearly see the effort that many individuals have made across the years this printer model has been released, and just how many people care about the ease of access and the functionality of these open source projects. These printers, such as the Jellybox, are representative of progress moving forward to have open source projects leading the charge in innovation and connection to the community for so many individuals, including myself. I feel like working on a 3D printer like the Jellybox allowed me to understand and help move forward the open source movement, as I am not contributing to proprietary products and instead learning about the open source community, and taking my first steps to contributing to it.
I feel that if I continue on the path that I am on, I will stay with the open source movement for the foreseeable future, and continue to contribute in any way that I can. Whether that fall to suggestions, remixes of current designs, supporting creators monetarily, or creating my own ideas and releasing them online in a open source fashion.
Preliminary Print
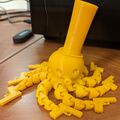
[edit | edit source]The first print that I chose to work on was one that a friend had sent to me previously. This file feature a octopus donning a hat and holding a set of toy guns - jokingly titled the "Glocktopus". This model was created by Thingiverse user Hellrazor978, and is licensed under the Creative Commons - Attribution license.
When selecting settings to run this print under on my 3D printer in Cura, I chose to mainly follow the options suggested by the Cura setup guidelines that came with my printer. This featured 0.1 mm layer height (average quality suggested by Cura), 1.2 mm shell thickness and bottom/top thickness. Fill density was set to 20%, with the print speed at 50 mm/s, the printing temperature at 210, bed temperature at 50, the support type set to everywhere, and the platform adhesion to raft. The last choice was specifically made to assure that none of the pieces would move during the print, as the limbs of the print were going to be fully flexible when done, so holding them in place was important during the printing process. During the print, the fans were all running at full capacity, as I was concerned with such a tall structure of the hat, if the fans were not cooling the print in time, that it would droop over.
Overall, this print turned out splendidly and after removing a few pieces of the created support, was very clean and without almost any blemishes.
You can find a picture of the completed print below in the "Mini Projects" gallery.

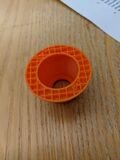
Blender Project - Lens Light Cover
[edit | edit source]My next project was trying to learn how to use Blender, and this was approached through a class project on everyone creating a lens light cover.
This lens light cover, created under the CC by Attribution license, was crafted in Blender 2.79, and can be viewed to the right.
This print was sliced in Cura and was printed with 0.3 mm layer height, fill density at 20%, full support structures to ensure that all angles were supported during the print, and a raft adhesion plate to make sure that the print did not shift during extrusion as the first attempt failed 40 minutes into the process.
This combination of settings provided a good basis for the print, and caused only minimal visual problems with the print, most of which can be attributed to the angles of the overhangs and the speed at which the nozzle was moving across the bed. If I were to offer suggestions for future prints, I would set nozzle move speeds to 80% capacity, instead of the 100% capacity on the Jellybox2 printer.
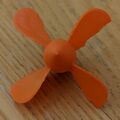
FreeCAD Project - Couch/Propeller
[edit | edit source]The FreeCAD instruction project was split into two sections. The couch that we built in FreeCAD in class, and the propeller that we built following an online tutorial. Below in the mini projects you will find pictures of both of these prints. Both fall under the CC by Attribution license, and were created in FreeCAD 0.18. Both projects were then sliced in Cura, using the same settings as the two projects above, as these settings lent themselves well to these previous projects. With both prints, the extra support was broken away to produce the final product after the printing was finished.
The propeller was designed in FreeCAD 0.18 and printed using the settings above, but it was shrunk to 30% size in Cura, simply on a wish for time saving and not having a need for a large propeller prop. This had unintended consequences as it made the fins only one filament layer thick, causing structural instability and stringing/layer misalignments throughout. The propeller came out okay, but it could have been drastically improved if the initial size was kept.
The rock wall hold was printed using most of the same specifications as listed above. The only difference was that it used 10% infill in order to not use drastic amounts of filament.
OpenSCAD Rock Wall Hold/Nameplate
[edit | edit source]OpenSCAD was used to design a rock wall hold and a customizable nameplate to be uploaded to Thingiverse. The rock wall hold was printed using most of the same specifications as listed above. The only difference was that it used 10% infill in order to not use drastic amounts of filament. The nameplate was not printed as of yet, but was designed in OpenSCAD and can be printed without supports and without any type of raft system under it.
I learned from designing both of these props that I enjoy using OpenSCAD a I can see all of the coding going into the object and fixing any problems seems a lot more straight forward. Also, learning how to upload customizer projects onto Thingiverse was really interesting and I am glad I know how to do it now so I can employ what I learned in the future.
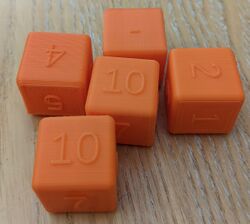
Educational Project: Customizable Dice
[edit | edit source]For my educational project this semester, I focused in on a simple, yet effective idea; math dice. This idea focuses around easily customizable dice that individuals may use to help learn equation solving. One or two dies will show numbers and be rolled and added together, the next die will have mathematical symbols, like +, -. or ÷. The final dice will be a repeat of the first set. After each set of dice is rolled separately, the 3-5 dice will line up to create an equation that can be used to practice problem solving. This project was then designed using OpenSCAD, printed on the Jellybox 2, and published to Thingiverse for customization, as well as NIH.
The images of the printed version can be viewed below. If this project were to be done again, I would have imbedded the text into the die instead of extruding, as well as future improvements to change the color of the numbers/symbols using either paint, or a different filament.
The change made to this model for this project from the prototype was using a marker to darken the symbols and numbers to make them visually distinct.
The total cost of each dice is 5 grams of filament, which in this case costs around 30 cents per die with the filament bought.
A commercial equivalent would cost roughly $5-10 for a set of these dice, without the ability to customize the face with what you want.
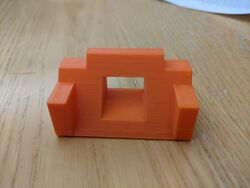
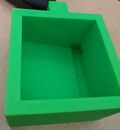
OSAT Project: Planter with reusable water collection point
[edit | edit source]For this project, I chose to focus on creating a planter for reusable water collection, as sustainable practices for watering plants can only be helpful in communities.
This project was designed in FreeCAD, sliced in Cura, and printed on my Jellybox2. The project was uploaded Thingiverse after its completion where you may find the STL files, images of the project, as well as the original FreeCAD file, and the link can be found here.
As for print settings, I printed this project with 10% infill with the course settings on Cura at 70% scale, as that is what comfortably fit on my printing bed.
If I were to do this project again, I would design a more succinct water collection device, as some small amounts of water currently miss the actual collection unit.
This design used 1.53 grams of filament, which equaled a cost of $4.59 for the filament that was used in this project. A commercial equivalent of this project would be in the $15-20 range, equaling a savings of 66% to even 75%.
Overall, this design is easy to print, requires no assembly, and printed in its entirety in a bit less than 8 hours with the settings listed above in Cura.
Big Money Project: Knitting Hook and Round Loom Replacement Peg
[edit | edit source]For this project, I chose to make a design that was pertinent to me and my interests. I have used a Round Loom for knitting and found that if I broke one of the plastic pegs on the loom, that I would have to buy a completely new set instead of just being able to buy a replacement part.
For this reason, I decided to design a replacement peg that would cost a fraction of the $60.00 set of Round Loom that I was using at the time.
The design was made in FreeCAD and also included the design for a knitting hook that would make ease of access to new hooks in case of yours breaking much easier. Both of these designs can be viewed here.
For printing practices of these files, I would suggest printing these at 50% size, as that is closest to what you would want for a peg replacement for most round looms. This is also a comfortable size for me for what size knitting hook I would want. Also make sure to print with supports only touching the bed, otherwise you will need to carefully remove all of the supports from within the hook holder print.
As for Cura settings, besides those listed above, I used the recommended "Fine" settings, along with a printed skirt for bed adhesion, and PLA filament.
The cost for this project is less than a dollar, as it uses close to 80 grams of filament for the entire print. With the price of the filament I was using being $20 for a KG of filament, this is a large amount of savings over buying an entirely new set of round looms & pegs. The round loom linked above costs $60, so this project leads to a savings of over 6000% if you simply need to replace a broken peg or want a new knitting hook.
If I were to do this project again, I would design the hook a bit more compact as it is slightly unwieldy on first use, but one quickly gets used to it.
Everyone's Mini Projects
[edit | edit source]-
 Preliminary Print - Fun octopus toy
 -
 3D Printed FreeCAD designed couch
 -
 An example of a failed print
 -
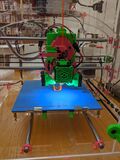 Image of my functional 3D printer
 -
 An image of my FreeCAD designed propeller
 -
 Nameplate designed in FreeSCAD
 -
 Rock wall hold designed in FreeSCAD
 -
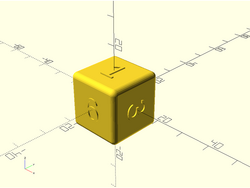 OpenSCAD View of Educational Project - Customizable Dice


Big Projects
[edit | edit source]-
 Educational Project: Customizable Dice
 -
 OSAT Project - Planter for reusable water collection.
 -
 Big Money Project - Knitting Hook and Round Loom Peg Replacement

