
It's a lot of fun hauling cargo around on a bike. With the high cost of owning and using a an automobile and the societal and environmental costs of driving, a bike trailer can make biking more practical for transporting groceries, laundry, friends, wedding cakes, etc. This is one of the least-expensive bike trailer designs out there. All that's needed is an old external-frame backpack you're ready to scrap, 18 feet of metal conduit, and some miscellaneous other hardware.
The prototype trailer was designed and built by Russell Kramer, who also brought us the Sunny Brae Yurt. This Appropedia article is by Aaron Antrim.
This project will be featured in the Community Wheel of HSU Green Wheels in Fall 2006.
Basics
Materials
- 1 external backpack frame (Check out Freecycle or, if you're in the region Humboldt CA supplies)
- 18 feet of 1 in. diameter metal conduit in 7 pieces
- 4 two-foot lengths for "wheel wells"
- 2 three-foot lengths, cross pieces at front and back of tailer "bed"
- 1 four-foot length for tongue
- 4 pieces of eighth-inch thick angle iron (this was recycled from what purpose?)
- 2 children's bike tires from Arcata Library Bikes
- 18 bolt/washer/hex-nut assemblies (2 washers each, beneath bolt head and before hex nut)
- 4 eye-bolt/washer/hex-nut assemblies (2 hex-nuts and washers per)
Tools
- Clamps
- Drill
- Grinder for angle iron
Construction
Frame
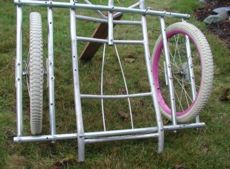
Completed frame: 3 foot lengths of conduit make front and back frame edges; 2 foot lengths form wheel wells

- Remove separate pack and accessories from frame. Hold onto the fabric pack because you can sew the shoulder straps back on to make a nice frame-less pack.
- Drill holes at cross-intersections to slip bolts through conduit and backpack frame
- Weave lateral 3' length of metal conduit through the curved part of the pack frame
- Set 3' lateral length of metal conduit on what will be the top side of the trailer, at its front, 2' forward of the end-piece of conduit, installed in step 3.
- Attach conduit to pack frame on center using 4 eye-bolt assemblies (2 hex-nuts and washers per)
- Set 4 two-foot conduit pieces on the underside of the 3' laterals. Space them exactly the necessary width for the wheel mounts. Clamps may be useful to secure hold the conduit as you mark the holes you're going to drill.
- Assemble conduit pieces using bolts.

Left: eye-bolt assembly. Right: standard bolt assembly


Wheel mounts
- Use a handheld grinder to cut cups for axles
- Drill holes in angle iron and conduit to attach using bolts.


Tongue


Hitch


Use
A crate or plastic container with a top works well as a cargo bed. Secure your load on the trailer by hooking bungees on the eye-bolts.
Recommendations
A wider trailer improves lateral stability. A hitch mount at the bottom of the seat stays, at the bike's rear wheel may further improve things.
