
Backpack frame bike trailer

| Type | Bike trailer |
|---|---|
| Authors | Russell Aaron Antrim |
| Location | Arcata, California |
| Status | Prototyped |
| Years | |
| Replicated | Yes |
| Cost | USD 40 |
It's a lot of fun hauling cargo around on a bike. A bike trailer can make a bicycle more practical for transporting groceries, laundry, friends, etc. One of the least-expensive bike trailer designs out there, all that is needed to build this backpack-frame bike trailer is an old external-frame backpack, 18 feet of metal conduit, and some other hardware (see materials).
The prototype trailer was designed and built by Russell Kramer, who also brought us the Sunny Brae Yurt. This Appropedia article is by Aaron Antrim with Russell's help.
A group from the Fall 2007 Humboldt State Engineering 114 course also has attempted a backpack frame trailer from these instructions! We will insert suggestions to improve replicability for those who may need a few more details to build a trailer successfully. The group members were generally all familiar with bike mechanics, though none of us had ever built a bike trailer before and did not have any particular skills in building things. However, between the four of us, we managed to build a good trailer. It helped a lot to have extra hands to stabilize the pieces while the conduit was being drilled, as well as added perspective to ensure that holes were being drilled in vertically, rather than tilted.
Basics
[edit | edit source]Materials
[edit | edit source]- 1 external backpack frame (Check out Freecycle, or, if you're in the region, the Arcata Recycling Center Store and other resources on Humboldt CA supplies)
- 18 feet of 3/4 in. (1/2 in. works, too) diameter thin walled steel conduit(EMT) in 7 pieces
- 4 two-foot lengths for "wheel wells"
- 2 three-foot lengths, cross pieces at front and back of tailer "bed"
- 1 four-foot length for tongue
- 4 pieces of aluminum angle bracket (Arcata Scrap and Salvage has tons of this stuff.)
- 2 20 in. (childrens/BMX) bike tires from Arcata Library Bikes (local bike trailer aficionados have suggested that both tires be front tires with as many spokes as possible, though this is not imperative)
- 18 bolt/washer/lock ring/hex-nut assemblies (2 washers each, beneath bolt head and before hex nut)(these should be approximately half the diameter of the conduit; we used 1/4" bolts that were 1.5 " long when using 1/2" conduit)
- 4 eye-bolt/washer/lock ring/hex-nut assemblies (or 4 more normal bolt assemblies if you want a smooth surface for the trailer bed, perhaps for towing larger items)
- For hitch:
- 2 hose-clamps
- Small Carabiner
- Small Piece of wood
- Eye Lag Screw
Tools
[edit | edit source]- Pipe Cutter
- Drill
- Measuring Tape
- Jig Saw
- Crescent Wrench
- Screw Driver
- Permanent marker or other marking tool
Construction
[edit | edit source]Frame
[edit | edit source]-
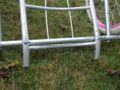
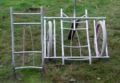 Right, Completed trailer: 3 foot lengths of conduit make front and back frame edges; 2 foot lengths form wheel wells
 -
-
-
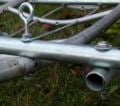 Left: eye-bolt. Right: standard bolt


- Cut your conduit using a hack saw or pipe cutter into the appropriate lengths specified in Materials list
- Remove separate pack and accessories from frame. Hold onto the fabric pack because you can sew the shoulder straps back on to make a nice frame-less pack.
- Drill holes (use expensive titanium bit, you won't regret it) at cross-intersections to slip bolts through conduit and backpack frame.
- : Helpful hint 1: Do not pre-drill all holes (attempted). This may seem superior but it is not. It is very hard to drill perfect holes separately and have them all line up, actually it's damn near impossible. Drill one hole and attach the new piece to the frame with this hole and a bolt, lock-ring washer combo. Now line up the next intersection and drill through both pieces at the same time. This will save you from having to re-drill holes and buying a new drill bit (they wear out when drilling through steel).
- : Helpful hint 2: It's hard to start a new hole on the round surface of the conduit. Grab a hammer and anything sharp and as hard as the conduit. Hammer in a dimple to get the drill bit to bite.
- : Helpful hint 3: From Engr 114 course - We'd like to emphasize not pre-drilling all holes! Instead, drill and connect each bolt before proceeding to drill the next hole. This will also ensure that the conduit does not accidentally move when drilling subsequent holes.
- Weave lateral 3' length of metal conduit through the curved part of the pack frame. Attach each bolt assembly before drilling the next hole to ensure that the holes are in the appropriate places.
- Set 3' lateral length of metal conduit on what will be the top side of the trailer, at its front, 2' forward of the end-piece of conduit, installed in step 3.
- Attach conduit to pack frame on center using 4 eye-bolt assemblies (1 lock-ring, 2 hex-nuts and washers per). Again, if a flat top is preferred, use the regular bolt assemblies here.
- Set 4 two-foot conduit pieces on the underside of the 3' laterals. Space them exactly the necessary width for the wheel mounts. Clamps may be useful to secure hold the conduit as you mark the holes you're going to drill.
- Assemble conduit pieces using bolts.
- Alternate suggested order of operations from Engr 114: Connect each bolt as you drill the holes. First connect bottom 3' length of conduit, then the top 3' length, then the outer 2' lengths for the wheel wells. Then attach the angle bracket to the outer lengths for the drop outs. Next place wheel into the that drop out to measure the exact placement of inner 2' wheel well conduit lengths and their respective angle brackets. After marking exact locations, attach angle bracket to the inner length, check measurement again with the wheel in place, and then finally attach the inner 2' lengths.
Wheel Mounts
[edit | edit source]

- Use a 1/2" drill bit (titanium not necessary as aluminum is soft) and a Jig Saw with a metal blade to make your dropouts. (The dropout is a term for a U-shaped hole cut into the aluminum angle bracket that the wheels can easily slide in and out of, but are small enough that the wheel can be securely attached without falling out)
- The angle bracket will be oriented like a "7" rather than like an "L", with the top arm of the seven bolted underneath the 2' lengths of the wheel wells.
- Drill holes in angle bracket and conduit to attach using bolts.
- Make sure you align the wheels slightly back of the balance point for a more stable trailer, also make sure they are not too far back so the wheel doesn't hit the rear lateral support bar.
- Suggestion 1 from Engr 114: Align and mark spacing of angle brackets on the conduit while they are attached to the wheels; this will ensure that the spacing is perfect for the size of that particular wheel (sometimes a front wheel and a back wheel of the same bike will have different sized axles)
- Suggestion 2: Make sure that the plane of the top edge of the angle bracket(when it is attached to the 2' length) is the same as the plane of the bed of the trailer, and that the all four angle brackets are also on the same plane - these steps will ensure that your wheels are not tilted inwards or outwards.
Tongue
[edit | edit source]Side attachment or seat-post attachment? That is the question. This trailer attaches at the seat-post. Victor of the amazing HSU Bicycle Learning Center says that the side attachment system tows more nicely. You can choose to do either, just keep your turning radius in mind when bending the tongue. I'll make another prototype trailer with a side attachment and post the direction on this page sometime in the future.
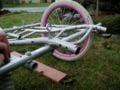
- Bend the conduit tongue in an "S" shape so that it clears the wheel and the trailer rides level. This takes some fine tuned adjustment. Pole benders are available at Ace for about $24, or you could just use the fork in two trees to bend them as Russell decided to do after seeing the price of the pole bender (almost as expensive as the whole trailer). Only buy if you are planning on making a few trailers.
- Hammer the small piece of wood into one end and pre-drill a small hole for the eye screw. Screw in the eye screw so that the piece of wood will never budge.
- I wrapped the eye-screw in tape to that it would be quieter when locked into the carabiner.


Hitch
[edit | edit source]

When designing the hitch I toyed around with all kinds of complicated mechanisms. Indeed there are just as many complicated hitches designed for prefabricated trailers. What I settled on was overly simple, durable and functional. You simply clip the eye bolt of the trailer into a carabiner that is attached to the seat post of your bike via hose clamps. This allows any motion possible without restraint. Tape the protruding hose clamp tabs for protection against scrapeage....unless you want to show of your hardcore trailer towing battle wounds!
To throw in a few other considerations, Bikes at Work compares three different hitch styles.
Costs
[edit | edit source]These are the costs for this particular tailer. Your particular costs may vary.
- Backpack Frame: $5 at the Arcata Recycling Depot, check pawn shops as well. You could potentially substitute the frame with a couple more pieces of conduit and a plywood deck.
- Conduit: I got this free from a construction dumpster for free but brand new it is about $4.50 for a 10ft length at ACE and $2.30 at Home Depot. You'll need two lengths so $10.
- Bike Wheels: I went down to the Bike Library and pulled the parts for these out of the "pit," a pit full of random bike parts tossed in for later sorting. Cost $4 for 2 wheels.
- Bolts and Hardware: Surprisingly expensive because I used stainless steel ~$20. Cheaper if you know how to weld and have access to a welder. Cheaper still if you only have access to a welder (the trailer not the raw materials). Just joking.
- Corner Bracket: Free if you chat it up with Bonnie at Arcata Scrap and Salvage. Very Cheap otherwise ~$2.
- Drill Bits: $3-10
- Carabiner and Hose Clamps: $5
- Total: $40 For me, if you bought everything new you could spend around $70-100.
- Labor: 5 hours for the mechanically inclined.
Use
[edit | edit source]
A crate or plastic container with a top works well as a cargo bed. Secure your load on the trailer by hooking bungees on the eye-bolts. Notice the hardcore trailer towing specialist.
The trailer built by Engr 114 is now available for community use at the CCAT at Cal Poly Humboldt.
More information
[edit | edit source]This project was featured in the Community Wheel of HSU Green Wheels in Fall 2006.
For another heavy load option check out xtracycles. Here is a great review of the Xtracycle or "Sport Utility Bicycle (S.U.B.)" from Riding the Spine.
Other designs
[edit | edit source]See more at Bike trailers.
- Community Bike Cart Design - Plans for two low-cost models of bike cart. Includes a few different hitch options.
- XtraCycle - Domestic bicycle lifestyle advocates, and customized carrier options.
External links
[edit | edit source]| Authors | |
|---|---|
| License | CC-BY-SA-3.0 |
| Cite as | Aaron, Selena, Big Russ (2006–2025). "Backpack frame bike trailer". Appropedia. Retrieved June 9, 2026. |