Yurt. Humboldt County is rainy in the winter and spring, so designing to withstand weather has been a front-and-center challenge.
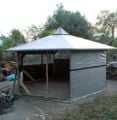
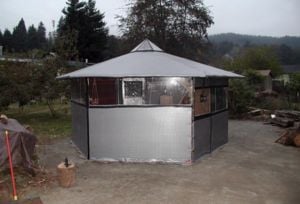
In the Fall of 2006 Russell Kramer began a project to build and live in a yurt in a neighborhood known as Sunny Brae of Arcata, CA. Low materials usage, low cost, excellent feng shui, and outer space withstand-ability were primary goals. Humboldt County is rainy in the winter and spring, so designing to withstand weather has been a front-and-center challenge.
Aaron Antrim also lent an occasional hand in this project, mainly as an editor and wikitext consultant for this Appropedia article. He's also been the butt-end of some (hopefully good-natured) ribbing (see below). Whenever this article speaks in the first person, though, that's Russell.
Dimensions[edit | edit source]
- Wall length = 7'
- Wall height = 6' 3"
- Big Russ height = 6' 3"
- Rafter Length = 9'
- Eve overhang = 1.5'
- Apex height = 8.5'
- Vertex to vertex diameter = 14'
- Wall to wall diameter = 12.5'
- Door Width = 32"
- 2 South windows = 7' × 2.5'
- Northeast Window = 51" × 2.5'
- Door Window = 21" × 24"
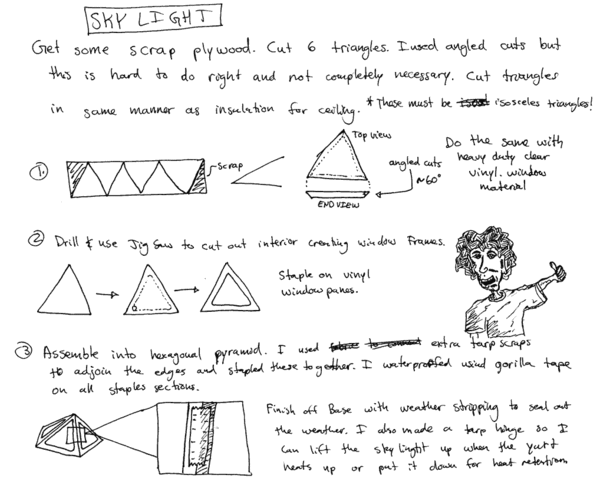
- Skylight max diameter (hexagon) = 32"
Tools[edit | edit source]
- Circular Saw
- Folding Hand Saw
- Power Drill
- Gromett Tool
- Square
- Snap Line for marking lumber
- Jim Dandy Plum Bob (Just Joking, this is an actual tool name though)
- Titanium Drill Bits
- Siccors
- Half a Brain
- Staple Gun
- Ladder
Materials and Costs[edit | edit source]
- Labor
- Certified Ape Man: rents for $15/hr. Discounts for Brogans.
- Heavy Duty Ace Tarp 20' × 30' ~$54
- Roll insulation same area as surface area of walls and ceiling. ~$130
- Wood:
- 2" lumber: One 9' long ripped lengthwise into 2 × 2's for rafters. More to add.....
- Small poles: Pressure treated tree support poles, young eucalyptus and alder. Cleaned with a machete and cut to length.
- Decking: I got lucky on this one, got a free kayak to get rid of recycled plastic lumber a friend had lying around. You calculate the amount.
- 3/4" steel conduit hammered flat, drilled and riveted to make brackets. *Note: Not economical but did divert waste, it took me all day to make the brackets, I could have bought them and worked for the money and had some left over. Building brackets built character though as well as gave me back pains blisters and metal shrapnel in my eye....wear safety glasses! Free in dumpster
- Hardware
- Rafter brackets, eye bolt, washers, nuts, hooks and who knows what else. Surprisingly expensive ~$90
- Lots of screws, staples, and Gorilla tape. $30-$40
- Plywood to make Skylight. Free
- Rope $10
Materials sources[edit | edit source]
For just about anything you might want, need it or not! These resources below and their contact info is on the Humboldt CA supplies page. Check it out for some more Humboldt County supplies resources.
- Note this is an e-mail list so beware. Set up filters or your inbox will fill up daily. This is an excellent resource to get rid of or acquire free stuff!
- Check often as this place is picked through a lot. I got 9 rafters worth of 2" × 6" lumber for $6!
Metal Stuff
- Local institutional dumpsters
- It is well known by fellow dumpster divers around the country that the dumpsters our capitalist system promotes also provide in a big way. I won't go into the specific ones to hit up, but I did divert a fair amount from the waste stream: old insulation, clear vinyl and metal for my brackets.
- Arcata Scrap and Salvage
- Awesome Place on South "G" Street across from the marsh interpretive center (contact info on Humboldt CA supplies page). Bonnie, the owner, is super nice. This is were I got materials for my wood burning stove …project to be posted soon on this site.
Construction[edit | edit source]
Framing[edit | edit source]
Table of Materials
| Material | Quantity | Dimensions | Purpose |
|---|---|---|---|
| 2×2 or poles | 12 | 7' long | Horizontal Wall Framing |
| 6 | 6'3" long | Vertical Wall Framing | |
| 6 | 9' long | Rafters | |
| 6 | "To be updated" | Eve Cross Pieces | |
| 6 | Scraps From Eves | Rafter Struts | |
| Scrap plywood | Whatever it takes | Random | Cross bracing |
Lumber
The frame was made with 2×2's ripped from a few 2×12's. This was much cheaper than buying separate 2×2's. It is also easy to find used 2× lumber that has been used for cement forms and such. I also used some Alder and Eucalyptus saplings (free via midnight mish) obtained from an overcrowded grove.
Brackets
The brackets were made by pounding 3/4" steel conduit flat, drilling it and pop-riveting the pieces together to form 12 T's. The seven foot lengths were laid out in a hexagon and brackets used to connect them. The 6'3" lengths were screwed onto the protruding leg of the bracket in a vertical position. The remaining 7' lengths were fastened in a hexagon connecting all the vertical wall pieces.


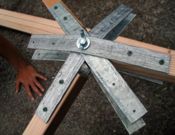
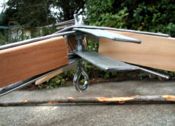
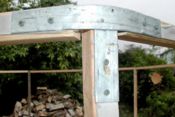
Roof-raising
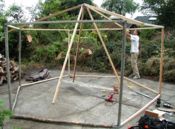
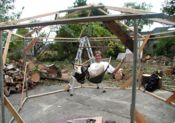
Three rafters were attached to the top layer of the apex bracket only (see "Top view of roof apex bracket" figure above). The remaining rafters were used to support the apex while I screwed them the the vertices of the structure (Aaron wasn't much help, although he's a great supervisor. Russ, buddy, you better make sure this page is on your watchlist, because I will strike back when you least expect it!--Aaron 22:44, 26 November 2006 (PST)). I gave them 1.5' of overhang from the walls to create an eve. Once they were in place I screwed in the bottom portion of the apex bracket. Then I attached the remaining three rafters in the same manner. This forces the structure into a perfect hexagon and can support a substantial amount of weight (see below). Cutting the eve pieces to connect them to the ends of the rafters was more easily said than done. It required funky angled cuts to achieve a snug fit with the rafters. I found the best tool for this was a folding hand saw. I used the scraps from this to incorporate parallel pieces about 3.5' from the roof apex.
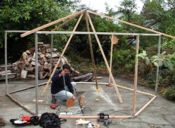
Cross-bracing, doors and windows
Next, I screwed in the cross-bracing on the corners of the walls for added strength. The last thing that needed to be done was framing the doors and windows. I cut wood poles to length where I wanted them and attached them using "T" brackets.
Done!
The assembly goes quickly once all the materials are gathered and prepared. Making the brackets, however, took a whole day of poundage with an 8lb. sledge and was no easy feat. It would be more economical to buy the brackets (if you have a job and hadn't dumpstered free steel conduit).

Covering[edit | edit source]
Covering was probably the most difficult part of the process because it required some forethought as to where and how large to make widows, doors, etc. and still use the material in the most efficient manner. After looking into different options I decided the cheapest (albeit not the best) material was heavy-duty duct tape-colored tarps at Ace Hardware. I purchased a 20' × 30' tarp and this covered most of the structure. I would inquire around some more if you have time. The sky was looking ominous and I wanted a house with rain protection quickly. I've seen canvas offered up on Freecycle.
Considerations:
- Roof seams
- Door and Window Placement/Dimensions
- Skylight Dimensions
Roof
After looking at way too many of other people's roof designs and even building a miniature model I decided on my own creation. I wanted a roof that was all one piece, hence seamless(=rainproof) and it had to be tight fitting so rain wouldn't puddle. This was achieved by cutting out a 20' diameter circle and punching a hole in the very center for the bolt of the apex bracket to fit into. Then I wrestled the beast onto the structure and inserted the bolt into the hole I punched. I then proceeded to staple (use stainless steel staples) the tarp to the vertices. I would pull the tarp tight against the bolt and away from the last vertex to eliminate lateral and vertical slack. I continued around the whole structure, in essence making a cone, until I reached the starting point and had an extra fold of tarp (from all the slack being pulled out elsewhere). I folded this over tightly and marked it so I would know where the fold was when I took it back off to tape (inside and out) the fold closed. I then cut out a hole for my skylight (~3' diam hexagon) and pulled the tarp back off. The fold was taped as well as the border of the skylight with Gorilla tape (like duct tape but much stronger). I also put in 12 grommets along the circumference of the skylight to further tighten the roof cover with rope once it was stapled on. Again I wrestled the tarp back on (it truly is wrestling), stapling it tightly in place. Then I installed hooks on the top side of the rafters and used rope threaded through the grommets and the hooks to tighten the tarp upwards against the eves. Voilá! Done… with the roof that is. I actually also grommeted each vertex pt. on the eve and tightened down in the same manner as the skylight opening, hooks and all.
-
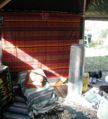
Interior before insulation installation
-
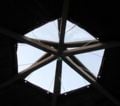
Skylight from inside
-
Shot right before last wall was added, skylight from outside
-
Nice sky after a long day of building
Walls
I wanted at least two solid walls for warmth and the rest for doors and windows — straight forward enough. Use two pieces of tarp cut to size for each wall with a little bit of shingled overlap. Fold over the vertical (doubling or tripling the thickness) edges and liberally apply staples along its length, attaching it to the frame. With more foresight I would have made more continuous, hence stronger walls that included more than one wall section per tarp piece. I compensated by grommeting two places along the top edge of every bottom piece of each wall and used string attached to hooks to pull it tightly upwards (the truckers hitch is handy to know for this). For the two large windowed walls I used a 4' high strip of tarp for the bottom piece. This is good because insulation comes in multiples of 2'. The basic concept is to make the walls tight fitting by stapling and tightening with string, then cover the seams of each corner with Gorilla tape for water resistance and aesthetics.
Windows
Doors
Skylight[edit | edit source]
Door[edit | edit source]
-
Close-up of to-be-improved door closure system. Washers threaded onto door with rope.
-
These are slipped over a screw head, a bungee cord theoretically pulls all washers tight
-
Back door zoomed out
Insulating[edit | edit source]
This is fairly straight forward. Use a staple gun to hang insulating material that is cut to size. This is especially easy where the walls are only 4' high underneath the windows because the insulation comes in a 4' wide roll. One thing I did was leave an air gap between the insulation and the wall. I also hung sheets and tapestries for added barriers to the cold and to cover up the space-age looking insulation.
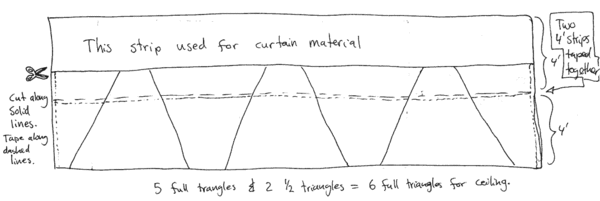
Insulating the ceiling took a little more forethought. At first I was going to use the same method as I used cutting out the roof material. This would entail laying out enough insulation in strips and taping them together so that I could cut out a 20' diameter circle. Then I thought of an even better solution that creates much less waste (< 1 square foot). The roof is comprised of triangles. If you take a set of triangles (in this case 6), any isosceles triangles will do, and flip alternating ones over you'll get a parallelogram. Cut a right triangle off of either end, flip it over, place it on the other end and you've got a perfect rectangle. I started with a perfect rectangle, so just repeat the process in reverse! The 4' wide sheet of insulation was not enough so I laid down two strips, taped them together and cut the triangles out of this. If this sounds complicated don't be alarmed: see diagram below. Also, these were not full triangles because the skylight negated the need for the top portion of each triangle. Therefore an approx. 26" strip was removed from the whole length. Luckily for me this material was the perfect amount I needed to make curtains for my two largest windows.
-
Interior wall hangings pulled back to reveal insulation. Blue foam is diverted institutional waste, roll insulation I picked up at ace. ~$90 for a 4'X 100' roll.
-
Aaron helping cut out wedges to insulate ceiling with.
-
Insulated ceiling
-
Full extend of scrap material after ceiling insulation procedure.
-
Roll of insulation and inner wall hanging after insulation of wall.
Interior Amenities[edit | edit source]
Thermal Curtains[edit | edit source]
- Contact your local seamstress
- Use old sheets to cover insulation material
- Add a batten along the bottom
- Design and opening and closing system
Pics to come...
Wood Stove Installation[edit | edit source]
See "Stove Installation" section of Shelter Systems' Manual for Domes and Structures
Many pics to come.....
Final Pics[edit | edit source]

Problems and Suggestions[edit | edit source]
Door Closure:
Time consuming and drafty. Air gaps are present between washers.
Potential Solution: Glue on velcro allows closure from in and outside. Hang mexican blanket for additional warmth.

