
The purpose of this project is to create an edible railing that will be built on the WetLand barge. The Food on Deck team created a prototype and design for the railing that will be replicated in Philadelphia, Pennsylvania. Team Food on Deck has been brought together through the Cal Poly Humboldt class, Engineering 215 - Introduction to Design, taught by Lonny Grafman.
Background[edit | edit source]
In the summer of 2014, an island-based ecosystem and mobile habitat, also known as, Wetland will be launched on the Delaware River in Philadelphia. Wetland is founded by a New York City-based artist named Mary Mattingly. Wetland will promote art, community, sustainable living, and environmental technology. The Wetland barge will provide a short-term home for artists, and a venue for educational events. One of the goals of Wetland is to showcase a model for interdependent living where resources are decentralized. This will be achieved by having a percentage of food being grown locally, having power generated by the sun, and the gathering, purification, and storage of water on site.
Objective and Criteria[edit | edit source]
The objective of the edible railing design is to create a safe perimeter for the barge that also serves as a food source. The railing will provide a percentage of the caloric intake for the three to five people that will be living on the barge. The railing will be constructed mainly of waste stream materials. The table below shows the criteria created by Team Food on Deck in collaboration with the WetLand creators. These criteria were weighted to help choose a design that best fit the client's needs.
Criteria[edit | edit source]
| Criteria | Importance | Constraints |
|---|---|---|
| Safety | 10 | The railing must be built to Code of Federal Regulation specifications. |
| Durability | 9 | The railing must last a least three months. |
| Produce Production | 9 | The railing must provide at least 25% of the food for three people per day. |
| Ease of Replication | 9 | The design must be simple enough to be replicated by a high school graduate. |
| Cost | 8 | The model of the railing must not cost more than $100 per 8-foot section. |
| Environmental Justice | 7 | Building materials must be from the Humboldt County, CA waste stream. |
| Plant Locality | 6 | Plants must be able to grow in Philadelphia, Pennsylvania. |
| Ease of Maintenance | 6 | The railing must be designed so maintenance will only take 30 minutes a day for three people. |
| Level of Water Conservation | 5 | The railing must only use 10% of the provided desalinated water. |
| Educational Value | 4 | The literature must be accessible to a fourth grader |
| Ascetically Pleasing | 4 | The railing must be a mix of organic and synthetic material |
Description of Final Design[edit | edit source]
The following sections contain the specifications and details for one 8-foot section of the edible railing structure. When applied to the barge, this 8-foot template will be repeated in fifteen sections to cover the 140-foot perimeter. These sections include a description of the materials, costs, and implementation instructions.
Materials and Our Costs[edit | edit source]
The following table lists the materials used to build the attachments for the railing.
| Image | Description | Quantity per 8-foot Section | Quantity for Whole Railing | Price per Quantity | Price per 8-foot Section | Price for Whole Railing | Place Bought |
|---|---|---|---|---|---|---|---|
 |
Small Plastic Nutrient Solution Containers | 10 | 135 | Donated | $0.00 | $0.00 | Water Planet |
 |
Large Plastic Nutrient Solution Containers | 4 | 60 | Donated | $0.00 | $0.00 | Water Planet |
 |
Zip Ties | 36 | 540 | $15.00/100 | $15.00 | $90.00 | Ace Hardware |
 |
Sandpaper | 1 | 15 | $5/3 pack | $5.00 | $75.00 | Ace Hardware |
 |
Trellis | 2 ft | 30 ft | Donated | $0.00 | $0.00 | Michael Otten |
 |
1/2 inch Hose | 3.7 feet | 55.5 feet | $0.13/1 foot | $0.48 | $7.22 | Miller Farms Nursery |
 |
1/4 inch Hose | 18.8 feet | 282 feet | $0.07/1 foot | $1.32 | $19.74 | Miller Farms Nursery |
 |
1/2 inch 90 Degree Connector | 1 | 15 | $1.00/1 | $1.00 | $15.00 | Miller Farms Nursery |
 |
1/2 inch T Connector | 2 | 30 | $1.00/1 | $2.00 | $30.00 | Miller Farms Nursery |
 |
Large Ball Valve with Hose Thread to Pipe Thread Converter and Valve to Pipe Thread Converter | 1 | 15 | $5.70/1 | $5.70 | $85.50 | Miller Farms Nursery |
 |
Small Ball Valve | 3 | 45 | $2.60/1 | $7.80 | $117.00 | Miller Farms Nursery |
 |
1/2 inch Connector with Thread | 3 | 45 | $2.00/1 | $6.00 | $90.00 | Miller Farms Nursery |
 |
1/4 inch Converter with Thread | 3 | 45 | $0.10/1 | $0.30 | $4.50 | Miller Farms Nursery |
 |
1/4 inch T Connectors | 13 | 195 | $0.10/1 | $1.30 | $4.50 | Miller Farms Nursery |
 |
1/4 inch End Plugs | 3 | 45 | $0.10/1 | $0.30 | $4.50 | Miller Farms Nursery |
 |
Weed Mat | 7.5 square feet | 112.5 square feet | $40/150 square feet | $2.00 | $30.00 | Miller Farms Nursery |
 |
Volcanic Rock | 14 inches | 210 inches | Donated | $0.00 | $0.00 | A Fertile World |
 |
Coconut Fiber | 1.5 cubic feet | 22.5 cubic feet | Donated | $0.00 | $0.00 | A Fertile World |
 |
Fox Farm's Ocean Forest Potting Soil | 1.5 cubic feet | 22.5 cubic feet | $13.00/1.5 cubic feet | $13.00 | $260.00 | Ace Hardware |
| Total | $61.20 | $782.96 | |||||
Plant Selection[edit | edit source]
The following table lists the recommended plants to be planted in each type of container on the edible railing.
| Plant | Container Type | Quantity of Seeds Per Container | Quantity of Transplants per Container |
|---|---|---|---|
| Lettuce | Small | 6-8 | N/A |
| Spinach | Small | 6-8 | N/A |
| Strawberries | Small | N/A | 1 |
| Radishes | Small | 10-12 | N/A |
| Carrots | Small | 10-12 | N/A |
| Potatoes | Large | 4 pieces | N/A |
| Peppers | Large | 1 to 5 | 1 |
| Tomatoes | Large | 1-5 | 1 |
| Beans | Trellis | 6 | 2-3 |
| Peas | Trellis | 6 | 2-3 |
| Cucumbers | 1-5 | 6 | 1 |
DIY[edit | edit source]
The following is a series of steps on how to build the attachments for an edible railing.

Small plastic containers[edit | edit source]

Cut the tops off all containers approximately 7.5 inches from the top of the container.

Thoroughly clean the inside and outside of the containers. Remove any labels.

Use sandpaper to smooth the rough edge where the top was cut off.

Drill 4 holes in the back of the containers. The 2 top holes should be 1-inch from the top and 1-inch from the side. The bottom holes should be 1 inch below the top holes. A 1/4 inch drill bit should be used for these holes.

Drill 2 holes in either side of the container 1-inch from the top of the container and 1-inch from the backside of the container. A 1/4 inch drill bit should be used for these holes.

Drill 2 holes in the front bottom of the containers, approximately 1 inch from the front and 3 inches from the side. A 1/4 inch drill bit should be used for these holes.

Thread 2 zip ties through the holes in the back of the containers.

Attach the containers to the railing by wrapping the zip ties around the metal crossbars. Space the containers according the above Figure. Make sure to tighten the zip ties as tight as possible.
Large Plastic Containers[edit | edit source]
| Step | Description | Picture |
|---|---|---|
| 1 | Cut the tops off all containers approximately 14 inches from the bottom of the container. |  |
| 2 | Thoroughly clean the inside and outside of the containers. Remove any labels. | |
| 3 | Use sand paper to smooth the rough edge where the top was cut off. | |
| 4 | Drill 4 holes in the back of the containers. The 2 top holes should be 7 inches from the bottom and 1.5 inches from the side. The bottom holes should be 1 inch below the top holes. A 1/4 inch drill bit should be used for these holes. |  |
| 5 | Drill 2 holes in either side of the container 1-inch from the top of the container and 1-inch from the backside of the container. A 1/4 inch drill bit should be used for these holes. |  |
| 6 | Drill 2 holes in the front bottom of the containers, approximately 1 inch from the front and 3 inches from the side. A 1/4 inch drill bit should be used for these holes. |  |
| 7 | Thread 2 zip ties through the holes in the back of the containers. |  |
| 8 | Attach the containers to the railing by wrapping the zip ties around the metal crossbars. Space the containers according the above Figure. Make sure to tighten the zip ties as tight as possible. |  |
Trellis[edit | edit source]
| Step | Description | Picture |
|---|---|---|
| 1 | Cut the wire fencing into two 12-inch by 36-inch sections |  |
| 2 | Place each trellis section into the large containers. |  |
| 3 | Attach each trellis to the railing by wrapping zip ties around the wire and crossbar. Each trellis should be attached to the top 3 crossbars in 3 places. |  |
Soil[edit | edit source]
| Step | Description | Picture |
|---|---|---|
| 1 | Cut the weed mat into 9, 7.5 by 8.5 pieces and 8, 9 by 12 pieces. | |
| 2 | Place each 7.5 by 8.5 piece into the bottom of each of the small containers. |  |
| 3 | Place 9 by 12 inch pieces of weed mat into the bottom and back of each large container. |  |
| 4 | Place approximately 1-inch of volcanic rock on top of the weed mat inside of each container. |  |
| 5 | In a large bucket or other container, mix the bag of Fox Farm's Ocean Forest Potting Soil with the bag of coconut fiber. | |
| 6 | Fill each container up to 1-inch of the top with the soil mixture. |  |
Plants[edit | edit source]
The following table lists the recommended plants to be planted in each type of container and how they should be planted.
| Plant | Container Type | Planting Seeds | Planting Transplants |
|---|---|---|---|
| Lettuce[1] | Small | Plant seeds 1/4 to 1/2 inch deep | N/A |
| Spinach[2] | Small | Plant seeds 1/2 inch deep | N/A |
| Strawberries[3] | Small | N/A | Plant deep enough to cover the roots with soil and so the bottom of the "crown" is level with the top of the soil |
| Radishes[4] | Small | Plant seeds 1/4 to 1/2 inch deep | N/A |
| Carrots[5] | Small | Plant seeds 1/4 to 1/2 inch deep | N/A |
| Potatoes[6] | Large | Plant potato pieces 1 to 3 inches deep | N/A |
| Peppers[7] | Large | Plant seeds 1/4 to 1/2 inches deep. | Plant deep enough so the top of the root ball is level with the top of the soil. |
| Tomatoes[8] | Large | Plant seeds 1/4 to 1/2 inch deep. | Place in the soil covering the roots and stem up to the first set of leaves |
| Beans[9] | Trellis | Plant seeds 1 inch deep | Plant just deep enough to cover the roots with soil. |
| Peas[10] | Trellis | Plant seeds 1 to 1 and 1/2 inches deep | Plant just deep enough to cover the roots with soil. |
| Cucumbers[11] | Trellis | Plant seeds 1/2 to 1 inch deep | Plant just deep enough to cover the roots with soil. |
Reservoir Cage[edit | edit source]
| Step | Description |
|---|---|
| 1 | Cut 1-inch,square, steel conduit into: (A) four, 27-inch pieces; (B) four, 11-inch pieces; (C) six, 13-inch pieces; and (D) six, 6-inch pieces. |
| 2 | Weld each section together as shown in the Figures below. |
| 3 | Align the 1-inch space at the base of the water reservoir cage with the top crossbar of the barge railing and weld together. |
- Reservoir Cage Instruction Diagrams
-
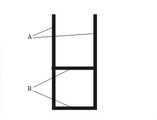
Front View of the Reservoir Cage
-
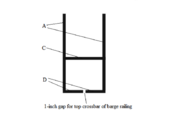
Side View of the Reservoir Cage
-
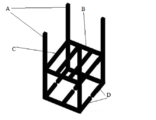
Top View of the Reservoir Cage
-
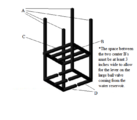
Complete View of the Reservoir Cage


Irrigation System[edit | edit source]
| Step | Description | Picture |
|---|---|---|
| 1 | Connect the large ball valve with attached hose thread to pipe thread converter and valve to pipe thread converter. |  |
| 2 | Connect the ½ inch connector with thread and ½ inch cap with thread converter to the hose thread to pipe thread converter. |  |
| 3 | Attach 3.25 inches of ½ inch tubing to the cap converter. |  |
| 4 | Attach a ½ inch T connector to the ½ inch tubing. |  |
| 5 | Attach 10 inches of ½ inch tubing to the bottom half of the first T connector. |  |
| 6 | Attach 3.5 inches of ½ inch tubing to the horizontal part of the T connector. |  |
| 7 | Attach one of the small ball valves to the 3.5 inches of ½ inch tubing. |  |
| 8 | Attach 3.5 inches of the ½ inch tubing to the other side of the small ball valve. |  |
| 9 | Attach the ½ inch connector with thread to the ½ inch tubing. |  |
| 10 | Attach the ¼ inch converter with thread to the threaded end of the ½ inch connector. |  |
| 11 | Attach X inches of ¼ inch tubing to the ¼ inch converter. |  |
| 12 | Thread the ¼ inch tubing through the side holes of each container. |  |
| 13 | Attach a ¼ inch end plug to the end of the ¼ inch tubing. |  |
| 14 | In the center of each container cut the ¼ inch tubing and attach a ¼ inch T connecter. |  |
| 15 | Attach the second ½ inch T connector to the 10 inches of ½ inch tubing that is attached to the first ½ inch T connector. |  |
| 16 | Repeat steps 6-14. | |
| 17 | Attach 10 inches of ½ inch tubing to the bottom of the second ½ inch T connector. |  |
| 18 | Attach the ½ inch 90 degree to the 10 inch of ½ inch tubing. |  |
| 19 | Attach 3.5 inches of ½ inch tubing to the horizontal end of the 90 degree connector. | |
| 20 | Repeat steps 6-14. | |
| 21 | On the front side of the reservoir tank write the following in permanent marker:
Watering Instructions: 1. Fill reservoir tank (approximately every other day or when empty) DAILY 2. Turn on the large ball valve 3. Turn on the first small ball valve; leave on for approximately 3 minutes 4. Turn off the first small ball valve 5. Turn on the second small ball valve; leave on for approximately 3 minutes 6. Turn off the second ball valve 7. Turn on the third small ball valve; leave on for approximately 3 minutes 8. Turn off the large ball valve 9. Turn off the third small ball valve |
Maintenance Guidelines[edit | edit source]
The maintenance of Life Support involves caring for the plants and checking that various components of the attachments are working properly. At least three people living on the barge are responsible for the maintenance of Life Support. The Table below lists the tasks to be performed to maintain Life Support, the frequency these tasks should be performed, and the cost in minutes to perform these tasks. The total time spent on maintenance per month is estimated to be 7 hours per person. The total time spent on maintenance per week is estimated to be 1 hour and 45 minutes per person. Full descriptions of the maintenance tasks are provides in the following sections.
| Task | Frequency | Cost (minutes) |
|---|---|---|
| Water plants | Once per day | 20 |
| Check that each plant is getting watered. | Twice per week | 15 |
| Check that all zip ties are as tight as possible. | Once per week | 15 |
| Remove any weeds and dead foliage from containers. | Once per week | 15 |
| Harvest Produce | Once per day | 10 |
| Replace any missing soil in the containers | Once per month | 30 |
Containers[edit | edit source]
Once per week, check that the zip ties connecting the containers to the railing are as tight as possible.
Irrigation System[edit | edit source]
The amount of water Life Support should receive is highly variable. The variables controlling the amount of water that should be supplied to each plant are climate conditions, season, type of plant, and location. Therefore the following guideline is a general recommendation for irrigating Life Support.
Once every other day, fill each reservoir. Before filling make sure the big ball valve and all three small ball valves are turned off (the tab is perpendicular to the pipe). Once the reservoir is filled, open the main ball valve. Open the first small ball valve. Leave this first valve open for approximately 3 minutes. After approximately 3 minutes, close the first small ball valve and open the second small ball valve. Leave the second valve open for approximately 3 minutes. After approximately 3 minutes close the second small ball valve and open the third small ball valve. Leave the third valve open for approximately 3 minutes. After approximately 3 minutes close the large ball valve. After approximately 3 minutes close the third small ball valve. Closing the large ball valve first allows any water stored in the tubing to drain out through the third line.
Check each container to make sure water is draining from each 0.25 inch T connector.
Plants[edit | edit source]
Once per week, or more often as necessary, remove any weeds and dead foliage from the containers.
Once per day, check each plant for ripe produce.
Results[edit | edit source]
The edible railing is successful in providing a safe food source for the people living on the WetLand barge.
Life Support was displayed outdoors for a period of two weeks and was watered in the technique described in the Maintenance Guidelines Section. The plants in the containers are growing and are anticipated to yield food as planned. All of the zip ties are tight and the containers have remained stable. All components of the irrigation system have operated properly.
Crop yields are highly variable, dependent upon the variety of plant selected, growing conditions, and the amount of maintenance each plant receives. For the recommended varieties of plants, estimated crop yield over the summer growing season, per plant, is as follows:
| Plant | Yield |
|---|---|
| Carrots | 6 to 10 carrots |
| Radishes | 6 to 12 radishes |
| Lettuce | 0.5 pounds to 1 pound |
| Spinach | 0.5 pounds to 1 pound |
| Potatoes | 1.5 pounds |
| Tomatoes | 0.75 pounds to 2 pounds |
| Peppers | 0.5 pounds |
| Beans | 0.3 pounds to 0.5 pounds |
| Peas | 0.3 pounds to 0.5 pounds |
| Cucumbers | 10-15 cucumbers |
| Strawberries | 0.5 pounds to 1 pound |
Design Costs[edit | edit source]
The design cost measured in hours, shown in the Figure below, displays the hours spent on each step of the design process. The estimated time to replicate one 8-foot section of Life Support is 8 hours for 4 people. This is based on the time Team Food On Deck projects that a high school graduate could replicate one 8 foot section using detailed instructions.

Troubleshooting[edit | edit source]
Plastic Containers[edit | edit source]
If the containers are sagging: either tighten the zip ties or replace the zip ties.
Plants[edit | edit source]
Some common problems that you may be able to correct are as follows.
Lettuce[edit | edit source]
If you see tiny colonies of aphids on the underside of leaves:
- Rinse them off with water.
- Consider introducing ladybugs which are a natural predator of aphids.[12]
If the edges of the leaves start to turn brown and"die back":
- This is known as tipburn.
- Clip off the brown part of the leaves.
- Water lighter and more frequently.[13]
If lettuce tastes bitter:
- Due to the hot weather, seedstalks begin to form.
- Wash and store lettuce in the refrigerator for a day or two.
- The bitterness should disappear.[14]
If you see yellow patches on leaves:
- The lettuce may have downy mildew.[15]
- Remove affected leaves.
- Add extra drainage holes.
Spinach[edit | edit source]
If you see yellow patches on leaves:
- The lettuce may have downy mildew.[16]
- Remove affected leaves.
- Add extra drainage holes.
Carrots[edit | edit source]
If the crown of the root (carrots) are turning green:.
- This condition is called sunburning.
- Cut away the green part and use the rest.
- Add soil to the container, taking care to cover the roots (carrots) well.[17]
If the carrots taste dry:
- Remove the green tops before storing.
- The greenery robs the carrots of moisture and nutrients.[18]
Strawberries[edit | edit source]
If you see a white or gray powdery coating on any part of the plant:
- The plant likely has powdery mildew.
- If it is only affecting a few leaves or fruit, remove the affected parts.
- If the powdery mildew is widespread, talk to your local gardener about how to apply sulfur.[19]
- Adjust the location of the irrigation tube so water does not get directly applied to the leaves. You may have to remove the container and drill a new set of holes for the irrigation tube, then reattach the container.
If you see tiny colonies of aphids on the underside of leaves:
- Rinse them off with water.
- Consider introducing ladybugs which are a natural predator of aphids.[20]
If leaves develop a fine speckling, later turning bronze:
- This is caused by an infestation of red spider mites.
- Discard badly infected plants.
- Consider introducing Phytoseiulus persimilis, a predatory mite.
- Talk to your local gardener about applying a canola oil spray to the plants.[21]
If birds are eating the strawberries:
- Harvest them earlier.
- Consider hanging old, discarded CDs on the railing to deter birds.
Radishes[edit | edit source]
If radishes are cracked or split:
- They are old.
- Harvest when they are younger and smaller.
- Check irrigation system to make sure it is operating properly. (A flush of moisture after a period of dryness, may cause roots to burst and split.)
If radishes taste too "hot":
- They are old or have taken too long to grow.
- Harvest when they are younger and smaller.[22]
Potatoes[edit | edit source]
If potatoes have green skin:
- Peel off the green skin and eat the rest.
- They were exposed to sunlight.[23]
- Add soil to cover potatoes deeper.
If potatoes have scabby spots of corky tissue on the skin:
- This is caused by potato scab.
- Peel the spots off plus some of the potato if affected.[24]
- Add more coconut fiber to the soil to retain more moisture.
Peppers[edit | edit source]
If you see tiny colonies of aphids on the underside of leaves:
- Rinse them off with water.
- Consider introducing ladybugs which are a natural predator of aphids.
If you see sticky "honeydew" on lower leaves and fruit:
- There are large colonies of aphids.
- Ask your local gardener for a recommended organic insecticide.[25]
Tomatoes[edit | edit source]
If the blossom end of tomatoes becomes dry, leathery, and brown:
- This condition is called blossom end rot.
- Remove the affected tomatoes.
- Apply foliar calcium spray.
- Make sure the irrigation tube is in the correct place, to distribute water evenly.[26]
If the leaves are yellowing or wilting:
- This may be a sign of verticillium or fusarium wilt.[27]
- If the damage is not severe, mound soil around the plant.[28]
Beans[edit | edit source]
If there are fuzzy, bright yellow insects on the plants:
- These are the larvae of the Mexican bean beetle.[29]
- Remove the larvae and beetles by hand, daily.
- Consider introducing spined soldier bugs, a natural predator.
- Consider introducing parasitic wasps, a natural predator.[30]
Peas[edit | edit source]
If the leaves are yellowing or wilting:
- This may be a sign of verticillium or fusarium wilt.[31]
- If the damage is not severe, mound soil around the plant.[32]
Cucumbers[edit | edit source]
If you see tiny colonies of aphids on the underside of leaves:
- Rinse them off with water.
- Consider introducing ladybugs which are a natural predator of aphids.[33]
If you see holes in leaves, chewed blossoms, or scars on stems and cucumbers:
- This is caused by cucumber beetles.[34]
- Apply parasitic nematodes to the soil weekly to control larvae.[35]
Irrigation System[edit | edit source]
If water is not draining from the ¼ inch T connectors: make sure the T is not clogged with soil and there are no kinks in the tubing.
If the reservoir container does not contain a hose thread in the opening: purchase a thread insert to insert into the hole.
Video[edit | edit source]
Downloads[edit | edit source]
Suggestions for Alternative Designs[edit | edit source]
The irrigation may be modified to eliminate the use of three separate rows that all require ball valves. This could be accomplished by extending the tubing along the first row, then wrapping the tubing down to the second row, and then to the third, in a 'zig-zag' like manner. This method of irrigation should be tested to ensure all plants are watered evenly before the system is used extensively.
The plastic nutrient solution containers could be substituted for other 'soil safe' recycled containers.
The plant recommendations are very general guidelines. Many other plants and varieties can be substituted for these plants.
Authors[edit | edit source]

Left to right: Gavin Zirkel, Heidi Otten, Rebecca Denny, and Joseph Trejo
References[edit | edit source]
- ↑ http://urbanext.illinois.edu/veggies/lettuce.cfm
- ↑ http://urbanext.illinois.edu/veggies/spinach.cfm
- ↑ http://urbanext.illinois.edu/strawberries/
- ↑ http://urbanext.illinois.edu/veggies/radish.cfm
- ↑ http://urbanext.illinois.edu/veggies/carrot.cfm
- ↑ http://urbanext.illinois.edu/veggies/potato.cfm
- ↑ http://urbanext.illinois.edu/veggies/peppers.cfm
- ↑ http://urbanext.illinois.edu/veggies/tomato.cfm
- ↑ http://urbanext.illinois.edu/veggies/beans.cfm
- ↑ http://urbanext.illinois.edu/veggies/peas.cfm
- ↑ http://urbanext.illinois.edu/veggies/cucumber.cfm
- ↑ http://urbanext.illinois.edu/veggies/lettuce.cfm
- ↑ http://urbanext.illinois.edu/veggies/lettuce.cfm
- ↑ http://urbanext.illinois.edu/veggies/lettuce.cfm
- ↑ ISBN-13:978-0-7566-0932-0
- ↑ ISBN-13:978-0-7566-0932-0
- ↑ http://urbanext.illinois.edu/veggies/carrot.cfm
- ↑ http://urbanext.illinois.edu/veggies/carrot.cfm
- ↑ ISBN-13:978-0-7566-0932-0
- ↑ http://urbanext.illinois.edu/strawberries/
- ↑ ISBN-13:978-0-7566-0932-0
- ↑ http://urbanext.illinois.edu/veggies/radish.cfm
- ↑ http://urbanext.illinois.edu/veggies/potato.cfm
- ↑ ISBN-13:978-0-7566-0932-0
- ↑ http://urbanext.illinois.edu/veggies/peppers.cfm
- ↑ http://urbanext.illinois.edu/veggies/tomato.cfm
- ↑ http://urbanext.illinois.edu/veggies/tomato.cfm
- ↑ ISBN-13:978-0-7566-0932-0
- ↑ http://urbanext.illinois.edu/veggies/beans.cfm
- ↑ ISBN-13:978-0-7566-0932-0
- ↑ http://urbanext.illinois.edu/veggies/peas.cfm
- ↑ ISBN-13:978-0-7566-0932-0
- ↑ http://urbanext.illinois.edu/veggies/cucumber.cfm
- ↑ http://urbanext.illinois.edu/veggies/cucumber.cfm
- ↑ ISBN-13:978-0-7566-0932-0