
Another CCAT project brought to you by an HSU student. The Campus Center for Appropriate Technology (CCAT) at Cal Poly Humboldt was in the process of reconstruction for several years (2004-2007). With reconstruction drawing to an end and plans for moving back into the new old Buck House finalizing, many efforts at finishing touches have begun.
The downstairs of CCAT will be a completely public space, with an ADA accessible bathroom, office space, a possible art gallery, living space, a composting room, a mechanical room, and access to the future attached greenhouse. The floor downstairs was bare concrete, poured by Beacom Construction earlier in the construction process, with a radiant heat system. The need to make the floor beautiful and durable was expressed, with natural and non-toxic methodology preferred. Jess H, late in the Spring 2007 semester, took this on as her Engr305 project, convinced that it is possible to adapt the not-so-eco-friendly concrete floor to something that demonstrates using natural elements and compromise between conventional and non-conventional construction.
What you're about to read...[edit | edit source]
Looking for a natural stain, I found the answer deep in cyberspace, in a woman's personal account of staining her own floor with iron sulfate, having read about it in a natural building document. Another fellow, using her guidelines, stained his floor as well and created a similar webpage. These accounts were my bible and only source of information, besides the back of the box of iron sulfate which read "IRON WILL STAIN...sweep concrete surfaces immediately to prevent staining. Use when concrete is dry. If concrete is wet when contact occurs, staining may be impossible to prevent." YAHOO! So what you are about to read is a blend of "How to", some experimentation and my personal experience with iron sulfate. Put on yer polka dotted shoelaces, turn up the tunes and here we go.
Discovery[edit | edit source]
The difficulty in working with a concrete floor, is that unlike a wall, floors receive much wear and tear and have somewhat complicated chemical make up. Thus, any product used on concrete tends to have harsh components and some chemical composition that is not entirely eco or anthro friendly. When the search was begun for a natural concrete stain and sealant, it became apparent that the majority of solutions to our problem were manufactured by companies and individual "do-it-yourself" solutions were almost nonexistent. Creating your own reality is very rewarding, so buying stain in a can just to roll it on didn't seem like much fun, and wasn't entirely appropriate in my eyes. I resolved myself to buying natural stains from eco-companies in Iowa until I stumbled upon Cathy Moore's web page on her experience with iron sulfate as a stain for concrete. Found in nurseries, hardware and gardening stores, iron sulfate itself is used for greening plants, specifically azaleas and citrus plants, containing some percentage of iron and sulfur. The iron is an element that will soak in and permanently stain the concrete floor. Yah! Being able to stain the floor with my own concoction was very exciting. Iron sulfate is natural components (the ingredients on the box read "11% sulfate, 30% iron", and is used as a fertilizer, thus relatively eco-friendly and certainly not damaging to it's surrounding environment. Finding a sealant for the floor proved to be more difficult. The point of a sealant is to create a durable floor that will resist wear and tear- requiring some difficult, unnatural solutions. I have bought three different sealants, each a bit more eco-friendly then the other and I plan on testing all three, for durability, user friendliness and toxicity.
Implementation[edit | edit source]
The phrase "permanent stain" might hold some apprehension in it. Don't get hung up on it- just go for it! Nothing is truly permanent. And if the most horrible thing comes of the stain- you can always make a rug out of recycled cloth to cover it.:)
Supplies![edit | edit source]

- Mop
- Soap
- Scrub brush
- Broom (or two)
- Bucket
- Iron Sulfate
- I found a "Lilly Miller" brand of Iron Sulfate, coming from Oregon at the nursery in McKinleyville, with a higher concentration of iron in it then the Hi Yield Copperas recommended.
- coffee grounds, for a darker stain
- found used at any coffee shop for free.
- measuring implements
- E.g. a 2 1/4 qt. jug for measuring water and a 16 oz. jar for the iron sulfate
- cheese cloth
- pillow case/ skirt ends
- gloves
- socks
- mask
Prep Work[edit | edit source]
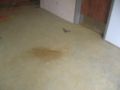
The process must begin with a perfectly clean floor. Some have suggested utilizing a floor buffer, but I found that a simple eco-friendly soap, some real hard scrubbing and mopping multiple times got the floor clean enough, without spending money or using electricity. It can be difficult to get concrete "clean". I had some problems as the contractor who poured the concrete must have walked in it and there was strange rust stains I couldn't get out. The stain masks these pretty well, but does create some inconsistency. Is your mop no longer full of muck? Then we can start staining.
Stir it Up, little darling[edit | edit source]
Depending on how dark you want your floor to be, you should experiment with the saturation point of iron sulfate in water. These are the two ratios I have tried so far- along with their results.
- 1 lb (16 oz) iron sulfate to 1 gallon (4 quarts) water ratio gives a orange stain.
- 2 lb iron sulfate to 1 gallon water + 1~2 cups coffee grounds gives a more saturated, or darker look.
- There's plenty of wiggle room, as you will be doing multiple stains and can always make it darker.
The rooms downstairs with little sunlight I wanted to have lighter floors, and the rooms that got a ton of sunlight I wanted to try a darker stain.
I found that the thing to remember is that you can always make the floor darker. Making it lighter will be difficult- so start with a mild saturation.
I mixed it in five gallon buckets, in small batches as I read that the stain is less effective as time progresses. The solution must be stirred for a couple minutes, and I had to be sure not leave it for too long, otherwise the iron sulfate would solidify on the bottom. Straining the solution through cheese cloth, especially the coffee ground solution is a good idea. The solution then remains of the same concentration. I taped the cheese cloth over one five gallon bucket and dumped the other one in there. When someone else was around, they could hold the cheese cloth so I didn't have to use masking tape (yes! less waste!)

The solution will look sort of like watered down cloudy milk depending on the concentration of iron sulfate, or brown when coffee was added. No fear. Let's spread it!
Spread some of that Love![edit | edit source]
Use Protection[edit | edit source]
Using protection against the stain is highly advised- high concentrations of iron sulfate felt caustic on my skin, though no damage has been really assessed. I wore plastic gloves and socks while staining. Leaving foot prints behind is not desirable, the socks help with that. Though the socks were soaked when I finished staining a room, I felt better wearing them as opposed to just walking barefoot. Also, my toenails and feet have turned slightly orange... wear protection. Shoes however, have more potential for tracking in dirt and leaving marks, so creativity is key.
Wet or dry[edit | edit source]
There are two ways to go about staining - it can be done on a wet floor or a dry floor. I mopped the mechanical room (a room we wanted a lighter stain in) with just water and left it decently wet, then applied the stain. This was said to let the stain penetrate better, but I found it leaves a more uneven coat and dilutes the color some. Applying the stain to a dry floor gets a more even spread, less cloudy looking. When applying to a dry floor, I found I used a lot more stain then with the wet floor.
Applying the stain, I carried the bucket in one hand (so not to leave any rings on the floor) and used a large piece of cloth (old skirt) to spread the stain. This looked much better then using a mop which I tried first. The mop left streaks and unsightly patterns. Using cloth bunched up left a more even coat. The stain looks clear upon application, but after ten minutes or so, color will begin to show. Making sure every area has been covered is important, and I found the more stain put on the floor, the better. Don't be stingy- flood the floor with the stain.

Uh, that floor looks kinda UGLY[edit | edit source]
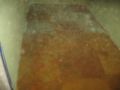
Yah, that'll happen. When I put down the first stain, I thought I had ruined the CCAT floors. It was splotchy, and had large visible swipe marks on it. Yikes. Do not panic. Anything worth having requires work!
Do it again! Do it again![edit | edit source]
Each time a new coat is placed the stain will darken. It is suggested that the floor receive at least three coats to create an even stain. If you want to do it more then three times, keep in mind the problem of efflorescence. (What the heck is efflorescence?) In order to stain the floor again, I had to let it dry, and then sweep- on floors that had the 1:1 stain there is little dust to sweep, but still do it. Sweeping distributes the stain dust so that it is not concentrated, it also helps get rids of the swipe marks. Next, wet the concrete again- this hopefully allows the stain to soak in even more. It also gets rid of the swipe marks- and you can create a pattern if you want. Then- mix up another batch of stain, strain it and spread it!

Sealing[edit | edit source]
The floor needs a protective seal over it to keep the iron sulfate from wearing off, and just for general protection against wear and tear. I have gone with AFM SafECOat Mexe seal, as it does not need to absorb into the concrete in order to seal. It was pointed out to me by Elliot at Organic Grace in Garberville that any sealant that "penetrates" the concrete will have very little room to penetrate, as the iron sulfate has already taken up that porous space in the concrete. It is low VOC and pretty eco-friendly. Before sealing, dust and mop the floor- any sort of dust will cause inconsistencies with the seal, and most definitely cause you problems. I swept the floor first with a large push broom, it seemed to get the fine dust off the best. I then mopped the floor twice, and waited for it to dry before I applied the seal. The seal was applied a paint brush, tedious and a long process, but less expensive then purchasing another tool. I was advised to do between 3 and 5 coats for maximum protection. The floors become darker with every layer of stain, more reddish and beautiful! Make sure you have ventilation in the space you are working in. Even a low VOC seal can have pretty heady fumes.
-

Swept and mopped!
-

Utilseal Stain.


My Thought Process (or lack thereof)[edit | edit source]
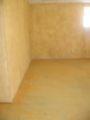
Since there is no real manual on how to stain your floor with iron sulfate, it was all a bit of an experiment. The rooms downstairs in CCAT that got little or no light we decided should have a lighter stain, thus I used the less saturated stain and left more water on the floor previous to staining it to further dilute it. I also only did three stains on it. The office, which gets good sunlight and has beautiful golden naturally painted walls, another Engr. 305 project, needed a darker stain. So I went heavy on the iron sulfate, using a little more then a 2:1 ratio and about 1.5 ~ 2 cups coffee grounds. I stained the floor in there 4 times, with lots of dust sitting on top. The 4th time, parts of the floor seemed resistant to the stain, not absorbing it unless I rubbed it in. Guess that's enough stain. Before I began staining any of these floors, I worked in the compost room, in a tile pattern so I could try multiple methods. The green you see is what I was told was copper sulfate (apparently it's supposed to stain blue) but turned out to be only copper carbonate, and didn't absorb into the floor. It washes off once dry.
Problems[edit | edit source]
One problem that I have not had, but that has been discussed as dire is efflorescence. This is a calcium build up that results on concrete from being too wet. There is a balance you need to strike between being wet enough for the stain to look good and being so wet you get a build up that is rumored to be very difficult to remove.
Another problem I had was staining too much. In the office, I wanted a really dark floor, so I stained it four times with a stain that had a 2:1 ratio of iron sulfate to water, and coffee grounds. The concrete sopped up as much of the stain as it could, and then started to refuse to adsorb anymore.
In concurrence with the aforementioned, since I applied 4 stains, I had a lot of iron sulfate dust to clean up- and that stuff is nasty. I found a respirator, had to close the downstairs of the house to others, and open all the windows. It's very fine, and very difficult to clean up.
Following those two problems I would just advise working with caution. The results of using a 2:1 ratio stain are very beautiful, but the dust could be hazardous to your health. Simply work with caution, and close the area off to others.
I had some trouble with sealing in the office room. This room had some of the most inconsistancies in the concrete itself then the rooms I had worked in previously. When sealing a floor, you spread it thinly (I did it with a paint brush), and leave no pools of milky stain. This was done easily, until I reached one part of the floor where the stain refused to spread thinly and remained milky. The only way I could get rid of the milky look was to clean the stain off the floor with a rag. Once dry, the part that looked milky dried lighter then the rest of the floor.
-
Look at all that dust flying!
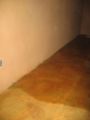
-

In the corner is how it should look, closer to the bottom of the picture, the floor is a lighter color


So I consulted Paul Bias of Organic House, as he has been working with us on the upstairs of the house. He said that it is a result of the concrete being a somewhat "natural" product, thus not perfect and having some quirks. It is possible that Beacom Construction poured concrete coming from two different sites as well. Concrete does what it damn well pleases. His advice was to continue to spread the stain, not to thin it out with water and that eventually, with more coats, it would stop pooling and become darker like the rest of the floor.
Options Options Options[edit | edit source]
There are multiple ways to stain your floor with iron sulfate. One of the personal accounts I found said he used a garden sprayer to apply the stain and then scrubbed it in with a short haired broom. The other account used a very diluted solution because she didn't want very dark floors. You could swirl, you could flood, you could scrub- there's many ways to apply the stain, and let it dry. Check out the two accounts I found Cathy Moore with light floor and Lawrence Lile's thorough account.
Analyze yo' situation[edit | edit source]
CCAT is a student run house demonstrating appropriate technology. Some components of being an appropriate technology that I was very aware of during this project was minimal waste, minimal environment impact, low embedded energy and people friendly.
Minimal Waste?[edit | edit source]
I was very conscious of how much waste this project created. To date I have recycled several plastic gloves and the wrapper from the mop, and recycled the cardboard boxes the iron sulfate came in. I have used old clothes ripped up for rags, and skirt ends as means for spreading the stain. The two 5 gallon buckets I used were rescued from other construction projects and will go to good use in the CCAT area after I am finished. The floor was disgusting, from being in a household under construction, so all that I swept up went into the trashcan (containing little metal shards, texture, gypsum, paint, etc.) I will have to toss the mop head when I am completed with the project, but the handle is reusable. The brooms were all borrowed, I'll have to return them all to their owners. What will actually be in the trash can when I am finished? The floor sweepings, the mop head and perhaps the cheese cloth, if it is not compostable.
Minimal Environmental Impact[edit | edit source]
Iron and sulfate are natural elements. They can create a problem though if they do not currently exist in the environment or become out of balance due to human interference. Iron is, however, believed to be the tenth most abundant element that makes up the earth.[1]
The Lilly Miller Iron Sulfate that I was using a solid composed of 11% sulfur and 30% copper that was put together for use as a corrective for iron deficient soils or for plants with iron deficiency, specifically azaleas, camellias, citrus and gardenias. Iron is needed for chlorophyll to develop in plant cells, and plays an important role in nitrogen fixation, respiration and photosynthesis. The sulfur in the mix is an essential ingredient for amino acids, also aids in nitrogen fixation, and takes part in seed production of all plants.
So in terms of environmental impact, I understand everything in moderation. I felt safe really diluting the solutions that I was using and dumping them on the soils around CCAT. I made sure it was not on any gardens, rather, I put it on the construction site as that soil has been most disturbed and the diluted solution would have little impact on it.
Low embedded energy[edit | edit source]
When looking at the materials in themselves, there is a good deal of embedded energy. The buckets are plastic, the gloves plastic, the mop handle plastic, all of which are petrol created and traveled quite a distance to get here. The iron sulfate was mined in a different location, is not native to this area and had to be processed for me to use it.
However, not considering the manufacturing of the products, I can feel a bit better about my purchases. The iron sulfate came from Oregon, (we're in Northern California) and I bought it from a local nursery in the next town over, on a multi-purpose trip. The brooms were borrowed and bought at the local hardware store, as was the mop (though I'm sure it journeyed from China). The plastic gloves were all recycled and the cloth I used to spread was from skirt ends. The sealant that I purchased is coming quite a distance. One is an EcoSafety product from Green Building Products in Phoenix, AZ. Another was from Soy Clean, based in Iowa, and the third was bought from Organic Grace in Garberville, brought to CCAT on another multipurpose trip. Their product was distributed AFM Safecoat, which is on the West Coast, according to their phone number. I reasoned that though there was embedded transportation costs on our environment, the product itself was environmentally friendly and the alternatives were much worse.
Why Not Just use Conventional Methods?[edit | edit source]
Conventional concrete stain is often very toxic to the user. Most popular recently is acid-staining your concrete floor. Acid stain contains iron chloride and hydrochloric acid.
Savings and Spendings Accounted for[edit | edit source]
The prices are very fantastic, when compared to conventional stains.
| Material | Cost ($) | Quantity | Total ($) |
|---|---|---|---|
| Iron Sulfate | 5.99 | 6 | ~36.00 |
| Mop | 12.00 | 1 | 12.00 |
| 2nd Mop Head | 6.00 | 1 | 6.00 |
| Eco-friendly soap | from home | 1 | 0.00 |
| scrub brush | ~3.00 | 1 | 3.00 |
| broom | borrowed | 2 | 0.00 |
| buckets | borrowed | 2 | 0.00 |
| coffee grounds | given | 6~7 cups | 0.00 |
| measuring implements | borrowed | 0.00 | |
| cheese cloth | 3.00 | 1 | 3.00 |
| skirt ends | reused | 2 | 0.00 |
| gloves | reused | couple | 0.00 |
| socks | free | 2 pairs | 0.00 |
| dust mask | acquired | 1 | 0.00 |
| TOTAL COST | $55.00 | ||
And costs for sealants:
| Material | Cost ($) | Quantity | Total ($) |
|---|---|---|---|
| Soyclean | 16.00 | two 1 gallons +shipping | 47.98 |
| Acri-Soy Gloss | 32.00 | four 1 gallons +shipping | 150.89 |
| AFM SafECOat | 38.64 | four 1 gallons | 154.44 |
| TOTAL COST | $353.31 | ||
So Costs for the entire project of staining and sealing a 1,400 square foot floor
were a whopping 408.31 dollars
Cool Floor, Cool House[edit | edit source]
Damn straight. The floors are rocking. It was done with minimal environmental impact, adapting a not so appropriate building material into an eco-friendly, approraiate, demonstratable natural floor stain. Here's the lowdown of every stain I mixed for each room, the gallery following has pictures of each room labeled.
- Bathroom
- 1st stain, 2:1 ratio with 1 cup coffee mixed in. 2nd and 3rd stain, 1:1 ratio. All applied on dry floor. 4 layers of sealant.:Resulting in pretty uniform red brown color.
- Utilities room
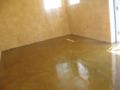
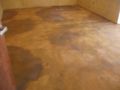
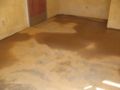
- All stains 1:1 ratio, applied on wet floor. 2 layers of sealant currently, 2 more to be applied.
- Resulted in orange/red stain that is not uniform and looks like clouds on the floor. Very cool.
- Office
- 4 stains of 2:1 with 1-2 cups of coffee mixed in, applied dry. 4 layers of sealant.
- Resulted in dark brown/red colors, not uniform due to inconsistent concrete and seal.
- Classroom/Gallery
- 2 stains of 2:1 with 1 cup coffee mixed in applied dry, 1 stain of 1:1 ratio applied wet.
- Compost Room
- Testing room, testing done in tile style.
- Resulted in lots of different colors.
- Office, Compost Room and Bathroom Floor Stains
-
First stain of the office floor
-
2nd stain going on office floor
-
3rd stain on the office floor
-
2:1 stain drying in the office
-
Lots of iron sulfate dust- beware
-
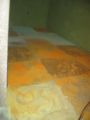
The compost room "tiled" experimentation
-
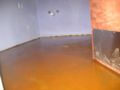
First stain in the bathroom
-
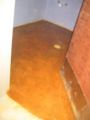
Bathroom seal!
-
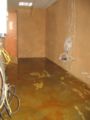
In the utilities room...2nd stain
-
Testing the sealant
-
The second coat of sealant on the utilities room


See also[edit | edit source]
References[edit | edit source]
B. T. Church & Cory CCAT Natural Concrete Stain
The CCAT building was redone in 2004-2007 the floor was poured and finished by Beacon Construction. The floor was fabricated with a radiant heating system in it. The floor was then stained by Humboldt State student Jess H. She stained the floor and sealed the concrete floor. She used 2 gallons of Soy Clean to prep and clean the floor at a price of $47.98 for both. She then stained the floor in one to four sequence applications, depending on how dark she wanted the stain to be. The Iron sulfate cost $36. She then sealed the decks with four gallons of Acri-Soy Gloss at a price of $150.89 for all four gallons; she also used four gallons of AFM Safe coat at a price of $154.44. So the total cost of cleaner stain and sealer was; $389.31, the total Square Footage was 1,400Sq. Ft. calculating out to $3.60/ Sq. Acri –Soy is a quality product that is clean, sustainable and friendly to the environment.
DuraSoy Bio-Based Paints DuraSoytm Paints Dealer Secured Online Ordering
Product Data Downloads DuraSoy One PDS DuraSoy Paints FAQ's DuraSoy Installation Guide DuraSoy Architectural Specification
Material Safety Data Downloads DuraSoy One MSDS
DuraSoy Bio-Based Paints DuraSoytm Paints Dealer Secured Online Ordering
Product Data Downloads DuraSoy One PDS DuraSoy Paints FAQ's DuraSoy Installation Guide DuraSoy Architectural Specification
Material Safety Data Downloads DuraSoy One MSDS
Description:
DuraSoy Onetm is a new generation professional grade sustainable bio-based paint technology that is changing all the rules in the paint coatings industry. Its unique chemistry fills the void when comparing performance, sustainability, and cost for professional painters and do-it-yourselfers alike.
DuraSoy Onetm does not contain hazardous ingredients such as propylene glycol or formaldehyde and is virtually odorless. It is a fast drying bio-based low odor paint system that will dry to the touch within 30 minutes to 1 hour for a quick return to service.
One problem Jess H. was concerned about was efflorescence, Calcium buildup on the surface, caused by excessive water content of the concrete. This did not present a problem. One problem that was eliminated by the sealing was any Hydrostatic pressure problems or water seepage coming up through the slab. Hydrostatic water problems occur in slabs that do not have a proper moisture barrier (Visqueen;9ml.)Or slabs that have drainage problems from plot layout and or hill side drainage. This can be a chronic and expensive problem to deal with. This is one of the main reasons for sealing your slab.