
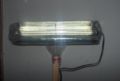
3rd world CCFL lamp (2007 model)

| Type | Flourecent lamp |
|---|---|
| Authors | |
| Status | |
| Years | 2007 |
This is a new kind of Fluorescent-lamp that has cold Cathode tubes. Because there is no heat production there is less energy loss. The cathodes are on the outer end on the inside of the CCFL-tube-lamp. This tube-lamp needs very high voltage to work; the inverter-transformer produces this voltage. The CCFL parts are the CCFL-tube-lamp and CCFL-inverter.
wikipedia:Cold cathode Cold cathode lamp (CCFL stands for Cold-Cathode-Fluorescent-Lamp).
Other names for this kind of lamp:12-Volt Heavy-Duty Inspection-lamp, work-lamp, garage-stick-lamp, Fluorescent portable lamp
Introduction
[edit | edit source]A Cold Cathode Fluorescent Lamp source haves match advantages. But one big disadvantage is that the lamp is very thin and need good protection against breaking.
This lamp can have up to four CCFL-lamps and inverters, taken from electronic equipment like old document-scanners.
-
 3rd world CCFL lamp 2007 model
 -
 3rd world CCFL lamp 2008 model
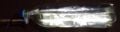
Benefit tubes in PET bottles
[edit | edit source]Safety
[edit | edit source]- Is more light-weight than the known type of lamp-cap
- Low voltage system
shape form
[edit | edit source]- Is very simple and fast to make.
- Is very simple to explain how to make.
- Have no sharp edges.
- Is lightweight only 0.2 kg, if the lamp-cap falls
- Outside is made of soft elastic materials.
electric
[edit | edit source]- Is watertight.
- No metal outer parts that can conduct dangerous electricity.
Sustainability
[edit | edit source]- If the lamp-cap falls, the elastic plastic breaks the fall.
- Can survive more vibration and higher fall from heights.
- The lamp-cap is air tight and hard to compress.
- The tubes-lamps are protected against vibration and shocks.
- The tubes have a very long life.
- Insects, dust and water can not get inside this lamp-cap.
- The bottle material Polyethylene-Terephthalate (PET) remains clear and strong for years
- The chips-bag material (Metalized PET/LDPE) remains reflective for years.
In Use
[edit | edit source]- Pivotable in every direction.
- The outside of the PET-bottle material is very clear and smooth, and easy to clean with water.
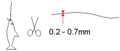
Tools to make the CCFL-lamp cap
[edit | edit source]- Measure tool, Sharp knife, Soldering material, Wire cutter, Sewing needle
- Cigarette lighter or matches
More
Material to make the CCFL-lamp cap
[edit | edit source]- 2mm thick sticks, like sate sticks
- Gummy type of (spray) glue.
- Chips-bag reflecting Metalized foil material LDPEW
- CCFLW-inverters and tube-lamps out of old document-scanners.
- Flexible electric-wire like 2x0.75 MM2.
- PET-bottles Recycling of PET BottlesW
- Thin Nylon fishing-line.
- 1 mm Thick nylon fishing-line
- (bamboo)wood stick
Electric parts
[edit | edit source]Soldering the electronic parts
[edit | edit source]WARNING the CCFL-inverter can have a dangerous high voltage output. Do not extend the wire between the inverter and fluorescent tube-lamp. More than one electronic inverter or electronic ballast Some type of inverters can feed two or more Fluorescent tube Lamp. Here is more information where to find CCFL material Cold Cathode Fluorescent Lamps
Soldering the Cold Cathode Fluorescent lamps and the 12 volt CCFL-inverter
-
 Soldering the CCFL-parts
 -
 Connecting the EEFL-parts

External Electrode Fluorescent Lamp(EEFL)
[edit | edit source]EEFL looks like CCFL with external Electrodes
There are EEFL inverters that can feed more than two parallel EEFL tube lamps.
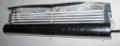
Tube-lamp-cap with old model fluorescent tube
[edit | edit source]Some people want to make a new clean lamp-cap for their old fluorescent-tube-lamp(S) and electronic ballast.
Clean the fluorescent-tube-lamp(s) for more light.
With the same building instructions it is possible to make a lamp-cap with one or two old tube-lamp(s) and electronic ballasts.
This type of electronic transformer (electronic ballast) has the same dimensions as a electronic inverter. The thyristor component does heat up; do NOT let it touch the plastic foil. In this tube-lamp-cap there is space to make a bigger aluminium heat-sink cooling plate.
It is possible to use a energy efficient CCFL inverter to feed a small thin fluorescent lamp like a T5 model.
A fluorescent-tube-lamp can not handle the heat of tin-soldering.
Tin-Solder the flexible electric-wire to a two self-made tin-plate clamp for every fluorescent-tube-lamp that slides over the two pins of the fluorescent-tube-lamp. Do not use massive electric-wire Use very thin metal tin plate.
This tube-lamp-cap design is stronger and is more lightweight than the factory model fluorescent tube-lamp-work-light. The PET material is more clear and the chips bag material reflects the light better.
- Tin-Solder the electric-wire to the tin-plate clamp
-
 200px
200px -
 flexible isolated copper Wire
 -
 Soldering wire on clamp


Fluorescent lamp tube
[edit | edit source]
A fluorescent lamp, or fluorescent tube, is a low-pressure mercury-vapor gas-discharge lamp that uses fluorescence to produce visible light. An electric current in the gas excites mercury vapor, to produce ultraviolet and make a phosphor coating in the lamp glow. Fluorescent lamps convert electrical energy into visible light much more efficiently than incandescent lamps, but are less efficient than most LED lamps. The typical luminous efficacy of fluorescent lamps is 50–100 lumens per watt, several times the efficacy of general lighting incandescent bulbs with comparable light output, which is on the close order of 16 lm/W.
Size of TL lamp
| Part | Measure | Shape | Size in mm |
|---|---|---|---|
| P109 | 1 | Ø | 16mm |
| P109 | 2 | Ø | 1mm |
| P109 | 3 | L | 5mm |
| P109 | 4 | L | 285mm |

Assembly
[edit | edit source]Reflecting chips-bag foil
[edit | edit source]- Use Chips-bag material with reflective inside.
- The plastic is Metalized PET/LDPE.
- This material remains reflective for years, much better than aluminium-foil.
- Test this plastic to make sure it is flame-resistant.
- Do NOT use PE-plastic or PP-plastic plasticW
- Cut out a piece of the reflecting foil out of a chips-bag
Chips bag material
| Measure | Shape | Size in mm |
|---|---|---|
| 01 | L | 280mm |
| 02 | L | 190mm |
Glueing the foil
[edit | edit source]Use glue that does not damage the reflective layer.
Spray a thin layer of glue like Tixotrope on basis of polychloropreenrubber.
Put the layer parts together without air bubbles in between.
Roll up the plastic layers so it stays in the rolled-up position.
Melting twelve holes
[edit | edit source]-
 Chips-bag reflecting plastic
 -
 layers Reflecting chips-bag material


Take 3 layers if Chips-bag reflecting foil
holes in reflecting plastic
| Measure | Shape | Size in mm |
|---|---|---|
| 11 | L | 280mm |
| 12 | L | 190mm |
| 14 | Ø | 1mm |
| 15 | L | 120mm |
| 18 | L | 50mm |
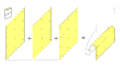
Fishing-thread and Sate-sticks
[edit | edit source]-
 Thin nylon fishing-thread
 -
 Thin bamboo sate-sticks

There are three sticks needed
Use good quality wooden sate-sticks
Sate-sticks
| Measure | Shape | Size in mm |
|---|---|---|
| 20 | L | 1.5mm |
| 23 | L | 80mm |

Wrap the foil around electronic-transformer(s)
[edit | edit source]Put the electronic-transformer(s) in the roll and leave the Tube-lamp(s) outside.
Binding tube-lamp(s) to the Stick
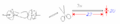
[edit | edit source]Press one sate-sticks through three holes of the foil
Bind with one piece of thin nylon fishing-thread the tube-lamp(s) to this sate-stick.

Slide in second and third sate-Stick
[edit | edit source]Slide in the second sate-Stick through one hole in the foil, through a knot in the electric-wire, and through the other holes of the foil.
The knot is to protect the inverter for pulling forces on the electric-wire.
And slide in the third sate-sticks through the four holes in the foil.

Do not bind the a thin lamp-tube to all three of the sate-sticks, otherwise the lamp-tube will break more easily.
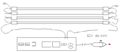
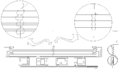
With the This drawing is to show how you can use more than one CCFL-lamp and inverter(s)

Printable building instruction
[edit | edit source](press to enlarge)
- Cut 3 layer reflecting chips-bag plastic A4 format, same length tube lamp
- Reflecting surface on the outside
- Melt 12x small holes in plastic with a needle.
- Cut 3x thin-stick on length of diameter PET-bottle.
- 2x knot in 12-Volt-wire.
- Put 2x thin-stick through plastic and 1x thin-stick through plastic and knot
- Put plastic through opening between inverter and tube-lamp
- Put 3x thin-stick through holes
- Knot tube-lamp to thin-stick with thin wire
- Put 3x thin-stick through plastic
Tube-lamp-cap with more fluorescent tube-lamps
[edit | edit source]-
 4 CCFL lamps without PET bottles protection
 -
 thumb
thumb


Lamp-cap shell
[edit | edit source](2007 model)
[edit | edit source]Make two bottles smoothly formed with steam Bottle smooth formed Plastic
Cut and melt a hole in the outside PET-bottle.
Outside PET-Bottle sizes
| Measure | Shape | Size in mm |
|---|---|---|
| 72 | L | 240mm |
| 74 | Ø | 81mm |
| 76 | L | 5mm |

Inside PET Bottle sizes
| Measure | Shape | Size in mm |
|---|---|---|
| 82 | L | 120mm |
| 84 | Ø | 80mm |

Slide in Bottle bottom
[edit | edit source]Make a rough surface on the inside of the PET-bottle-bottom, using coarse sandpaper or other tool.
Pull the whole length of wire through the hole in the PET-bottle-bottom and slide in the assembled parts
The second knot is to protect the electronic-transformer(s) for pulling forces on the electric-wire

Slide in Bottle in Bottle
[edit | edit source]Make a rough surface on the outside of the shortest-bottle-bottom, using coarse sandpaper or other tool.
Slide in shortest bottle-bottom inside the longest one. (Do not slide the longest bottle bottom inside the shortest one.)
Otherwise the long bottle of the lamp-cap can compress and let air in, which would make the Tube-lamp-cap less stiff
Make sure the coarse surface on the inside- and outside bottle-bottoms are in contact with each other.
This is to prevent the bottle-bottom from sliding unwanted out of each-other.
Make water and air-tight
[edit | edit source]Glue the electric-wire in the hole in one side of the bottle-bottom with Hot-melt glue or gummy type of glue. If you take the same size bottle halves it is almost air tight already. A good air-tight lamp cap is better protected against mechanical compression. If this kind of lamp cap can be made air tight it can be extremely strong.
(2008 model)
[edit | edit source]work in progress
Lamp in one PET bottle shell

-
 Cut Bottle lamp shell
Coming soon, How to put the tube-lamp and inverter assemble in one lamp
-
 Bottle lamp shell close
Sealing haves to be done from the inside out.
Pivot joint
[edit | edit source]With a pivot you can point the lamp to needed direction

2007 model
[edit | edit source]PET bottle double pivot
| Measure | Shape | Size in mm |
|---|---|---|
| 91 | Ø | 70-80 |
| 92 | L | 70-80 |
| 93 | Ø | 70-80 |
| 96 | Ø | 22 |

Thick fishing thread and Hook
[edit | edit source]
Thick nylon fishing thread
| Measure | Shape | Size in mm |
|---|---|---|
| 98 | Ø | 1mm |
Hook or eye
| Measure | Shape | Size in mm |
|---|---|---|
| 101 | Ø | 10-15 |
| 102 | L | 20-25 |

Stick out end
[edit | edit source]The PET-bottle must slide over the out-end easley.

Stick out end
| Measure | Shape | Size in mm |
|---|---|---|
| 104 | L | 20 |
| 136 | Ø | 21 |
Assemble joint parts
[edit | edit source]The nylon fishing thread is very slippery Use the right type of knot to connect the ends together A knot named the "Water knot"
Link Water knot

Printable buiding instuction
[edit | edit source]
Steam 2x PET-plastic bottle
A. Cut 1x bottle in part A,B,L
A. Do not use part A
B. Put part B around part E
C. Cut second bottle in part C,F
C. Do not use C
D. Drill hole in bottom F
E. Put 12-Volt-wire through hole in F
F. Put F around part E and part B
G. Make hole in F air-tight
K Put thick plastic wire loop on hook M
L. Fit L on stick N
M. Make hook on stick N
N Stick N
O. part F through part K
Pivot joint 2008 model
[edit | edit source]

For the middle sized arm length.
You need:
- bold M5x40mm
- Ring 5mm x 15mm x2mm
- Ring 10mm x 20mm x2mm
- Nut M6
- Hex screw or hex bold M5x50mm
- Ring 10mm x 20mm x2mm
- Ring 5mm x 15mm x2mm
- Spacer
- Spring ring M5
- Wing-nut M5
- metal or aluminium strip proximately 2mm thick 15mm wide, long 175mm
External links
[edit | edit source]- 3rd world arm lamp
- Electrical wiring and switching
- Cold Cathode Fluorescent Lamps
- Electrical wiring and switching
- Low voltage connection basics
| Authors | |
|---|---|
| License | CC-BY-SA-3.0 |
| Organizations | Demotech |
| Cite as | Stef (2007–2026). "3rd world CCFL lamp (2007 model)". Appropedia. Retrieved July 23, 2026. |