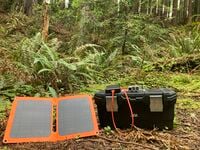
Cassiopeia is a portable and durable computer capable of operating completely off solar power and without access to the Internet. The design consists of a Raspberry Pi 3b+, 9W fold-able solar panel, lithium-ion rechargeable battery, and container to house it all. The project was designed and built in the spring 2022 semester by Cal Poly Humboldt students enrolled in Engineering 215: Introduction to Design. The team, Suns of Community, consisted of Zane Cook, Max Cunningham, and Phil Tran.
The design was inspired by the desire to give people who live off grid and who don't have access to Internet the opportunity to access vast resources of information to optimize survival chances. Cassiopeia displays all of Wikipedia and survival-related articles of Appropedia through their mobile smart device.
Background[edit | edit source]
The spring of 2022 ENGR 215 class at Cal Poly Humboldt have taken on a design project on behalf of Appropedia. This website is dedicated to creating a platform where users can interact with one another to help create solutions for sustainability, poverty reduction, and international development by providing users with the information to build appropriate technologies. Our team, Suns of Community, have been tasked with building a portable and durable apocalypse computer powered through solar radiation and using inexpensive and/or commonly found items. Emilio, the Executive Director of Appropedia, was the client and he provided guidance for the development of the design.
Problem statement[edit | edit source]
The objective of Suns of Community is to create a portable computer housed in a durable container that is capable of running for several years off solar radiation and without access to an electrical grid nor the Internet. Cassiopeia will provide users with valuable information from Wikipedia and Appropedia on survival strategies and DIY engineering systems through their mobile devices that will enable them to live off grid and without organized society for long periods of time.
Criteria[edit | edit source]
The Apocalypse Computer's criteria and respective weights are listed in the table below. Criteria are the general categories that guide project design. The Suns of Community selected these criterion to ensure that this project will be effective, useful, and replicable.
| Criteria | Description | Weight (1-10) |
|---|---|---|
| Portability | Lightweight and easy to transport. | 9 |
| Durability | Long lasting, impact resistant, and weatherproof. | 8 |
| Reproducibility | Can be built by single individual with high school education and access to computer and internet. | 7 |
| Ease of Use | Easy to navigate interface and access information. | 7 |
| Cost | Less than $250. | 7 |
| Capabilities | Stores and displays information suitable for survival scenario to user's mobile device. | 7 |
Prototyping[edit | edit source]
Two main prototypes were made to show two different use cases for our project, the first being a robust version and the second being a sleek design.
The robust version has a much larger volume to carry extra survival gear or equipment that can help assist you in times of need. The components in this version are embedded into the container and are not meant to be easily removed. This design is meant to be a bug out bag/box itself and being an "all-in-one" solution.
The sleek design is a much more mobile and compact design. Here, there is no extra storage space for anything other than the necessary components. This design is meant to be stored in a place where it can easily be accessed when needed and stored into a pre-made bug out bag.
-
Robust Prototype. Large container with embedded components.
-
Sleek Prototype. Small containers to hold components with no additional storage space.
-
Sleek Prototype. Components must be taken out of case in order to be accessed.
Final product[edit | edit source]
For our final product we combined the most useful aspects of both prototypes. We used a larger container for extra gear to be stored alongside the computer, and we used Velcro to enable easy attachment and detachment of components.
The final product is a configuration consisting of a durable container, 9W solar panel, Raspberry Pi 3B+, 20,000mah power bank, and connection cables. Once the Raspberry Pi is powered via solar panel or power bank, the user will then connect to the wireless hotpot signal. Once the connection is made, the provided Kiwix link will allow the user to access all the stored information on the device.
-
Solar Panel with Raspberry Pi and power bank on top of durable container.
Construction[edit | edit source]
The following pictures below describe the construction process of the Cassiopeia to include components and software needed.
- Construction Gallery
-
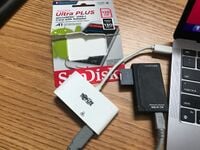
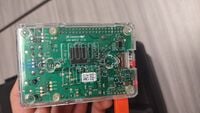
Step 1: Source components. 9w solar panel, Raspberry Pi, Li-ion rechargeable battery(12V preferably), USB connection cable, SD card (ours was 128GB), sturdy case to house components
-
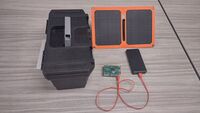
Step 2: Download software that will enable the Raspberry Pi to generate a hotspot when turned on and output the information to the user. Download software to install Kiwix and online wiki data (Wikipedia, Appropedia, etc). Use these links for software and code downloads:[1][2] Watch this video for more information:[3]
-
Step 3: Store the data from the reference libraries onto the SD card that will be connected to the Raspberry Pi.
-
Step 4: Insert SD card into the Raspberry Pi.
-
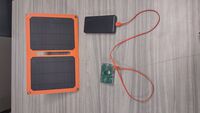
Step 5: Connect Raspberry Pi to charged battery bank or solar panel to power on.
-
Step 6: Sign in to hotspot. It shows up as Kiwix on the phone, but it can be renamed. Ours is renamed to Cassiopeia.
-
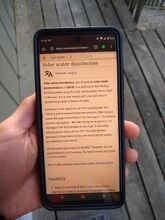
Step 7: Use smart device to search for information within the stored libraries. The user is depicted searching Appropedia for ways to use the sun to disinfect water for consumption.
-
Step 8: Fit all components in container for easy transportation.
Video instructions[edit | edit source]
The following video describes the step-by-step process on how to download and store information on a Raspberry Pi for off grid use.
Bill of materials[edit | edit source]
Description of costs of materials used.
| Item | Amount | Cost per unit | Total |
|---|---|---|---|
| Raspberry Pi 3B+ — CPU | 1 | USD 35.00 | USD 35.00 |
| Solar Panel — 9W With two USB ports | 1 | USD 50.00 | USD 50.00 |
| Power Bank — 20,000 mah Li-ion battery-pack | 1 | USD 20.00 | USD 20.00 |
| SD card — Data and Code for Hotspot | 1 | USD 50.00 | USD 50.00 |
| Voltage Regulator — For charging or Directly powering without charge controller | 1 | USD 5.00 | USD 5.00 |
| Container — Housing components and protection from the elements | 1 | USD 20.00 | USD 20.00 |
| Power Cable — For connecting Raspberry Pi and power-bank to solar panel | 1 | USD 5.00 | USD 5.00 |
| Software — Kiwix free hotspot downloader instructions: https://www.kiwix.org/en/documentation/how-to-set-up-kiwix-hotspot/ | 1 | USD 0.00 | USD 0.00 |
| Grand total | USD 185EUR 159.10 <br />GBP 135.05 <br />CAD 229.40 <br />MXN 3,857.25 <br />INR 13,847.25 <br /> | ||
Operation[edit | edit source]
The following video describes the step-by-step process of how to connect to the Kiwix hotspot.
Maintenance[edit | edit source]
The Cassiopeia Solar Apocalypse Computers maintenance is minimum. The battery's best use practices avoid overcharging the power bank and letting it be stored with zero charge. The solar panel should be cleaned prior to use and the Raspberry Pi should be not stored in moist or dusty/sandy conditions. Any edits of the code will need a working computer.
Maintenance schedule[edit | edit source]
- Daily
- Clean solar panel of any dust before use.
- Disconnect Raspberry Pi when not in use.
- Bag in weather proof bag or container during wet, sandy or dusty conditions
- Monthly
- Charge power bank
- Every 3-4 years
- Replace the power bank
- Every 7-10 years
- Every 25-30 years
- Replace the solar panel[6]
Conclusion[edit | edit source]
Testing results[edit | edit source]
We found the test results all came back meeting our expectations of success. Our device is powered directly with a solar panel, or indirectly through a power bank. (The solar panel can also power the device and charge the power bank at the same time). When fully charged the power bank lasts 37 hours while the Raspberry Pi is running the hotspot. When powered the device creates an accessible hot spot which that displays the data quickly to the user's mobile device.
Discussion[edit | edit source]
Overall we are happy with how we have met the criteria, and addressed the problem. Our device is portable, durable and simple. It's simplicity allows the user to modify for any extra desired utility. The results indicate our design is successfully functional.
Lessons learned[edit | edit source]
As a way to decrease costs further, the user should opt for a simpler solar panel that does not have a USB port already built in. With this simpler panel, the user will need to connect a voltage regulator between the connection cable of the Raspberry Pi and the solar panel (prevents damage to the Raspberry Pi during sharp spikes in voltage or changes in load conditions).
When downloading the kiwix software and hotspot code, ensure there is at least 20 GB of available space on the computer's hard drive. Furthermore, using a Macintosh OS can prove to be problematic while downloading the software. We switched to using Windows to complete the downloads.
When downloading the offline reference libraries from Wikipedia, Appropedia, and whatever else the user decides, expect to download for several hours, depending on download speed. It took us over 10 hours to download everything with a very fast connection speed. During this download time, our computer transitioned to sleep mode and the download was halted. Prevent the computer from sleeping by playing media in the background.
Next steps[edit | edit source]
It is possible to get the device to not just be a hot spot for its own data but also facilitate access to a third party internet router (WIFI). The addition of this code could mean when ever the internet is accessible and the device is powered on, it can update data in Wikipedia, Appropedia, and the other references libraries that may be included.
The housing for storing the device could be more robust to environmental conditions. Water proofing can be improved by adding rubber gaskets between open seams within the container. Electro magnetic pulses can be stopped from interfering with the computer hardware by making a Faraday cage. This can be implemented by applying faraday tape to the inside of the container.[7] A cheaper version can be created by alternating layers of aluminum foil and thin plastic (three times) to the inside of the container.[8]
The design we went with allows for the option to store extra gear. This leaves it open to the user to optimize their design to fit their survival needs by adding different tools to their gear set.
Troubleshooting[edit | edit source]
The following table provides solutions to common problems related to the operation and construction of the apocalypse computer.
| Problem | Suggestion |
|---|---|
| Hotspot link not opening | Tap on the designated Wi-Fi name, select 'Forget This Network' and restart the CPU. |
| Solar Panel not powering CPU | Make sure it is plugged in, angle the panel towards direct sunlight and try to make connection. |
| Computer goes to sleep during long download time | Use download manager to backup data downloaded. Also, play media (movie) in background
to keep computer on. |
Team[edit | edit source]

Suns of Community, Spring 2022
- Zane Cook
- Max Cunningham
- Phil Tran
References[edit | edit source]
- ↑ https://github.com/KalebClark/ApocalypseWiki
- ↑ https://www.kiwix.org/en/documentation/how-to-set-up-kiwix-hotspot/
- ↑ https://youtu.be/R63x2TXm0s8
- ↑ https://raspberrytips.com/how-long-will-a-raspberry-pi-last/#:~:text=The%20average%20lifespan%20of%20a,card%20failures%2C%20and%20ineligible%20environments.
- ↑ https://www.sdcard.org/consumers/faq/#:~:text=SD%20standards%2Dbased%20memory%20cards%2C%20like%20most%20semiconductor%20cards%2C,and%20reduce%20consumer%20electronic%20waste.
- ↑ https://www.nrel.gov/docs/fy09osti/43844.pdf
- ↑ https://www.amazon.com/TitanRF-Faraday-Tape-High-Shielding-Conductive/dp/B07CRLCGCH?th=1
- ↑ https://www.wikihow.com/Make-a-Faraday-Cage


![Step 2: Download software that will enable the Raspberry Pi to generate a hotspot when turned on and output the information to the user. Download software to install Kiwix and online wiki data (Wikipedia, Appropedia, etc). Use these links for software and code downloads:[1][2] Watch this video for more information:[3]](/w/images/thumb/a/a5/Software_download.jpg/165px-Software_download.jpg)
