| Line 14: | Line 14: | ||
===Problem Statement=== | ===Problem Statement=== | ||
The trail connecting the parking lot of Friends of the Dunes' to the Humboldt Coastal Nature Center needs to be illuminated to guide visitors to special evening events. | '''''The trail connecting the parking lot of Friends of the Dunes' to the Humboldt Coastal Nature Center needs to be illuminated to guide visitors to special evening events.''''' | ||
===Criteria=== | ===Criteria=== | ||
Revision as of 06:51, 1 May 2012

Abstract
Friends of the Dunes, the client, teamed up with Humboldt State University's Engineering introduction to design class to design and construct various aspects of the Humboldt Coastal Nature Center (HCNC). Team Little Blue Dune Buggy was formed to design and implement trail lighting from the parking lot to specific events hosted at the HCNC. Many brainstorming sessions resulted in several alternative solutions for the trail lighting. Each of these solutions were compared and scored according to how well they met specified criteria. The final solution was chosen through this process and several discussions with the client. The implemented solution consists of an on site solar powered light charging station.

Background
Since 1982, the not-for-profit organization Friends of the Dunes (FOD) has aided in the conservation of coastal lands. FOD hosts many community based restoration efforts as well as educational programs and guided tours. Carol Vander Meer has been the representative of FOD who meets with us on a weekly basis. Throughout the design process she has stressed the importance of the trail lighting for special events hosted at night. The lighting will be implemented from the parking lot to the HCNC for these evening events.
Problem Statement & Criteria
Problem Statement
The trail connecting the parking lot of Friends of the Dunes' to the Humboldt Coastal Nature Center needs to be illuminated to guide visitors to special evening events.
Criteria
The specified criteria as discussed by the group with the client is listed on a scale of 1-10 below.
| Criteria | Weight | Description |
|---|---|---|
| Leveraging Local Resources | 6 | Must try to use as many local and donated resources as possible. |
| Trail Coverage | 10 | Must cover 150 feet of trail at a two foot height. |
| Cost | 8 | The final product must cost no more than $400. |
| Appropriateness of Materials | 6 | Consider environmentally friendly materials when designing the trail lighting. |
| Ease of Use/ Maintenance | 8 | Must be able to be used by volunteer workers.Maintenance must be able to be completed by volunteer workers. |
Final Design
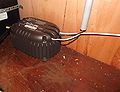
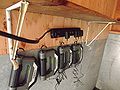
The final design begins with the sun. The design implements two photovoltaic panels, rated at (6 volts and 65 watts each), which will harness energy from the sun to power the lighting for the trail. Both of the solar panels were donated by Backwoods Solar. These solar panels will be mounted on top of a shed at Friends of the Dunes and the electrical components will be housed inside. When in use, the panels will be angled so that they can best capture incoming sunlight. The panels will be held at their angle with a rod that is attached to the panel with a hinge. This rod locks the panels into place at a 38 degree angle, which is appropriate for the gathering of energy. Wiring will run from the back of the solar panels into the device and connect to a (10 amp) charge controller. The charge controller keeps the machine from over-charging itself and removes the risk of fire or explosion from over-charging. The wiring from the charge controller also leads into a (300 watt) power inverter which converts the direct current electricity made by the solar panels into alternating current electricity that will be used to charge the lights. Two surge protectors will be plugged into the power inverter to allow for 10 lights to be charged at a time. The charging cables for the lights will be plugged into the surge protectors and run through small holes on the side of the device. The cables can then be plugged into the lights which will be hanging from hooks on the side of the device or magnetically attached to the metal walls of the shed. The picture below shows the electrical components used in the design. The panel for the system is mounted on top of a newly constructed shed and the electrical components are housed inside the locked shed at all times.
The lights being used in the design are ten 3.5 watt LED 130 lights provided by Cooper Industries. Each light takes about 4 hours of sun to fully charge. Throughout the year the lights will take various lengths of time to charge due to various amount of solar radiation in each month. These lengths can be calculated using the table provided in the testing results section. Once charged, the lights can be stored until an event that requires lighting for the trail. Due to the high lumen output of each light, not all ten will be needed to give enough light to the trail. This allows for volunteers at the event to replace any light that may go out during the event with another fully charged one. The lights will be spaced along the trail, angled towards the ground on individual bars.
Costs
Design Hours
The image on the right displays the total number of hours spent on each section of the design project. The total hours spent on the project was 304.

Material Costs
Below are the costs of each component of the solar powered light charging station. Significant cost reduction occurred as a result of donations from Cooper Industries,Backwoods Solar, and Solar Racks. The overall cost of the solar powered light charging station was $162.37. Projected cost total for this project came out to $800.75.
| Quantity | Material | Source | Our Cost ($) | Cost ($) |
|---|---|---|---|---|
| 2 | 6 Volt Solar Panel | Donated | 0 | 130.00 |
| 1 | Inverter | Donated | 0 | 99.00 |
| 10 | LED Lights | Donated | 0 | 400.00 |
| 1 | Charge Controller | Donated | 0 | 6.60 |
| 1 | Roof Cement | Ace | 7.99 | 7.99 |
| 2 | Vinyl Gloves | Ace | 1.49 | 1.49 |
| 1 | Conduit 1" | Ace | 4.99 | 4.99 |
| 1 | Clamp Hose 3/8" to 7/8" | Ace | 2.98 | 2.98 |
| 2 | Surge Strip 7 Outlet | Ace | 37.98 | 37.98 |
| 3 | Elbow 90 1/2" SXS SCH40 | Ace | 1.47 | 1.47 |
| 1 | Conduit PVC 1/2X10 | Ace | 2.99 | 2.99 |
| 1 | Fuses | Ace | 6.50 | 6.50 |
| 1 | Fuse Housing | Ace | 3.50 | 3.50 |
| 1 | 7 Amp Hour Battery | Interstate Battery | 26.95 | 26.95 |
| 1 | Acrylic Caulk 10 oz | Myrtletown Lumber Yard | 1.43 | 1.43 |
| 1.25 | Sheetrock Screws 1" | Myrtletown Lumber Yard | 2.59 | 2.59 |
| 4 | Misc. Nuts and Bolts | Myrtletown Lumber Yard | 6.00 | 6.00 |
| 2 | Misc Nuts. and Bolts | Myrtletown Lumber Yard | 1.30 | 1.30 |
| 2 | Misc. Nuts and Bolts | Myrtletown Lumber Yard | .50 | .50 |
| 1 | Misc. Wood | Myrtletown Lumber Yard | 28.00 | 28.00 |
| 1 | Tape 3/4X20 | Do-It Best Lumber | .59 | .59 |
| 1 | Wire Conn Small Yellow | Do-It Best Lumber | 1.44 | 1.44 |
| 10 | Round Hooks | Do-It Best Lumber | 5.87 | 5.87 |
| 6 | Wire 10-2WG NM350 | Do-It Best Lumber | 8.57 | 8.57 |
| 1 | 3/4X10 Strap, Galv | Do-It Best Lumber | 2.12 | 2.12 |
| 1 | 10 oz Roof Patch | Myrtletown Lumber Yard | 1.95 | 1.95 |
| 1 | Caulk Gun | Myrtletown Lumber Yard | 2.97 | 1.35 |
| 1 | PVC 1" | Myrtletown Lumber Yard | 2.20 | 6.60 |
| Total Cost | $162.37 | $800.75 | ||
Maintenance Time
The maintenance costs for the solar powered light charging station are listed in the table below. Very few maintenance tasks are required for the solar charging station per year. The maximum maintenance time for the system is 70 minutes per year.
| Task | Time(min/year) |
|---|---|
| Clean solar panel surface | 25 |
| Replace wiring (if necessary) | 30 |
| Tighten bolts on solar panel mount | 15 |
| Total | 70 |
Testing Results
Through the testing of our solar panel system we were able to determine that ample energy is being supplied and passed throughout the entire system. The table below displays the amount of days it will take for the solar shack to charge the lights according to the peak hours of sunlight for each month.
| Month | Minimum Full Sunlight | Energy Made By Panel | Days To Charge(based on peak sunlight hours) |
|---|---|---|---|
| January | 1.8 hr/day | 93.6 Wh/day | 1.5 days |
| February | 2.6 hr/day | 135 Wh/day | 1 day |
| March | 3.6 hr/day | 187 Wh/day | 1 day |
| April | 4.8 hr/day | 249 Wh/day | 1 day |
| May | 6.7 hr/day | 348 Wh/day | 1 day |
| June | 7.6 hr/day | 395 Wh/day | 1 day |
| July | 7.6 hr/day | 384 Wh/day | 1 day |
| August | 6.4 hr/day | 332 Wh/day | 1 day |
| September | 5.1 hr/day | 265 Wh/day | 1 day |
| October | 3.8 hr/day | 197.6 Wh/day | 1 day |
| November | 2.4 hr/day | 124.8 Wh/day | 1.1 day |
| December | 1.8 hr/day | 93.6 Wh/day | 1.5 day |
The Table below displays the amount of solar energy collected by each component of the system. These numbers represent the amount of voltage collected in direct current (dc) or alternating current (ac). This information was gathered using a multimeter at the site.
| Source | Voltage |
|---|---|
| Panel | 20.2 V(dc) |
| Charge Controller | 14.5 V(dc) |
| Battery | 14.5 V(dc) |
| Inverter | 113.8 V(ac) |
| Surge Protectors | 113.8 V(ac) |
How To Build
-
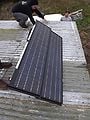
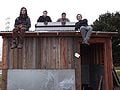
Step 1: Mount the solar panel.
-
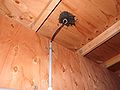
Step 2: Run wires through the roof.
-
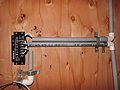
Step 3: Wire into the charge controller.
-
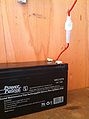
Step 4: From the charge controller to the battery.
-
Step 5: From the charge controller to the inverter.
-
Step 6: From the inverter to the surge protector(s).
-
Step 7: Finished project.
-
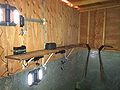
Internal wiring


