| Line 5: | Line 5: | ||
== PV Array == | == PV Array == | ||
=== Array === | |||
* | * Panels | ||
* | * Outback MPPT charge controller | ||
* | * Batteries | ||
* Inverter | * Inverter | ||
=== | === Array stand === | ||
* Post | |||
* Array rack | |||
=== Array Design === | |||
The PV array is made up of 8-120 watt modules so at peak power we should get 960 watts. Each panel is 12 volts and 6.82 amps. The panels are set up so that 4 of them are in series and the two sets of 4 panels are in parallel. In this way it is a 48 volt, 13.64 amp system. The panels are made by Evergreen which is one of the only solar panel companies that is not owned by a big oil corporation. They are made with a technology called “String Ribbon” which compared to conventional ways of making solar cells uses half as much silicon. | |||
=== Construction === | === Construction === | ||
Revision as of 17:08, 29 April 2006
Introduction
This project is a solar blah blah blah.
PV Array
Array
- Panels
- Outback MPPT charge controller
- Batteries
- Inverter
Array stand
- Post
- Array rack
Array Design
The PV array is made up of 8-120 watt modules so at peak power we should get 960 watts. Each panel is 12 volts and 6.82 amps. The panels are set up so that 4 of them are in series and the two sets of 4 panels are in parallel. In this way it is a 48 volt, 13.64 amp system. The panels are made by Evergreen which is one of the only solar panel companies that is not owned by a big oil corporation. They are made with a technology called “String Ribbon” which compared to conventional ways of making solar cells uses half as much silicon.
Construction
describe in general
- First we had to dig a hole deep enough to support the stand. Due to the size of the array this hole had to be five feet deep. We dug the hole with Daniels tractor which is run off bio-diesel. (See Fig 1 and 2)
- In the bottom of the hole we laid 6 inches of gravel. This gravel is to allow for the drainage of any water that might find its way into the post.
- Once the gravel was down we put in the concrete form. This consisted of a ½ inch thick cardboard tube that is 16 inches in diameter. (see Fig 4)
- After the form was in we centered the stand with in it. The stand is a steel ½ inch, 16 inch diameter post. The post was to heavy for us to lift and move around once it was in the hole so we tied it to the tractor to lifted it up while I centered it and then lowered it back down. (see Fig 5 and 6)
- When the stand was in place it was time to pour the concrete. We used a mixer which was run off the electricity from a micro-hydro system we installed in the fall. This made the job go a lot quicker then if we had to mix all the bags by hand. In total we used 10 bags of quick-crete. When done it is important to make sure that the concrete is not level but raised up some. This is because it will shrink and settle down as it drys. (see Fig 7 and 8)

-
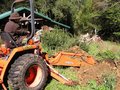
Fig 1: Digging hole. I wonder how much test will still look good in this caption? Let's see what this looks like with word wrap.
-
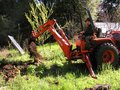
Fig 2:
-

Fig 3:
-
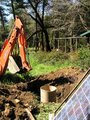
Fig 4:
-
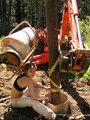
Fig 5:
-
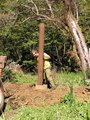
Fig 6:
-
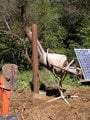
Fig 7:
-
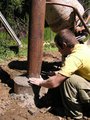
Fig 8:


